Ben Caulkins built a life-sized costume of the Master Chief from Halo over the past six months. Those who have followed his Flickr postings have seen the suit develop from the helmet down. Now that this epic project is finished, Ben shares his thoughts on the process and techniques behind the build.
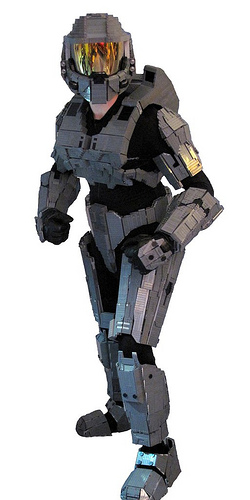
Some of you may have noticed by now that over the past six months, I have constructed a full size Lego costume of the Master Chief from the Halo series. It was by no means easy, and I had to put a lot of time and effort into completing it. It required more thought and patience than any of my previous LEGO projects, not that I have done that many anyway.
 But I didn’t decide overnight to build a Master Chief costume out of LEGO bricks. The very base of the idea was probably inspired by Simon MacDonald’s (SIMAFOL) Boba Fett costume. Then it was after I saw some really amazing LEGO creations at my first LEGO convention, Brickworld, that I really seriously started thinking about it. At first it was just a fantasy, which is reasonable enough, I mean, come on, a full-blown LEGO Master Chief costume? It is pretty ridiculous. But when I started to take it seriously, I finally realized that it was possible, and I committed myself to it.
I put a surprising amount of thought into which part I would construct first, and I finally settled on the helmet because I thought that if I could do a convincing MOC of the Master Chief’s helmet, and be able to wear it, I could do the rest of the suit.
 The helmet took more planning than any other element. I started in late October and spent many hours getting the necessary resources and devising what size to make the helmet in order for it to be proportionate with the rest of my body. I think that if I hadn’t done so it wouldn’t have looked nearly as good as it does. But after much planning, I finally started building. I’m generally a pretty slow builder, and I went through a lot of experimenting with parts while building it, particularly for the vents on the “cheeks”. I had decided to use a non-LEGO piece for the visor long before I started building, and I had already purchased a sweet looking motorcycle helmet visor with a nice gold sheen to it, and with a few modifications, it fit like a glove.
So, I had at last finished the first part of my suit, and it managed to garner a lot of attention. I had never really been blogged about before so I was overwhelmed. It was one of the most memorable moments in my LEGO building “career”, and I jumped for joy when I saw I was on the Wall Street Journal’s blog, and then GIZMODO, and a host of other websites including the good old Brother’s Brick.
 After the initial reaction died down and all the bloggers finally stopped, I got to work on the most time-consuming part of the project: the torso armor. It was one the most challenging in that it had to be able to take a lot of punishment and look good at the same time. I tried strengthening it where I could, but it still wasn’t enough. After many catastrophic accidents, in which many naughty words were uttered, I decided that I had to use glue. Yes, it was a lazy thing to do, but I just thought “screw it all” and went ahead with it. But it worked, so I don’t see a problem!
 I then managed to squeeze the belt in before Christmas break, but I still had a problem: how was I going to achieve the concave shape of the thighs and forearms? It was one day on the bus back from school when I had nothing to do that a solution came to me, and boy was I pleased when it did. It was actually really simple: construct two rings, but make them different sizes, and then construct supports between them that I could put different aesthetics onto. This would achieve the proper concave shape, as it causes the shape to narrow. But before actually building the thighs, I built the arms first and applied my newly devised technique on them.
I’m not entirely satisfied with the upper arms, as they appear a little small when compared to the Chief’s. But I couldn’t make them any bigger, otherwise I wouldn’t be able to flex my arm (plus I couldn’t bear the extra weight). And besides, it still looks good as it is.
 The forearms actually came out surprisingly well, though they were prone to coming undone. The reason why was that I had made them a little too small, and so whenever I flexed they would come undone. To solve this particular problem, I attached three rings of Velcro to the inside of one section that could wrap around my arm, keeping the section in place. But, it also would squeeze my arm together, so it wouldn’t bulge as much when I flex, and the other section now stays snuggly attached.
Afterwards I bought a pair of nice Master Chief looking gloves, glued some plates to them, and then built the thighs. The thighs ate up more tiles (smooth plates) than I can count!
 At this point the suit was getting pretty close to completion, although there were unexpected delays (Spring break, a small LEGO convention, me getting sick). But in between I managed to get some work in. I always knew that the legs would be difficult on account of their odd shape (take a look at them and you’ll see what I mean). The Master Chief’s leg armor bulges in the back in order to shape itself around the calves, and this was something I had feared doing since starting the project. An idea that I had thought of but didn’t believe would work was to first build a frame for the legs that would follow that actual shape of the Chief’s. Although it appeared crude, I had no other good ideas. So I went about building this frame, and realized that it could work. Yes, it took me several variations, but that was what I ultimately settled on.
 It was the next week that the suit’s first trial came: the “LEGO fun at Lyndhurst” festival, a small local event organized by Arthur Gugick, which I have been attending for quite some time. I originally planned to just display the suit and not wear it. Not only did I wear it, I walked around the entire event. This proved that I could move in it without too much damage occurring (one lost piece and one part that came undone). Also, it stood up pretty well against LEGO’s main adversary, the hands of small and curious children. Also, the helmet went through quite an ordeal, having to be placed on the heads of around 100 children.
 Now, there was only one thing left to do: the feet, the least interesting part to look at. But I still wanted them to be of the same quality as the rest of the suit, so I went about making the toe look nice and curved by using segmented plates. But you can’t expect me to not loosen up a little bit. If you look closely you can see bits of red and yellow showing through the gaps between plates. Also, for the rest of the foot, I seriously lowered my quality standards, but you can’t really tell because, like I said, who looks at the feet?
I have to say finishing it was sort of anti-climactic, especially considering I had built the coolest part of the suit first, and was finishing with the feet. I’m actually a bit relieved it’s done because I was getting pretty tired of it, and I’m not sure how much longer I could have gone on. But I am glad I did, because now I can say that I’m the only person to (successfully) build a Master Chief costume out of LEGO. :)
For more pictures, visit Ben’s Flickr gallery.
The Brothers Brick is funded by our readers and the community. Articles may include affiliate links, and when you purchase products from those links, TBB may earn a commission that helps support the site.


