About Andrew Becraft (TBB Editor-in-Chief)

Andrew Becraft is the Founder and Editor-in-Chief of The Brothers Brick. He's been building with LEGO for more than 40 years, and writing about LEGO here on TBB since 2005. He's also the co-author, together with TBB Senior Editor Chris Malloy, of the DK book Ultimate LEGO Star Wars. Andrew is an active member of the online LEGO community, as well as his local LEGO users group, SEALUG. Andrew is also a regular attendee of BrickCon, where he organizes a collaborative display for readers of The Brothes Brick nearly every year. You can check out Andrew's own LEGO creations on Flickr. Read Andrew's non-LEGO writing on his personal blog, Andrew-Becraft.com. Andrew lives in Seattle with his wife and dogs, and by day leads software design and planning teams.

Posts by Andrew Becraft (TBB Editor-in-Chief)

May the odds be ever in your favor!

For this LEGO scene from The Hunger Games, Brian (Âtin) takes his inspiration not from the movie due out later this week but from what he imagined while reading the book. Effie Trinket announces the tributes from the coal-mining District 12 in “Grim Reapings.”

Grim Reapings

*SPOILERS FOLLOW*

(I haven’t quite figured out what to think about The Hunger Games, which I admit to reading recently. Is it a classic like Lord of the Flies or another Twilight — which my wife and I read together for the lulz? Personally, I liked the characterizations and plot of the first book, and I think the overall story arc has potential within a truly unique fictional universe, but I set the trilogy aside partway through Catching Fire when one of the primary points of conflict appeared to be poor Katniss Everdeen’s tough, tough choice between two boys who like her. Team Gale! Team Peeta! Meh. Still, I’ll finish the trilogy at some point and might even consider checking out the movie.)

The Brothers Brick is funded by our readers and the community. Articles may include affiliate links, and when you purchase products from those links, TBB may earn a commission that helps support the site.

Transforming LEGO Game Boy & Tetris + bonus Super Mario 3 Fireflower level

Though we’re a tad behind the interwebs on this one, we wanted to make sure to highlight this excellent transforming Game Boy by Julius von Brunk.

LEGO Game Boy Transformer

Read more on Julius’ blog and check out lots more pics — including the tiny transforming Tetris — on MOCPages or deviantART.

Of course, we’d be remiss in our blog duties if we didn’t also highlight Julius’ carefully rendered LEGO version of the “Fireflower” level from Super Mario 3:

LEGO Super Mario 3 Fireflower level

The tiny photo doesn’t do the massive model justice, so click through for all the details.

The Brothers Brick is funded by our readers and the community. Articles may include affiliate links, and when you purchase products from those links, TBB may earn a commission that helps support the site.

Nausicaä leads the Valley gunship into battle

One of my favorite vehicles designed by Hayao Miyazaki is the gunship from Nausicaä of the Valley of the Wind. This LEGO version by Jon Hall captures all the iconic details, from the rounded, swept-back wings to the unique landing gear.

Valley Gunship 01

The Brothers Brick is funded by our readers and the community. Articles may include affiliate links, and when you purchase products from those links, TBB may earn a commission that helps support the site.

10225 UCS R2-D2 – new LEGO Star Wars exclusive [News]

LEGO has just officially unveiled the newest addition to their Ultimate Collector Series of LEGO Star Wars models, the opinionated astromech droid we all know and love, 10225 R2-D2. Artoo ships in May 2012 for 180 USD and includes 2,127 parts.

10225 R2-D2 (1)

Tons more pictures showing off details and functionality in the photoset on Flickr.

Here’s the full press release:

10225 R2-D2™

Ages 16+. 2,127 pieces.
US $179.99 CA $229.99 UK 149.99 £ DE 179.99 € DK 1499 DKK

Presenting the Ultimate Collector Series R2-D2™ – the best-loved droid in the Star Wars galaxy!

Presenting the iconic R2-D2 as you’ve never seen him before! Everyone’s favorite droid from the Star Wars galaxy is now part of the Ultimate Collector Series and features fantastic detailing, such as retractable third leg, front panels that open to reveal a universal computer interface arm and a circular saw, rotating head and 2 fold-out front spacecraft linkage control arms. With the included fact plaque and R2-D2 minifigure, this diminutive model is the perfect addition to your LEGO® Star Wars™ collection!

  • Ultimate Collector Series R2-D2™!
  • Features retractable third leg!
  • Front panels open to reveal a universal computer interface arm and circular saw!
  • Features realistic rotating head!
  • R2-D2 features 2 fold-out front spacecraft linkage control arms!
  • Includes fact plaque and R2-D2 minifigure!
  • Measures over 12” (31 cm) high and 7” (18 cm) wide!

Available for sale beginning May 2012

only at shop.LEGO.com, LEGO® Stores or via phone.

Here’s the designer interview video:

The Brothers Brick is funded by our readers and the community. Articles may include affiliate links, and when you purchase products from those links, TBB may earn a commission that helps support the site.

How-to: Tools of minifig customization – Confessions of a customizer (Part II)

In our first guest post from Jasbrick, we learned about how to get started with minifig customization. Now, let’s hear what he has to say about the tools of the trade.

Now that you have a concept and have gone as far as you can by conventional means it is time to bring in the tools. The range of customisation techniques mean that even with limited tools you can get some pretty impressive results without breaking the bank.

Painting and re-colouring

RAF 100th Steamsuit SquadronI use painting to add details or re-colour parts that would not otherwise be possible.

For example the following minifig fits the steampunk genre with its almost rust / bronze coloured metallic effect which would have been impossible with the original bright white Buzz Lightyear original scheme.

Those of you who have everything you need but with parts that are not quite in the colour you want have two options: Dyeing or Painting.

Dyeing using vinyl dyes works well with parts that you want to change completely, but is limited in colours available and achieving a particular tone can be tricky.

Painting can offer more flexibility in colour choice and coverage, however the biggest downside is that painting plastic is difficult. I see examples every day of great custom concepts that are ruined by the quality of the painting. As painting is a favourite technique of mine I will go into much more detail on this and how to avoid creating a dull, streaked and unconvincing paintjob.

The key tools you need for painting are shown in the image below:

Painting Equipment

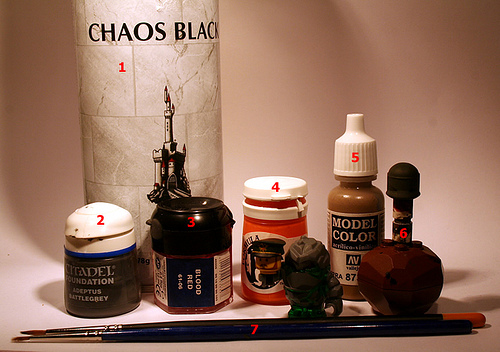
  1. Spray undercoat (essential for smooth painting on a plastic surface);
  2. Games Workshop Foundation paints (high opacity paints that give a good coverage with a single coat;
  3. Games Workshop Normal paints (good range and availability);
  4. Privateer Press P3 paints (slightly better quality than GW paint in my opinion, smaller range of colours and poor availability);
  5. Vallejo Paint (Excellent range of paints that also has colour range that is named after military colour schemes e.g. Lluftwaffe Blue);
  6. My device for holding helmets / heads for painting;
  7. Games Workshop brushes of various sizes.

The most crucial of all is the spray primer, as painting a smooth coat onto plastic is virtually impossible without it. Spray primer covers the part with a very thin layer of paint which is much more likely to bond with the plastic and not scratch off easily. Subsequent coats of paint adhere to this base and settle without streaks or chipping. So if you want a minifig helmet to be a nice shade of dark blue to match your plan for a Judge Dredd figure then you need to spray it before applying the perfect paint colour.

Your choice of paints is also important and I suggest you experiment with different types before applying to a Lego part. Characteristics like price, coverage, mixing, drying time, finish and colour choice all need to be considered. I personally use the Games Workshop model paint range as they score highly on all of the above criteria (except price). Games Workshop also have a great range of inks for washing and foundation paints for good coverage. Other good ranges are Vallejo and Privateer Press P3. All of these sell starter sets which contain a good selection of paints and brushes to get you started.

With paint brushes it is not just about size but how you use them that counts… You will need to have good quality model brushes in three main sizes: fine detail, standard and basecoat. Working out the right brush for the job is essential as a small brush will not cover a large area as smoothly as a basecoat brush. As with most things brush control improves with practice and it is advisable to test your new skills on something less precious than your rare minifig part. The following is an example of fine brush work:

Luchador: British Bulldog

This wrestler’s mask was painted freehand with a fine detail brush in multiple layers.

Jasbrick Joker V2

The joker here has face details that were painted on freehand and the hair which was primed and then painted with a dark green colour using a basecoat brush.

Painting detailed designs requires not only brush control but paint control as well. Another obvious problem in some custom work is the thickness of paint application and poor layering. Experience in handling paint can be shortcut by the use of a tool known as a Wet Palette. These are so easy to put together and it is definitely going to improve your paintwork. Quite simply all you need is a small tray, about the size of an 8 x 16 brick, and some absorbent cloth or paper towel. Put the cloth in the tray and then add water to it until the cloth is completely damp… That is it, now all you need to do is transfer your paint to the wet palette before painting on the part. The damp cloth waters down the paint slightly, keeps the paint from drying and also allows you to mix with more control.

There are a whole host of tutorials on the internet for how to create a wet palette and how to paint, however I hope to bring more Lego-specific tutorials to you in the near future.

An important part of painting is the final finish. Paint applied properly will be more resilient than you think possible. However, to seal the deal you can use a varnish to protect your work. Varnishes can be matt or gloss, with the latter being particularly useful for returning a shine comparable to pure unadulterated plastic.

The Brothers Brick is funded by our readers and the community. Articles may include affiliate links, and when you purchase products from those links, TBB may earn a commission that helps support the site.

In the Magic Shop with Alex Eylar

Alex Eylar (Profound Whatever) returns after a six-month break with this scene inspired by the Academy Award-winning movie Hugo.

Magic Shop

As always, Alex packs his LEGO scenes with atmosphere and detail. See more on MOCPages and Flickr.

The Brothers Brick is funded by our readers and the community. Articles may include affiliate links, and when you purchase products from those links, TBB may earn a commission that helps support the site.

DSV Beluga dives into the uncharted abyss

I ran across Victor Vercesi‘s LEGO creations right before I went on vacation, and came back to find this really great submersible inspired by both DSV Shinkai 6500 (which inspired the first successful Japanese CUUSOO project) and the DSV-4 Sea Cliff. Usage of the gray fence as the sub’s skids is inspired.

DSV Beluga

While I’m at it, here’s another great micro vehicle, the PA-51 Locusta V/STOL Assault Transport. I love the printed number tiles and the striping on the tarmac.

PA-51 Locusta V/STOL Assault Transport

The Brothers Brick is funded by our readers and the community. Articles may include affiliate links, and when you purchase products from those links, TBB may earn a commission that helps support the site.

10224 Town Hall out now + free shipping & double VIP points [News]

I realize that the release of 10224 Town Hallicon isn’t news to many of you (I’ve been on vacation), but the LEGO Shop online is also having a double VIP points promotion through March 15, and today through the end of the month you’ll get free shipping on all orders over $75.

icon
icon

If you buy the Town Hall between now and the 15th, you’ll get 399 VIP points.

FREE Shipping on all LEGO Shop orders of $75 or more!  Valid through 3.31.12

The Brothers Brick is funded by our readers and the community. Articles may include affiliate links, and when you purchase products from those links, TBB may earn a commission that helps support the site.

How-to: Confessions of a minifig customiser – Part I: Getting started

As we say in our AFOL jargon glossary, purism is “a form of religious fundamentalism.” LEGO fandom includes a broad range of preferences for what’s “legal” and what’s not. In the spirit of broadening our horizons, we’re very pleased to bring you the first in a series of posts about LEGO minifig customization by master customizer Jasbrick.

Light Tent TestContrary to popular belief customisation of minifigs is not a dark art and even established purists have tried their hand at slapping some paint around (albeit on the Friends Mini-dolls). Some will never stoop to the mutilation of their favourite brand of ABS plastic, however I do believe that if done properly it can at least be appreciated by all.

The Brothers Brick have given me the opportunity to introduce you to some of the tools and techniques of my trade to help those amongst you that have the desire to walk on the dark side for a while. In later posts I will go into specific techniques that I developed in my time as a customiser. Hopefully you can benefit from avoiding the pitfalls I fell into and get a few projects like these underway:

New Gears of War 3

These minifigs involve more advanced painting techniques and some third party accessories.

Monster Manual Player Power

This group utilises painting, combinations, third-party accessories and printed decals.

Establishing a strong concept design

One tool a customiser must have is a highly developed imagination (something pretty common in the Lego community); everything else is optional.

Off to Afghanistan!Those moments when putting a particular combination of parts together and a perfect fig pops out are wonderful, but about as rare as chicken dentures. The key to a good custom project is pre-planning and a well defined concept. This does not have to be something completely new, as for example computer game concept art offers a rich seam of material to be interpreted, or real life inspiration can be just as good. The minifig on the right was created for a Green Beret Major currently serving in Afghanistan who sent me a photograph of himself to copy.

But if you want to start from scratch then a sketchpad is your best friend. You don’t even need to be good at drawing to develop a decent concept due to the simplicity of the design of our little friend the minifig. As this series develops I hope to be able to share with you some of the concept designs that I have developed and how they become a reality. Alternatively you can sketch your concept over a template like this:

Collectable Minifig Design Interview

Once the concept is set (not in stone, but pretty solid) the next step for me is to determine how much of this can be achieved with standard parts or by utilising third party accessories. I will be delving deeper into how to get the best from suppliers such as BrickArms, BrickForge, Brick Warriors and Arealight later, but I highly recommend checking out these companies as they offer a great range of products that can serve as inspiration in themselves.

Parts Library

As an AFOL who has amassed quite a large collection of minifig parts and accessories I have a library that I can dip into that can make most custom projects a matter of tweaking to get the final effect rather than building everything from scratch.

The following image is a recent group of minifigs that I put together that are without any noticeable customisation. I managed to achieve a lot with just the combination of parts and a few third party accessories thrown in to tie the concept together:

Odysseus Crew need ship

I recommend that you take a close look at the Minifig and Minifig parts areas in the catalog on Bricklink and see which figs / parts speak to you of further opportunities. Developing an inventory of useful parts is essential to allowing you to get projects moving swiftly before your enthusiasm for the concept dies.

The Brothers Brick is funded by our readers and the community. Articles may include affiliate links, and when you purchase products from those links, TBB may earn a commission that helps support the site.

Hikari gunship by nabii

When Mark Stafford isn’t busy designing LEGO sets or baiting Justin Bieber fans, he builds awesome stuff like this Hikari gunship. From the tiny guns up front to the massive engines in back, the gunship looks prepared to retake Earth from the insectoid horde.

Hikari

I especially like the mix of red and white Technic. Mark gets bonus points for getting the name of the vehicle to match up accurately with the Kanji character — “hikari” means “light” in Japanese.

The Brothers Brick is funded by our readers and the community. Articles may include affiliate links, and when you purchase products from those links, TBB may earn a commission that helps support the site.

Landing at the Triport Spire

I’m going to close out my evening of LEGO space catch-up with this awe-inspiring tower by micro-space master Tim Goddard (Rogue Bantha).

Triport Spire

In addition to the high level of detail we’ve come to expect from Tim, the tower includes working lights and a functional elevator!

The Brothers Brick is funded by our readers and the community. Articles may include affiliate links, and when you purchase products from those links, TBB may earn a commission that helps support the site.

NASA Deep Space Habitat and Rover on LEGO CUUSOO

Following the official launch of the LEGO CUUSOO Hayabusa space probe, it only seems fitting to highlight another great CUUSOO project inspired by the exploration of our solar system. CUUSOO user Brianr8811 has proposed a LEGO version of NASA’s Deep Space Habitat and Rover, which may serve humanity in its first manned mission to Mars.

LEGO CUUSOO NASA Deep Space Habitat and Rover project

Via Brick Town Talk.

The Brothers Brick is funded by our readers and the community. Articles may include affiliate links, and when you purchase products from those links, TBB may earn a commission that helps support the site.