Tag Archives: Custom

This is not the page for LEGO purists. From heavily customized minifigures to LEGO pieces chopped, painted, and stickered to within an inch of their little plastic lives, this is where you’ll find some of the most creative uses — and abuses — of LEGO anywhere.

I am Gotham’s reckoning.

We so rarely feature custom figures on here, and it’s high time to highlight one. Minh Pham creates exceptional custom figures, so the hardest part is actually picking one. The level of detail on this, like everything else in his portfolio, is just stunning.

Gotham’s reckoning indeed.

The Brothers Brick is funded by our readers and the community. Articles may include affiliate links, and when you purchase products from those links, TBB may earn a commission that helps support the site.

Streetfighter Custom Minifig Combo!

Julian Fong (levork) is a minifig customiser that I greatly admire… his designs always capture the essence of the subject whilst also making the transference to Lego style perfectly.

This group of custom minifigs based on the Streetfighter computer games are absolutely fantastic:

Street Fighter 2 minifigs - complete roster

He has also submitted this to CUUSOO which in my view would be a project that definitely deserves your support.

Levork this is a K.O. “You Win!”

The Brothers Brick is funded by our readers and the community. Articles may include affiliate links, and when you purchase products from those links, TBB may earn a commission that helps support the site.

Scania R730 “The Dragon”

bricksonwheels is certainly known for his highly detailed LEGO model vehicles. But he turns up the awesomeness knob on his latest build.

Scania R730 ''The Dragon''

He said that he was inspired by the custom painted trucks often seen in Scandinavia. After some trial and error, he was able to take a high resolution wallpaper from Magic The Gathering and edit the colours in Photoshop to perfectly match the LEGO colour palette. I think he did a rather remarkable job because it looks as if this was actually airbrushed on the model!!

Scania R730 ''The Dragon''

The Brothers Brick is funded by our readers and the community. Articles may include affiliate links, and when you purchase products from those links, TBB may earn a commission that helps support the site.

New Gears of War gets the custom treatment

Some may already know me but I am Jas (Jasbrick on Flickr) and I have an unhealthy obsession with mutilating ABS plastic.  I promise that this fixation will not divert me from highlighting unadulterated creations, but I thought it fitting that my first official post involves customisation… and what better way to start than with pure brilliance:

Gear Project Update

Andrew (Pecovam on Flickr) is a talent that I have been watching closely over the last year and this image of his Gears of War project is all the reason you need to see why.  This project combines all the best aspects of the customisers art, with flawless sculpting, painting, combinations and even an MOC by Legohaulic to just add the cherry to the cake.

There are more pictures of his work on Flickr and any aspiring customisers can use this to see how it should be done… and us Gearheads can just drool at the COG goodies he is working on.

The Brothers Brick is funded by our readers and the community. Articles may include affiliate links, and when you purchase products from those links, TBB may earn a commission that helps support the site.

World War Brick

From June 15-17 in Wheeling, IL, there will be a show by custom military vendors including Brickmania and BrickArms. In addition they will be displaying some models and exclusives. Click on the flyer below for the full details.

The Brothers Brick is funded by our readers and the community. Articles may include affiliate links, and when you purchase products from those links, TBB may earn a commission that helps support the site.

Baby minifigs!

If you’ve ever wondered where baby minifigs come from, Citizen Brick is the answer!

The Brothers Brick is funded by our readers and the community. Articles may include affiliate links, and when you purchase products from those links, TBB may earn a commission that helps support the site.

ROVI the Recycled Robot

Here’s a perfect example of why there is no such thing as a useless piece. Even broken pieces can be used, given sufficient imagination and skill, as flickr user erth&fiya so aptly demonstrates with his adorable creation made entirely of damaged pieces.

rovi 'the recycled robot'

The Brothers Brick is funded by our readers and the community. Articles may include affiliate links, and when you purchase products from those links, TBB may earn a commission that helps support the site.

Chromed Royal Naboo Starship

Eurobricks member Anio‘s Naboo Royal Starship has fewer than 300 bricks, but who cares when they are custom chromed? Anio says he got the chrome parts from Chrome Block City, one of the two Bricklink stores with an extensive selection of custom chrome parts (the other one being Chrome Bricks).

The Brothers Brick is funded by our readers and the community. Articles may include affiliate links, and when you purchase products from those links, TBB may earn a commission that helps support the site.

Better with chrome

A bit of chrome goes a long way to add realism and distinctiveness to Alex Jones’ (“Orion Pax”) fire truck.

FIRE TRUCK

The Brothers Brick is funded by our readers and the community. Articles may include affiliate links, and when you purchase products from those links, TBB may earn a commission that helps support the site.

How-to: Cutting, gluing, & sculpting – Confessions of a minifig customizer (III)

In Part 1 of “Confessions of a minifig customizer,” we heard from Jasbrick about how to get started with minifig customization, and in Part 2 we learned about how to paint great minifigs. In our final installment, Jasbrick shares tips about the best ways to take customization even farther.

When you just can’t find the perfect part to represent the armour, weapon or even hairstyle of your imagined design this is the time to get serious. This aspect of the discipline is definitely not for the faint-hearted as irreversible damage can be done!

I do not profess to be the best sculptor around but here are some examples of my sculpted work:

Highlander

The hat and kilt above are both sculpted and painted pieces.

Bob the Hobgoblin Arms Dealer

The head, pipe and torso detailing are all sculpted on the goblinoid character above.

The following image shows the tools I use:

My trade secrets...

  1. Spare drills and scalpel blades;
  2. Sanding heads for hobby power tool;
  3. Various grade sandpaper disks for hobby power tool;
  4. Hard grinding disks for hobby power tool;
  5. Hobby power tool;
  6. Plasticard (for creating composite plates and armour);
  7. Pliers;
  8. Hobby saw (for cutting really thick / hard pieces);
  9. General purpose craft knife;
  10. Heavy duty sharp blade (lethally sharp.. be careful);
  11. Scalpel blade (as above but for more controlled cutting);
  12. Needle;
  13. Various shaped tweevers;
  14. Metal pins (used for strengthening joins);
  15. Diamond tipped file;
  16. Sculpting tools (for use with greenstuff and lesser extent milliput);
  17. Clay shapers (my favourite tool of choice… never sculpt greenstuff without them);
  18. Hobby pinning hand drill;
  19. Milliput (for creating inorganic material);
  20. Greenstuff (for creating anything, but particularly good for organic sculpting);
  21. Variety of hobby files;
  22. Last but not least… a decent cutting mat / worksurface.

The first tools of choice here are the hobby knife and mini saw. Lego plastic is of such good quality it is very difficult to cut without either a very strong and sharp hobby knife (no kitchen knives please) or a modelling saw for the really thick parts.

Once you have cut a piece it is important to file down the edges with either very fine grain sandpaper or modelling files. Filing a part is also useful to improve contact surfaces for when you want to glue two or more parts together. I generally use super glue as the adhesive of choice, combined with a technique called pinning which improves the strength of a join. Pinning requires you to drill a small hole in both of the parts being joined and inserting a small, usually metal, pin into the hole and then gluing this and the parts together. This adds great strength to the finished part and ensures that playability is maintained.

When adding rather than removing we have one of the more advanced disciplines in the customisers arsenal… sculpting. This is where you can really express your artistic side. However, projects that include sculpting tend to be the most involved and time consuming.

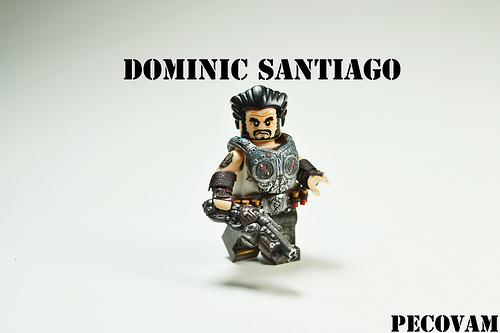
A great customiser that is producing some of the finest sculpted pieces I have seen is Pecovam. Here are some examples of his recent GOW work:

Dominic Santiago

2012 Preview

To sculpt you will need a modelling putty or clay as the medium, with my preference being Green Stuff or Kneadatite. Green Stuff is a very easy to use modeling putty that sets at room temp and does not shrink or expand during the setting process. Alternatives are substances like Sculpy, however these need to be baked and final result fluctuates in size and finish.

To work the medium you will need sculpting tools and most important clay shapers as this will allow you to shape it without having it stick to your fingers or deform due to too much pressure. Sculpting complex pieces require a number of stages that take time, but ensure a better final result.

The Brothers Brick is funded by our readers and the community. Articles may include affiliate links, and when you purchase products from those links, TBB may earn a commission that helps support the site.

Dazzling Lego DeLorean

Alex Jones’ (“Orion Pax”) Back to the Future DeLorean looks like an actual diecast model rather than a Lego creation. Despite the spray-painted hull, it’s still a legit build due to the skillful customization job.

DELOREAN

The Brothers Brick is funded by our readers and the community. Articles may include affiliate links, and when you purchase products from those links, TBB may earn a commission that helps support the site.

How-to: Tools of minifig customization – Confessions of a customizer (Part II)

In our first guest post from Jasbrick, we learned about how to get started with minifig customization. Now, let’s hear what he has to say about the tools of the trade.

Now that you have a concept and have gone as far as you can by conventional means it is time to bring in the tools. The range of customisation techniques mean that even with limited tools you can get some pretty impressive results without breaking the bank.

Painting and re-colouring

RAF 100th Steamsuit SquadronI use painting to add details or re-colour parts that would not otherwise be possible.

For example the following minifig fits the steampunk genre with its almost rust / bronze coloured metallic effect which would have been impossible with the original bright white Buzz Lightyear original scheme.

Those of you who have everything you need but with parts that are not quite in the colour you want have two options: Dyeing or Painting.

Dyeing using vinyl dyes works well with parts that you want to change completely, but is limited in colours available and achieving a particular tone can be tricky.

Painting can offer more flexibility in colour choice and coverage, however the biggest downside is that painting plastic is difficult. I see examples every day of great custom concepts that are ruined by the quality of the painting. As painting is a favourite technique of mine I will go into much more detail on this and how to avoid creating a dull, streaked and unconvincing paintjob.

The key tools you need for painting are shown in the image below:
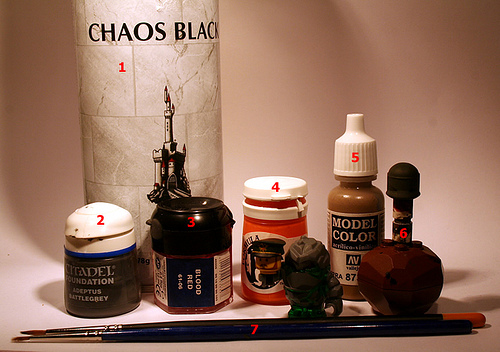
Painting Equipment

  1. Spray undercoat (essential for smooth painting on a plastic surface);
  2. Games Workshop Foundation paints (high opacity paints that give a good coverage with a single coat;
  3. Games Workshop Normal paints (good range and availability);
  4. Privateer Press P3 paints (slightly better quality than GW paint in my opinion, smaller range of colours and poor availability);
  5. Vallejo Paint (Excellent range of paints that also has colour range that is named after military colour schemes e.g. Lluftwaffe Blue);
  6. My device for holding helmets / heads for painting;
  7. Games Workshop brushes of various sizes.

The most crucial of all is the spray primer, as painting a smooth coat onto plastic is virtually impossible without it. Spray primer covers the part with a very thin layer of paint which is much more likely to bond with the plastic and not scratch off easily. Subsequent coats of paint adhere to this base and settle without streaks or chipping. So if you want a minifig helmet to be a nice shade of dark blue to match your plan for a Judge Dredd figure then you need to spray it before applying the perfect paint colour.

Your choice of paints is also important and I suggest you experiment with different types before applying to a Lego part. Characteristics like price, coverage, mixing, drying time, finish and colour choice all need to be considered. I personally use the Games Workshop model paint range as they score highly on all of the above criteria (except price). Games Workshop also have a great range of inks for washing and foundation paints for good coverage. Other good ranges are Vallejo and Privateer Press P3. All of these sell starter sets which contain a good selection of paints and brushes to get you started.

With paint brushes it is not just about size but how you use them that counts… You will need to have good quality model brushes in three main sizes: fine detail, standard and basecoat. Working out the right brush for the job is essential as a small brush will not cover a large area as smoothly as a basecoat brush. As with most things brush control improves with practice and it is advisable to test your new skills on something less precious than your rare minifig part. The following is an example of fine brush work:

Luchador: British Bulldog

This wrestler’s mask was painted freehand with a fine detail brush in multiple layers.

Jasbrick Joker V2

The joker here has face details that were painted on freehand and the hair which was primed and then painted with a dark green colour using a basecoat brush.

Painting detailed designs requires not only brush control but paint control as well. Another obvious problem in some custom work is the thickness of paint application and poor layering. Experience in handling paint can be shortcut by the use of a tool known as a Wet Palette. These are so easy to put together and it is definitely going to improve your paintwork. Quite simply all you need is a small tray, about the size of an 8 x 16 brick, and some absorbent cloth or paper towel. Put the cloth in the tray and then add water to it until the cloth is completely damp… That is it, now all you need to do is transfer your paint to the wet palette before painting on the part. The damp cloth waters down the paint slightly, keeps the paint from drying and also allows you to mix with more control.

There are a whole host of tutorials on the internet for how to create a wet palette and how to paint, however I hope to bring more Lego-specific tutorials to you in the near future.

An important part of painting is the final finish. Paint applied properly will be more resilient than you think possible. However, to seal the deal you can use a varnish to protect your work. Varnishes can be matt or gloss, with the latter being particularly useful for returning a shine comparable to pure unadulterated plastic.

The Brothers Brick is funded by our readers and the community. Articles may include affiliate links, and when you purchase products from those links, TBB may earn a commission that helps support the site.