¡Hala Madrid! Fans of Los Blancos are the next to get a lavish scale model of their club’s home ground. Trailing only LEGO’s previous stadium set Camp Nou, and Dortmund’s Signal Iduna Park in size among European club homes, the Santiago Bernebéu sits in the heart of Madrid, a capital of sport in a capital city. Few stadiums have hosted as varied a list of premier competitions, from the UEFA Champion’s League, the Copa Libertadores, to the FIFA World Cup, let alone the storied history of Real Madrid itself. Is Creator Expert 10299 Real Madrid – Santiago Bernabéu Stadium a worthy home to the legacy of the Galacticos? Available March 1 for US $349.99 | CAN $449.99 | UK £309.99, this 5876 piece set packs the spirit of 81,000+ tiny fans. Come along as we kick off LEGO’s biggest stadium build yet!

The LEGO Group provided The Brothers Brick with an early copy of this set for review. Providing TBB with products for review guarantees neither coverage nor positive reviews.
Unboxing the set
I have to admit that my first reaction when opening the large shipping box from LEGO wasn’t to the size of the box, but something on it – specifically, Helvetica. I hadn’t known before, but Helvetica is Real Madrid’s logo font, so it makes sense that for an officially licensed product, it’s used on the box as well. The bottom of the box has the now-familiar LEGO for Adults branding (and matching typeface) with the piece count, set number, and 18+ age designation. Like all of the sets marketed towards grownups, the age recommendation on this one is just that – marketing. There are some clever techniques, and it’s a lot of building, but my 13-year old helper plowed through about 3/4 of this on their own.

The back of the box showcases the dimensions of the set (Height: 5.5″/14cm, Width: 17.5″/44cm, Depth: 15″/38cm), some inset shots of the real-life stadium and LEGO version, and highlights the removable roof.

The top of the box has a very nice blueprint-style diagram of the build, and features the team bus as the “1:1 scale element” – the first time I can remember multiple pieces being used, with the exception of minifigures.

Just like on the Nou Camp, there’s a holographic “Sticker of Authenticity”, but this one is on the bottom. It’s not the same as the authentication mark on official jerseys, but it’s the same idea. I found similar stickers on official window clings, if you need more holographs in your life.

Inside the tab-sealed box are 40 part bags, some loose and some in a plain white box. I don’t know what goes into deciding which bags are loose and which are in the box, and why sometimes the separately grouped bags are sequential and sometimes it’s a mishmash but …. this time it’s a mishmash. You’ll need to dump out the inner box along with the already loose bags and sort all 40, along with two unnumbered bags, to get started. The two instruction manuals are inside the white box in a plastic sleeve that keeps the sticker sheet flat, so that’s a plus. Speaking of the sticker sheet, “whoa, Helvetica!” again. Compared to the two previous stadiums, there are fewer letters to be individually applied to 1×2 bricks. But there also isn’t much variation, and there are a lot of them with variations on “Real Madrid”.


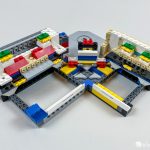
The part bags fall into six groups: bag 1 builds the field, along with the large 8×16 printed tiles from one of the unnumbered bags. Each quadrant of the stadium is a group of nine bags, along with some black 6×16 plates. And the final three bags, along with the printed Real Madrid 6×12 modified tiles, build the removable roof.


The Instructions
The set spans two instruction manuals. The first covers history of both Real Madrid and the Santiago Bernabéu, the field, and the first two quarters of the stadium. The second covers the third and fourth quarters and the roof, along with the parts inventory. Both have a medium gray inventory that gave me some initial fear from building instructions with black background, but are perfectly clear throughout. There are small notes throughout, offering historical facts about the stadium or sometimes about the LEGO pieces being used. They’re nice details, though to be honest they’re also easy to miss. But the primary job of the instructions is to get you through a nearly 750-page build, and they do that smoothly.
Each quadrant of the stadium can be built independently, with only a few steps at the end of each half to connect them together. Book 2 even starts over at step one, something I haven’t seen recently as LEGO switched away from sub-assemblies with their own numbering. While the set doesn’t have the Build Together branding, it’s easy to have two people building, one with each book – and given the similar structures of each quarter, it lessens some of the repetition as well.
The parts
The nets have been seen before in the two previous stadium sets, but we have all-new pitch prints in this set – three 8×16 printed tiles in two new designs, with a darker, more plaid-like grass-cutting pattern. The middle third is unique, with the two attacking/defending thirds identical.
We also get the interesting—and quite a mouthful to describe—Brick, Round 1 x 2 with Hollow Studs and Open Center with Bars in light blueish gray for the first time (only two of them), along with 80 of the “bread loaf” 1×4 tan pieces, 44 1×5 tan plates, and 52 1×1 tan brackets, not new in this color but previously only in very limited quantities. And the 1×2 panel, Wall Double Corner 1x2x1, is new in transparent dark blue. Space builders are almost certainly coming up with uses for this one already:

The build
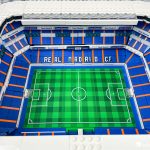
The LEGO stadium sets have settled on building the pitch first, and so we have our playable field done in just one bag. One could imagine a foosball game happening atop this base, if the scale was right. Toni Kroos, German international and Real Madrid midfielder, has previously appeared in Minifigure form and so comes along on the build, though he seems to have kept his DFB uniform on. (Please note that Mr. Kroos is not included in the set; the minifigure is from the 2016 German National Football Team series.)

The remainder of the build divides the stadium seating into four quarters and the roof. Each quadrant is very similar, with the third and fourth featuring towers with many metallic grille plates. The bases feature a mix of technic pieces with bricks, plates, and tiles, featuring supporting structure for the seating will clip in, and where the four towers will sit.


There aren’t many complicated techniques here, but one piece goes to a bit of trouble to position 1×3 inverted tiles in a way that seems overly complicated at first.

The seats are built in many wedges, using the 1×2 grille bricks to give the suggestion of seats. The construction of these is very precise and can get a bit tedious. There is a very nice stud reversal technique done with the new 2L bar with stop and the 1×3 inverted tiles.


The wedges are pretty effective at filling in gaps, though from the side of the module you can see all the gory details. The panels that provide the “tray” for the seats to sit on, with tiles forming the front edge of each tier, are effective, but the process of clipping the seat wedges in inevitably puts some downward pressure on them. With only the sideways connection to hold them up, it’s easy to dislodge one or more panels. Usually you don’t need to unclip the seats to reattach them, but it’s a bit fussy. Once everything is in place, it’s a clean look.


Turning to the outside of the building, there’s a lot of studs-out bracket work to provide detailing for the columns as well as the four large towers. The relatively new 1×4 “bread loaf” piece looks good as columns, and there are some variations to keep the exterior varied – office windows, ticket sales. It’s a bit of a shame that a sense of the ramps spiraling up the towers couldn’t be conveyed, but there’s no obvious solution – the Guggenheim museum Architecture set had the same challenge. Also, we learn what those carefully placed 1×3 inverted tiles were for! The dark green ice cream cones make lovely trees at this scale, and the hockey sticks as light posts are delightful.


At the end of book 1, we’ve finished the classic facade with the Santiago Bernabéu name and Real Madrid’s crest. The two quarters are locked together securely with technic pins and then some plates and tiles bridge the two halves. It’s very solid and you can pick the whole half up and move it around safely.


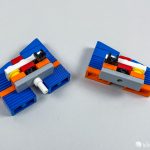
The build process for book two is very similar to what we’ve just done. The main difference is the large towers and glass facade, achieved with many, many Flat Silver 1×2 grille tiles and 1×2 “cheese grater” grille wedges. There are also a few openings in the base that are used to slot in the sides of the towers later. Toni shows off how the side panel slots into the base, with click hinges holding everything in place.


When finished, the full large facade is a striking difference to the other half of the stadium.

The final bags build the removable roof. It sits loosely on 1×2 door rail pieces spaced around the stadium, and you could say it really tops off the build.

At the end, you’re left with a pretty small pile of extra pieces for such a large set. Our review copy had some unexpected extras also, and one extra curved slope brick (used for the front of the team bus) in place of a 1×2 blue grille brick. I’ve developed a bit of pride in being able to figure out where a piece goes when one of my children claims there’s an unexpected extra, but this time neither I or my helper were able to find steps we’d missed.

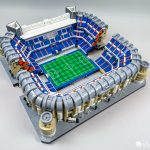
The finished model
The completed model is quite satisfying. The geometry generally works well, though the corners do show some visible gaps on the outside. Like the other stadium sets, it’s going to take an unusual bookshelf to house it, but it’s not as overwhelming as a Millennium Falcon or Star Destroyer. The fact that the stadium halves are connected helps a lot with stability compared to the other stadiums. It still tends to come apart when sliding around, but if you clamp the halves together you can keep it steady, and even pick it up carefully with a solid grip on each half.

The contrast between the two halves is nice for variety. I like the effect of all of the grille tiles, but the other half shows more of the historic facade and has lots of fine architectural details.

Zooming in on some of the details, the 1×1 peaked roof tiles and transparent blue cheese slopes do an effective job of conveying the separation between stadium tiers and the luxury box suites. The “Real Madrid” logos feel a bit repetitive, but are authentic to the real stadium.

It’s mostly hidden when the build is finished, but I like that the lower level entrance from the towers is finished with tiles; it manages to give that impression of a small tunnel emerging into the grand arena.

I am curious about a change from the previous two stadium sets. Both Old Trafford and Camp Nou affix the goals by wedging them in between studs. The Bernabéu, however, uses click hinges to mount them instead. I was unable to find any difference between the real stadiums that this matches. I think the switch to an 8×16 tile for the middle of the field, rather than the 6×6 tiles used in the previous sets, forced the change as the end lines are now one stud in, rather than right on the edges.

Conclusion and recommendation
Real Madrid is one of the most successful and popular sports teams in the world, so between that large market and their data on sales of the two previous stadiums, LEGO surely knows what they’re doing here. I am a football (or soccer, for the Americans) fan, though not particularly of Real Madrid, and while I admire the models, I haven’t purchased either previous stadium and didn’t feel particularly called to do so. Building the Estadio Santiago Bernabéu has made me question that decision. I don’t know where I’ll put this one, let alone three stadiums, but I’m more likely now to go back and get the other two. So that surely counts in the set’s favor.
How about from the perspective of a LEGO builder and not a sports fan? If you collect the large Creator and Architecture buildings, this is a worthy addition and I think you’ll want it. Otherwise you are most likely to be interested in the parts. At $350 US for 5876 pieces, the price-per-part is just under six cents per, which is about as cheap as it gets, and that’s for an officially licensed product. There are some small pieces that pad that number, but it’s not as deceiving as a Technic set with hundreds of pins. The grille tiles and wedges are useful and in an attractive color, and you get some pretty new pieces in tan in large useful quantities. Ultimately it depends what you build, but there’s a solid base here.
Final recommendation? My helper and I give it a big thumbs up for sports fans and Architecture-style buildings. If that’s not you, it comes down to if the build calls out to you, or you like the parts you get.

Creator Expert 10299 Real Madrid – Santiago Bernabéu Stadium will be available March 1 from the LEGO Shop Online for US $349.99 | CAN $449.99 | UK £309.99. It may also be available via third-party sellers on Amazon and eBay.
The LEGO Group sent The Brothers Brick an early copy of this set for review. Providing TBB with products for review guarantees neither coverage nor positive reviews.
Check out our full gallery of images


I think I would like to build one (or more) of these stadiums, for the experience and such. But the stadium would then turn into a giant dust collector that I already do not have room for. And I wouldn’t be inclined to deconstruct to repurpose the parts for $350 + tax. There are other parts I could use for that price. Looks nice though!