When it comes to motorcycles, few manufacturers are as internationally recognizable as Harley-Davidson. Since 1903, their bikes have proven themselves on the battlefields of World War I and II, dusty roads around the world, and in countless racing events. This rich legacy now includes LEGO set 10269 Harley-Davidson Fat Boy, the 2nd Creator Expert set to feature a U.S. vehicle (the first being this year’s Ford Mustang). Harley-Davidson first unveiled the Fat Boy for the 1990 model year, and the line has been in production ever since. Revealed for the first time today, LEGO’s version of the Fat Boy depicts the 2019 model with Milwaukee-Eight 107 engine. The set consists of 1023 pieces and will be available to LEGO VIPs beginning July 17th and to the general public worldwide on August 1st for $99.99 USD | $139.99 CAD | £84.99 GBP

A nod to the past
Believe it or not, this isn’t the first time LEGO and Harley-Davidson have saddled up together. In 1976, LEGO released set 394, a police-themed Harley-Davidson, as a part of its short-lived line of Hobby Sets. While perhaps somewhat primitive by today’s standards, the Hobby Sets emphasized building accurate looking LEGO cars and motorcycles with more advanced sculpting techniques. In a sense, they were the forerunners of what would later evolve into the 1980s-1990s LEGO Model Team and today’s Creator Expert vehicles.

LEGO has come a long way since 1976, but I’m thrilled to see another LEGO Harley after all these years. Placed side-by-side, the Fat Boy dwarfs the little black and white police bike, but you can definitely see they are distant cousins. Both builds place an emphasis on the little details and are comprised of standard and Technic elements. Technically-speaking, the Technic elements in the police bike predate the Expert Builder and Technic themes, but the axles, bushings and gears represent their origins and are compatible with modern Technic pieces.

The box and contents
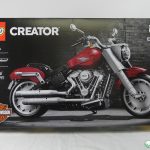
Everything is packaged in a large, attractive box, which is simultaneously fairly thin for containing a Fat Boy. Artwork on the front of the box makes the bike look hip and edgy, thanks in part to the dark shadows and a masonry-filled background that fades to black. Add to that the iconic orange, black and white Harley-Davidson logo, and we have ourselves a set that is begging to be opened. By contrast, the back of the box showcases the other side of the bike within a bright and cheery riverside city scene. Other details include a closeup of the speedometer and an exciting cutaway illustration of the fully functional engine. Including this particular feature on the box was smart, as it is perhaps the most intriguing aspect of the design.


Opening up the box reveals seven individual bags, numbered to correspond with the four different sections in the instruction book. In order to minimize wear and tear while loose in box, the instruction book and sticker sheet are packaged in plastic. The only loose items are the tires and wheels.

The instruction book packs 156 pages of pure muscle and has a premium feel. If you prefer digital building instructions, you can download the LEGO Life app and scan the QR code on the front cover. Personally, I prefer the analog experience of flipping back and forth between pages, and the book itself looks mighty spiffy alongside other vintage Harley literature.

Peppered throughout the book are tidbits of information on Harley history and the development of the set, including a historical timeline of Harley-Davidson, a brief history of the Fat Boy, and an interview with LEGO Senior Designer Mike Psiaki. There are even pages with descriptions of some of the bike’s key features, making the book both practical (for building) and informative.


Utilizing sticker sheets over printed elements is one way of cutting costs and, while this may be frustrating for some LEGO fans, I feel like they never dominate the bike’s overall appearance. There are a total of nine, and they are used for capturing smaller details like the mirrors and speedometer. Unfortunately, the sticker sheet doesn’t offer customizing options for the Fat Boy like the Ford Mustang because it only comes with one license plate sticker. Despite this, the sticker sheet’s leftover silver trim could come in handy for detailing your own original LEGO models.
The LEGO Group often hides “Easter eggs” in decal sheets and printed elements, and the Fat Boy’s sticker sheet is no exception. The vehicle identification number (VIN) is WGDLN1990, with 1990 referencing the year the Fat Boy was introduced. With the license plate decal, Wisconsin refers to the state where Harley-Davidson is headquartered and the “mfg” in the lower-left-hand corner indicates it is a manufacturer’s plate. Less certain is what the number 41 represents, though it may be alluding to the first year of military motorcycle production for World War II (1941).
One of the more intriguing numbers on the sticker sheet is on the odometer, which has 1974 miles logged. This is a possible reference to Bill Davis inventing the softail design in 1974 (the Fat Boy is a softail bike). Davis was a Harley enthusiast who customized his motorcycle, patented the design, and showed it to Willie G. Davidson in 1976. Davis continued refining his design and sold his patents to Harley-Davidson in 1982, who in turn produced the 1984 Harley-Davidson FXST as their first softail bike.

Despite the prevalence of stickers, the iconic Harley-Davidson badges gracing both sides of the fuel tank are printed on 2×4 tiles. I’m really glad LEGO went this route because the emblem is so closely tied to the identity of Harley-Davidson’s bikes. Each emblem is angled in such a way that allows them to sit level against the tilted build of the tank, and their glittering silver print looks slick against the dark red background.

When it comes to new parts, the Fat Boy has a handful of exciting elements. Builders of large-scale vehicles will be happy to see new wheels and a wide tire that fits two of them. Element Designer Mani Zamani created the wheels specifically for this set in order to represent Harley-Davidson’s Lakester rims. While the narrower front tire is not new, it’s last appearance in a set was back in 2015 with the Technic Street Motorcycle. There are also four of the new-for-2019 3×3 sloped wedge bricks in dark red.

While the number of new parts is small, the number of parts in previously unavailable colors is huge. Fans of dark red will be especially pleased with 1×1 Technic bricks, 4×2 curved slopes, 45 2×1 with 2/3 cutout & 45 2×1 with cutout without stud slopes, 2 x 2 locking with 1 finger on top hinge plates, 1×2 – 2×2 & 1×2 – 2×4 brackets, and round corner 3x3x2 dome top bricks. Vehicle builders will probably also be interested in the 4x4x2/3 triple curved wedges in light bluish gray and Modified 1×1 half circle extended tiles in trans red (three are included, though there are only two pictured). Then there are four inverted 45 4×1 double slopes in black; up until now, they had only been available in dark bluish gray.


In addition to new parts and colors, the Fat Boy includes a number of other fun elements like Technic chain links, sloping elements, and round 1×1 d. 90 degree elbow bricks in light bluish gray. I was also excited to see light bluish gray barrels, which have previously only appeared in two 4 Juniors Pirates sets from 2004. Their appearance in the Fat Boy may possibly lower their price on the secondary market.

The build
The first leg of the build consists of assembling the Milwaukee-Eight engine, internal mechanics for moving the pistons, and part of the surrounding frame. Some of the most important functions are built into the frame early on, such as the kickstand seen here. The stand itself is held in place by a modified 1×2 plate with arm up on the bottom and 1×4 modified plate with arm down on the top. Although this nifty feature is shown on the back of the box, the kickstand was implemented so early on that I didn’t pay it much attention and actually forgot about it by the end of the build.

Following completion of the kickstand, Technic bricks and pins are used to form the beginnings of what will form the housing for the rear wheel. The one side is hinged, which will come into play later.

Once the basic framework is out of the way, the Milwaukee-Eight engine begins to take shape with the internal mechanism for moving the pistons up and down. Light bluish gray string reels make for convincing looking pistons, and a combination of Technic gears, axles, pins and beams are connected in such a way that achieves the necessary motion. Words alone cannot describe how awesome this feature is, which is why I’m glad the instructions illustrate how the chain connected to the rear wheel powers the pistons inside.


With the pistons fitted in place, it’s time to build the V-twin engine housing around them. Hinges are propped up against 1×1 slopes to achieve the iconic “V” shape, and the pistons move inside layers of basic plates and round 4×4 with 2×2 hole plates. It’s an amazing feat of engineering, especially given how effortlessly the pistons move without ever catching.

Although the finished engine is a testament to form and function, I can’t help but feel like the functionality of the pistons is hidden away from sight. Flipping the build upside down reveals the up and down motion of the piston rods, but it’s not as satisfying as looking at them head-on. I feel like this could have been mitigated by including transparent colored elements for an optional “cutaway view” engine. Given the number of transparent elements available on the secondary market, it should be possible to cobble together an adequate solution.

After placing the engine atop the frame, an angled Technic skeleton begins to take shape. While not obvious now, it eventually serves to mount the seat and fuel tank.

The Fat Boy’s rear tire is wide enough to accommodate two of the wheels, which are connected together with Technic pins. Meanwhile, a Technic axle is used to connect it to the frame. Remember the hinged part of the frame I referenced earlier? It’s a great design, allowing the right side of the frame to fold over the axle.


By the time I reached the chain, I came to the horrifying realization that I had placed a gear in the wrong spot and that the ends of the chain wouldn’t connect. Although the instruction book clearly identifies the parts needed for each step, I tend to not look at them in detail. Without carefully picking the parts for each step, it’s easy to miss a piece or place it incorrectly in such a large model. Having to take apart sections of the frame’s interconnected elements was not particularly fun…learn from my mistake!

After correcting my error, it was time to make the rear fender. This area is formed from a combination of standard slopes and curved elements, finished off with light bluish gray parts for the chrome trim. This is followed by the seat, which is built in two sections. While the driver portion is laid out over the frame, the rear passenger seating is mounted over the fender. When placed together, they convey a sense of ergonomic realism.


One of the biggest visual selling points of a motorcycle is its fuel tank, and the LEGO Fat Boy delivers in this area. Curved elements and wedges are used to form the classic teardrop shape, and the way they are positioned within the frame flows into the angle of the seat. Stickers are placed to represent the molding and the speedometer/odometer. While the molding and speedometer decals look slick, my only complaint is that the central molding as a whole looks chunky compared to that of the real bike. In the actual Fat Boy, the molding tapers off and thins out toward the seat, and I feel like this could have been emulated by switching out two of the three light bluish gray 4×1 curved slopes for dark red.


After this part of the build, the next step is to assemble the first of the dual exhaust pipes. This involves threading together bricks, tubes, and an engine (often used in sets depicting aircraft) with Technic axles and pins. Instead of connecting directly to the engine, the curved element rests flush against it for a simple-yet-elegant solution. Immediately after the exhaust pipe, you build the rear brake pedal which can be adjusted to your liking.


Before making the second exhaust pipe, the instructions direct you to flip the bike around and make the primary housing and attached shifter pedal. Once this sub-assembly is completed, it is affixed to the frame with a yellow 1×1 modified plate with horizontal clip, and it is held in place by Technic bricks with holes slipped over the Technic axles. A footrest assembly is then snapped into place, slightly overlapping the front of the primary housing. Coupled together, they make for a surprisingly strong connection that adds to the model’s authenticity.


The Fat Boy is flipped around again so that the other footrest and exhaust pipe can be assembled and placed, and what a difference they make! This second pipe is curvier and rests against the engine’s left side, finishing off the beefy look of Fat Boy’s dual exhaust.


With the majority of the motorcycle complete, it’s time to build the front end. With fewer parts involved, it’s a great way to finish things off. The front fork is nice and sturdy, thanks to the Technic axles threaded through it. As soon as the upper portion is completed, the front fender is built with curved elements and held into place with click hinges, pins, and Technic connector hubs. It’s an ingenious design because the angle of the axles in the hubs form the fender’s natural curve, and the beams of the front fork do a great job of hiding the gaps.

Once completed, the front fork is held in place to the rest of the bike with a Technic axle with stop. At this point, the headlight is built and fitted between the front fork. The connecting studs are angled to ensure the accuracy of its tilt.


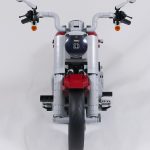
Then there are the handlebars, which are shaped using Technic elements. They are also beautifully detailed, complete with levers and signal lights. My favorite part would have to be the mirrors, with each one consisting of a mechanical claw, bar holder with handle, and a minifigure signal paddle. Thanks to all these bar and clip connections, the mirrors can be tilted in a multitude of different angles.


Last but not least is the stationary display stand. While the kickstand does it’s job well, the brick-built stand allows the bike to sit straighter for display.


The completed model
When all is said and done, the Fat Boy is an amazingly detailed LEGO model with enough curved and slanted cues to give it a fresh and modern look. Despite the few criticisms I raised earlier, the finished motorcycle impresses from just about every angle, and it’s difficult to not be blown away by the level of detail the designers were able to achieve. It’s also a nicely sized display piece, measuring 12 inches (33 cm) long and 7 inches (20 cm) high.


Folding out the kickstand results in a more dramatic pose, with the Fat Boy leaning to the side. It gives an otherwise inanimate object a dash of attitude worthy of the Harley name.


On the subject of detail, this is also a fun model to get up close and personal with. The view from the seat is particularly stunning, with the teardrop shaped fuel tank sloping upward toward the handlebars.

If I were to pick my favorite aspect of the LEGO Fat Boy’s design, it would have to be the way the right side of the engine and dual exhaust pipes play off of one another. It’s wonderfully executed and feels true to the original motorcycle. While I don’t mind the light bluish gray elements used to represent metal, I have a feeling a number of LEGO fans will be left wishing LEGO had given us metallic silver or chromed elements. As amazing as that might look, any sort of chroming process would undoubtedly raise the cost of the set. Fortunately, you can search for custom chromed pieces on the aftermarket, and I have a feeling that some industrious individuals will make special chrome packages to outfit the entire bike. Now if only someone could create a trans clear element pack to highlight the engine’s working pistons….


It looks especially cool alongside its great-grandfather, a 1929 Harley-Davidson.

….as does the engine!

Conclusion & recommendation
Without a doubt, I feel like the Harley-Davidson Fat Boy is one of the best LEGO motorcycles to date, if not the best. It presents an enjoyable build from start to finish and, while I wish the bike had “x-ray vision,” the working pistons are such an amazing feature. For those who aren’t motorcycle enthusiasts, the Fat Boy offers an excellent selection of parts for custom models, particularly if you are looking for dark red. The fact that many of them are elements appearing in dark red for the first time is a plus.

I for one am happy to see LEGO making another Harley-Davidson set after over forty years. The Fat Boy lives up to the high expectations of the Creator Expert line of vehicles, and it’s great to see LEGO is willing to deviate from cars and take a chance on an iconic motorcycle. Though it’s a larger scale than the other Creator Expert vehicles, this bike stands mighty fine on its own. After all, Harley-Davidson embodies the near-mythic image of rugged American individualism!

At $99.99 USD for 1023 pieces, the price of admission is more than reasonable, especially when you take into account new exclusive pieces and the number of elements appearing in select colors for the first time. Whether you want to display it at home or in the office or part it out into your ever-growing collection of loose LEGO parts, the appeal of this motorcycle is broad enough that it might tickle your interest. Pair it with the Ford Mustang for a double-dose of pure American muscle.
10269 Harley-Davidson Fat Boy will be available to LEGO VIPs starting July 17th, with general public availability beginning August 1st for $99.99 USD | $139.99 CAD | £84.99 GBP as well as some third parties on Amazon, Bricklink and eBay. You will even be able to purchase the set on Harley-Davidson.com and through Harley-Davidson dealers throughout the U.S.!
The LEGO Group sent The Brothers Brick an early copy of this set for review. Providing TBB with products for review guarantees neither coverage nor positive reviews.


Any pictures with some of the Creator Expert cars?
Yeah, if there’s one set that deserves chrome elements, a Harley has to be at the top of the list.
@parsom Unfortunately, I don’t have any of the other Creator Expert cars in my personal collection. Otherwise, I promise you I would have provided a group shot. :-) The scale is definitely larger than that of the other vehicles.
@Jimmy We think this bike would look cool in chrome, too. Fortunately, there are folks who produce custom chrome LEGO elements as a business, and a few of them can be found through BrickLink.
My Harley arrived today. Yeah baby!!