As soon as rumors of Creator Expert 10261 Roller Coaster started flowing, there seemed to be a huge sigh of, “Finally!” that spread throughout the LEGO fan community. I’ll shamelessly admit that I was one of the ones bouncing up and down, shouting that it was about darn time. But even if you weren’t as excited as I was, I’m guessing that it at least piqued your interest, and perhaps that interest brought you here.

When we recently had the chance to go hands-on with the roller coaster at the 2018 Fall Preview event in New York, it was so much fun that we definitely couldn’t wait to do our own review. We anxiously awaited our copy from Billund and it’s finally here! So step right up! Let’s plunge in and see what the exclusive LEGO Creator Expert 10261 Roller Coaster has to offer!
The box, instructions, and sticker sheet
This box is big! It’s another double-wide, like the LEGO Ghostbusters 75827 Firehouse Headquarters. One of the main reasons for this is the large quantity of slightly bulkier track pieces. Inside, two additional smaller boxes separate some of the numbered bags. There are eleven numbered sets of these bags, over thirty in total, and that’s not including the ones that are unnumbered.

If you want to talk stats, this set definitely has some impressive ones. It includes 13 16×16 studded and 4 8×16 studded green plates, and 163 2×2 green jumper tiles that set the foundation. There are 6 types of brand new track, in addition to another one that has never been seen in red before, totaling 44 pieces alone. The amount of tile would make any tile-hoarder gasp. Want the new leaf element? There are 48 of those. And that chain that works the lift? That’s a whopping 203 pieces, not including the little handful of extras.

But the obvious mammoth in terms of numbers is that of the white 2×2 round bricks that form the supports: 530. That’s in contention for one of the highest numbers of a single element in a set.


The two instruction books and a single sticker sheet are kept in their own separate bag. The stickers themselves (19 in total) are exactly what you would expect from a roller coaster set, featuring rules, a height limit chart, booth labeling, and even mid-ride photo shots.

The build
In terms of sheer volume (considering footprint as well as height), this is one of the largest sets we’ve ever built, rivaling even the rather flat UCS Millennium Falcon. Unless you have a fair amount of space to build and display, it can be awkward to maneuver around.
The set contains many of the newer elements, and several elements that have never been seen before in their respective colors. This includes the Dark Blue roller coaster cars, hinge panel, and 2×2 macaroni tile, in addition to the Dark Azure 1×1 brick, 2×1 inverted slope, and 3x4x2/3 Wedge with cutout, among others. The bright pink beehive and minifigure head that make up the cotton candy are also new, and the technique used to put them together is quite interesting. A rod comes through the bottom to be inserted into a Technic pin at the base of the minifig head, which makes the top of the cotton candy. It actually borders on “illegal” as it is not a standard connection, but it’s certainly clever! The whole treat cart is actually pretty cute.


Besides the track, there is one other piece that is brand new in this build, and that is the Light Bluish Grey Brick, Modified 1 x 2 x 1 with no studs and a curved top. This awesome little piece is used in part of a guide for the lift chain mechanism.

This build is interesting in the fact that it was quite repetitive, with all the white columns, but there are slight differences from step to step that still keep you paying attention. The entire structure is actually pretty sturdy and moveable by holding the supports in the middle, close to the base. They are all connected using mostly clips.

There are a few connections along the way that are formed by ratcheting clips and ball sockets. Some of them make perfect sense, but others are a little curious. I found these odd because they don’t move or seem to have a need to be different from the rest. One of the ball-socket connections makes sense as part of the support, but has another interesting feature: it spins. While building, it was hard to pass by those steps without capitalizing on that feature. I, for one, will be using this technique to create cool side-builds in the future.

Another odd feature was that, instead of a smooth 2×2 round tile capping the columns, many had a jumper instead. Some utilized this jumper for flags, but many we empty.


One of my favorite parts of the build was, naturally, making the “Coaster” sign. It’s always fun to see how the designers choose to create these features. The rounded letters are attached to a row of white fence via clips, and it fits the scheme perfectly.

It was also really fun to build the other detailed portions of the set, like the loading station and ticket booth. Expert sets like this one are filled with fun techniques that are always good to keep in mind for personal creations. One of my favorites is the use of those hinge plates for the roof of the loading station.


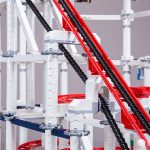
The finished model and roller-coaster mechanism
The completed model, as mentioned before, is massive. Like a real coaster, it’s quite impressive to behold, and the aesthetics are appealing from every angle.

The set comes with two sets of three cars, which are held to the track with smooth grips on the undercarriage.

They can be switched off the track by pulling a lever on the side.


It’s important to note the fail rate of the cars staying on the track. After several rounds up the lift chain, sometimes the track starts to come loose from the tension. This occasionally results in a major derailment, even if the separation is minor.
The roller coaster’s mechanism is powered via hand-crank. From top to bottom, the whole drive-train is connected, making the series of gears, axels, chain, and tires pretty long. While this is very cool, if things aren’t placed right, it can put a fair amount of stress on the system.


The cars can also be stopped by pulling out another lever that brings out a wheel, which acts as a brake. You can get it started again by turning another adjacent crank.

The set can also be motorized with the attachment of a Power Functions M Motor and Battery Box (not included). During the build the instructions already set you up for this feature, and then there are additional instructions in the back of the second book that explain how to connect both Power Functions and LEGO Boost.


You can add a Power Functions Control Switch so that the Coaster can be started and stopped more easily from the front of the build. Or you can even make the set remote control by using an IR Receiver and wireless Remote.

Just check out the system in action!
The minifigures
This set comes with 11 minifigures in total. For the most part, they are simple and there is not much new about them, but they really are pretty cute, and fit the set well.

The guys include a LEGO Coaster Operator, the child’s Grandfather, a Queasy Rider, a “Classic Space Man,” and a Cool Customer. The girls include a Child, a Cautious Rider, a LEGO Coaster Operator, the child’s Grandmother, a Cheerful Rider, and the Cotton Candy Vendor. A couple things that are fairly new and still rare are the hair pieces on the Cotton Candy Vendor and the Female Coaster Operator. I’m excited about the latter because it means I finally get to make a great sig-fig!


Alternate faces for three of the guys include a bit of terror. This is how “Queasy Guy” also got his name, as it looks like he is about to lose his lunch.

The alternate faces for the girls are a little less sick or terrified. It looks like the girls can handle rollercoasters a bit better! One rider even seems to be in meditation! The sad face for the child is because she is too short for the Coaster (in addition to dropping her cotton candy). Poor kid!

Conclusions and Recommendations
For anyone who is in love with the whole series of Creator Expert Amusement Park sets, this is definitely a perfect addition to the collection. I personally really love this color scheme. After seeing grey track in a couple other sets recently released, I was worried that the whole thing would be grey. So it was a wonderful surprise to see such a vibrant outcome!
Even though the set is pretty sturdy, my one concern is the fact that is doesn’t quite stand up to a ton of repetitive play. Eventually you have to make sure the track pieces are all still firmly connected, or else risk a derailment. If a derailment occurs on the lift, and you are running a motor, the binding up of parts can be tough on both the mechanisms and motor. To anyone who chooses to purchase the set, I would suggest being extra cautious while building the mechanical components.

All in all, this is a timeless set that is fun to build and mesmerizing to watch! I would definitely recommend it to anyone who is interested!
LEGO Creator Expert 10261 Roller Coaster includes 4,124 pieces and 11 minifigures. It will be available tomorrow, June 1 from the LEGO Shop ($379.99 in the US | 479.99 CAD in Canada | £299.99 in the UK.
The LEGO Group provided The Brothers Brick with an early copy of this set for review. Providing TBB with products for review guarantees neither coverage nor positive reviews.

Thanks so much for the detailed review. I was on the fence about getting one but now I think I’ll go for it.
One minor correction – you wrote, “In terms of shear volume…” I believe you meant “sheer.” :-)
Hi Rick!
I’m glad you liked the review! I’d love to hear what you think of it once you build it!
I’d also really appreciate it if you’d please consider using our links to LEGO Shop at Home or Amazon if you plan to purchase the set online. When you do, a part of the proceeds comes back to help us continue to provide this content! (It’s really easy, just follow the links within this article or on your right)
Also, you are absolutely right! My bad! We definitely don’t want any shearing going on! It’s now fixed. ;)
Nice review! Is it possible to speed up the chain lift mechanism or would that cause too much havoc with the linkage? It would be cool to have both set of cars running at the same time, but it looks like the lift portion takes longer than the actual run.
I think I might grab this for Christmas.
Hi Eric!
Thanks for your comment! I wrote a response already but somehow it’s not showing up. Hopefully you don’t get a duplicate all the sudden!
It was my experience that the system actually runs more smoothly at higher speeds. Once it gets going at a nice rate, it’s easier to keep it up. Make sense? I wouldn’t try to alter the original gearing to make it extremely fast, but if you use the Power Functions M Motor and the IR Remote Control set at its highest speed, it works just fine. I prefer to keep it just under the highest speed.
I’m actually really impressed with the thought that went into the physics of the system. A loaded set of cars can make it from the first drop, all the way to where it catches on the lift, with just the hand crank and no extra help at the bottom. (An empty set of cars might fall just short of catching the lift).
The speed of the lift is deceptive. If you have two sets of cars with the same or similar number of riders, and you’re powering it with consistent force (like that provided with a motor), you should be able to run it for a pretty long time before they start to catch up to each other.
I hope this helps! Please let me know if you have any more questions!
Bre