Once a year, my long-distance partner Alyse Middleton and I, Chris Doyle, try to take a week of vacation together. With the realities of life in the USA in 2020 limiting the potential destinations, this time we opted for a “Quarencation” at my place. Kind of a bummer, but staying here kept us within easy reach of my LEGO workspace…and that paid out some nifty results. We were able to take an idea we had been kicking around all the way from concept to physical model. Working in the style of the new LEGO Art sets, we created a mosaic of Lynda Carter as Wonder Woman.
I’d built a number of mosaics in the past, so I had a few ideas on how we could approach making a new one. And while that experience was helpful, we ended up taking a very different route to reach our goal. Come along with us on our journey of highs, lows, seemingly endless moments of “I guess we’re starting over again“, and, yes, eventual triumph.
First up: Just what are we building?
A Wonder Woman-themed mosaic had been on our radar for a long time, but we had only talked about it in very general terms. Did we want to try and do something in transparent-LEGO for a stained glass effect? Were we thinking studs-to-the-ceiling or studs-facing-out? Or maybe studs to the side? And just how big? Bigger is better; it means more detail and a clearer image. Bigger is also not better – huge footprint builds are a pain to work with, or hang, and tend to run into the “super expensive” when it comes to parts. In the end, LEGO helped us make a choice. Their new Art sets gave us a size (and a style) to replicate. To me, it made sense to get one of the official LEGO sets as a base and then just ignore the instruction book. I put an order a week or so in advance…then watched it sit at a status of “in warehouse”. Stupid COVID.
Oh well. There were still things we could do to prepare.
Deciding on an image

So we had our subject: Wonder Woman. But what image would work best for our mosaic? We took a couple of things into account while trying to determine that. First, it had to fit the aspect ratio we were going for. A square image would work for a single art set. Cost effective, easier, and probably a fast build. But Alyse and I are notoriously bad at doing things in a small way. So we also looked at images that would match the 1:3 “boy, do you have a lot of disposable income” 3-set LEGO Art super-builds.
Second, we didn’t want to duplicate a creation that someone else had done before. Thankfully(?) there aren’t a ton of LEGO Wonder Woman mosaics out there, so we had a fairly wide range of choices. We considered everything a Google Image search gave us: comic art from various eras, stylish fan art, the recent Gal Gadot cinematic version…but we kept gravitating back to the classic Lynda Carter look. For me, it played well into the nostalgic aspects of the Beatles and Warhol LEGO Art sets. Plus…I mean, c’mon. Lynda Carter as Wonder Woman. How can you go wrong with that? Luckily Alyse was in agreement, provided we could find an image of Lynda that didn’t have a fake looking publicity-still smile.
We ended up agreeing on the image you see here- a cropped version of one of the most popular promotional shots from the Wonder Woman television show. There are enough thematic elements to make sure you were looking at a super hero, and as a bonus the top portion would nearly fit into the square aspect ratio of a single art set. Our main concern was the huge amount of flesh-toned elements we were going to need. The Iron Man set had quite a few tans and nougats, but…this was going to be a large expanse fairly rare colors for 1×1 round plate. But we had made up our minds, and decided to just run with it.
(Almost) Making it LEGO-compatible
Leaning into the processes I had used in earlier projects, we took our source image into PhotoShop to transform it into something that would map onto the LEGO world. The first step was creating a reduced color pallet that matched existing plate colors. This, as it turns out, is a major pain. There’s a lot of outdated color lists on the web, and a lot of disagreement as to what RGB colors values to use, and even more on what colors should be called. In the end, we ended up relying on the color chart that Ryan Howerter has made available. It was up to date, and, most importantly, had links to examples of the colors in use in existing parts to we could make sure we were speaking the same tonal language. Our initial plan was to make a master palette of all the LEGO colors, then crop it down to just the 1×1 round plate range.
The next step was to have PhotoShop convert the image to use just our colors, then shrink the image down to a point where one pixel would equate to one LEGO stud. Pretty automated, but we were mostly happy with the result as a prototype. Then we realized we were still using a much broader color list than was actually available in LEGO round plate. Whoops.
So we did some deleting in the color list to bring things more in line with “things than exist that we might be able to source.” The colors weren’t quite where we wanted them to be, but it was still recognizably Lynda. Even if it was “Undead Queen Lich Woman” Lynda.
So we adjusted the available colors and tried again. This time we got a more flat comic-book look, that was still mostly recognizable as Lynda. Mostly.
The final step was to break up the big image (if 48×144 pixels could ever really be considered “big”) into 16×16 pixel chunks that we could use as our building templates. There were still areas we didn’t like, but our plan was to address those as we went. Neither of us was happy with a 100% “paint by numbers” approach to our mosaic anyway; we wanted to be more involved in the process than just letting the computer do all the heavy lifting. As such, we were more willing to start with a pattern we knew we weren’t going to follow exactly. Rather than spend even more time getting frustrated at near misses, we decided to press on.
The first parts arrive
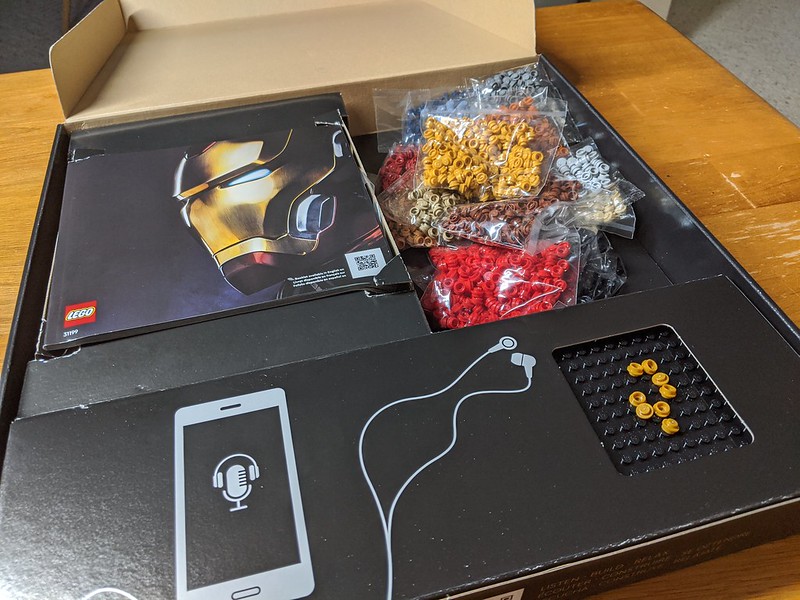
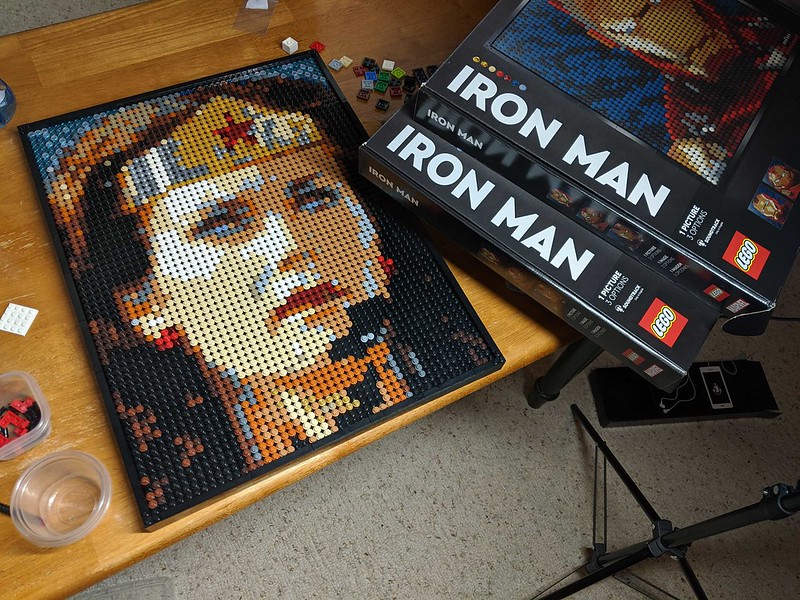
Monday, my LEGO order finally left the warehouse and happily arrived early Wednesday. I had picked up a 31199 Iron Man LEGO Art set for three main reasons: plenty of 1×1 plate in colors I thought we’d use, those new 16×16 bricks for the back plane, and a desire to own that new chonky boi brick separator. Despite the exterior packaging being in great shape, the interior of this set wasn’t. There were eight loose gold 1×1 plates (mysteriously, the bag of them was still sealed) and the instruction manual was scuffed and bent in the corners from the way it was crammed into to the packaging. I was kind of glad I was just looking for the parts. And now we had them! Time to get to building.
Getting Started: General Tips and Tricks
To keep the different colors of plate organized, we used a lot of X-Pod containers, along with some snack-sized plastic storage cups. We added little slips of paper with the color name/ID to each container once we realized we couldn’t keep “medium nougat” and “sand yellow” straight without really stopping to look.
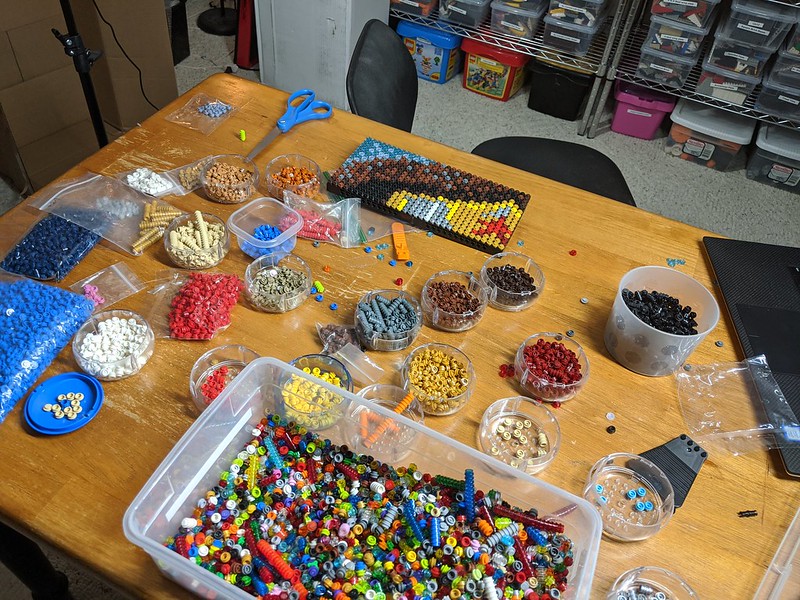
On the building front, we found that making stacks of the 1×1 plates meant they could be applied to the base a lot faster. The method was pretty simple – take the stick, jab the bottom onto the stud you wanted to cover, then lean the stack to the side. That’ll pop off the bottom plate and you can apply to the next stud in rapid order. It goes a LOT faster than trying to put things on one at a time. The same process also works in reverse when we had to take everything off large sections to rework them. There is a danger though – putting a lot of stress on the sides of the plates can cause them to crack. We lost a lot of older gold plate that way.

One other thing we learned is shared mosaic building is a great way to get that bin of unsorted 1×1 round plate organized. While one person was working on a 16×16 section, the other could still participate by trying to find out if we had any more tan lurking in the pile. By the end of our build we had sorted the entire box, and even separated out all the various shades of grey, gold, and silver into their own storage bags. And when all the things were sorted, then the other person could make up “sticks” to help speed up the build. Total win-win.
Oh, and that new brick separator? It really doesn’t work all that well. We ended up going back to a standard one pretty quickly. (It still looks cool, though.)
Enter LEGO Art Remix
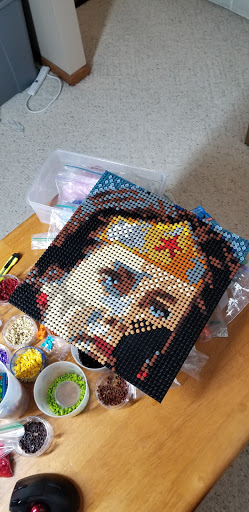
So we had our self-generated instructions, and we had our LEGO brick, and we were ready to start building. Things went along pretty well, and early results were pretty positive. But some things weren’t translating into reality as clearly as we had hoped. The hair and tiara were working great, but the face…not so much. We had decided we were going to have to spend a lot of time reworking things once we had more of the mosaic built and we could see how things looked in context. Things got worse the further we went. We were back to Wonder Lich. What to do?
Then, behind the scenes, the Brothers Brick got an email from Deb Banerji, a developer who was making a tool that would totally change our approach. The LEGO Art Remix converts images into mosaics using the colors from the LEGO Art sets, or from colors you can add yourself. Then it’ll generate a PDF instruction book to make the build super-easy. That alone was a huge benefit – squinting at a 16×16 pixel image and trying to guess what color mapped to what brick was wearing thin for us fast.
We quickly ran our source images through the process and were really amazed at the results. The colors in the face were handled so much better that we enthusiastically threw away the hours of development work and building we had put into things so far. We ripped out 90% of the studs we had put down, and started over.

Still not quite right
Not to say that the Remix plans were perfect for us, though. While the face was spot-on, the hair wasn’t quite right, and the bodice wasn’t working for us either. Estimating how much of a given color we had (or could reasonably get) was iffy for us. So we tweaked our settings, and made up two different batches of instructions – one for the skin tones, and one for the rest of the build. (And we still ended up hand-building the tiara to get the look we wanted.)
So we started over. Again.
Things were moving really quickly for us now, though. We could (re)build a 16×16 panel in fifteen minutes or so. But brick soon became a problem – we were running out of the rare colors fast. We had put in some BrickLink orders to try and secure extra parts, but some of the stuff we needed was really only available in the Iron Man set. I ordered a second one. And, amazingly, it showed up two days later. We had enough of the rare stuff to complete the first 48×48 section.

Out of time
It was obvious to us that we needed to build at least one more 16×48 row (to finsh Lynda’s face) before we could say we’d reached a stopping point. Sadly, we were down to our last couple days of vacation, and even best-case delivery from BrickLink was days away. Alyse and I wanted to build this together, and she’d be leaving for home before then. There was much sadness. But we did what we could, adding one last row of 16×16 blocks. We had enough parts to finish everything but the last regions of medium nougat. We added on the LEGO Art framing and started planning for the future.
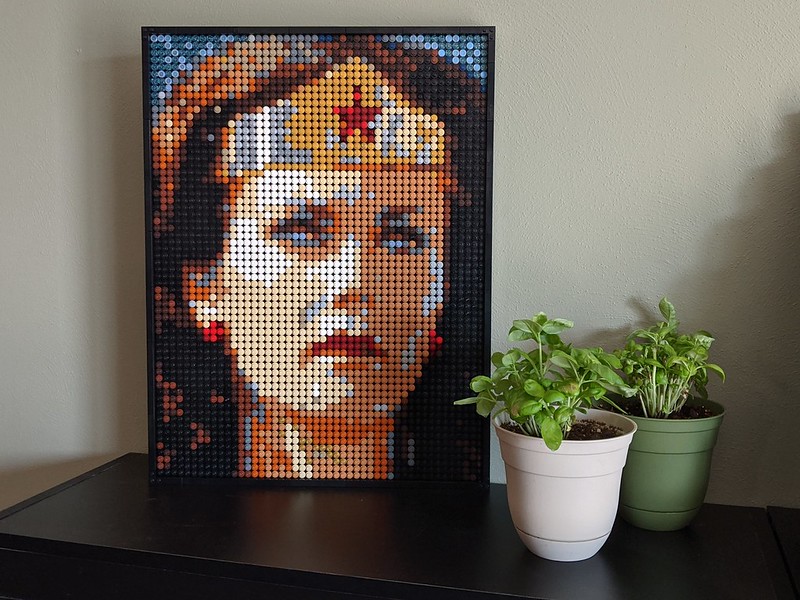
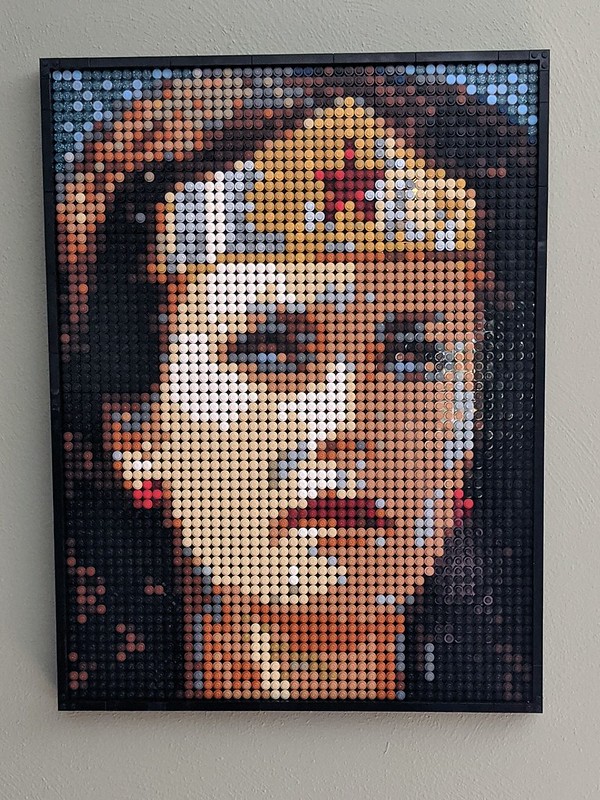
Done…for now
As luck would have it, the day after Alyse left a BrickLink order with the needed medium nougat plate arrived. I was able to put in the last bits, and complete our image. We’re really happy with the end result – it’s clearly Wonder Woman, clearly Lynda Carter, and clearly something the two of us built with our own hands and ideas. We were thrilled to use tools along the way, but it still feels like “our art”.
What tomorrow will bring
This isn’t the end of this project for us, though. Eventually we’ll get to spend more in-person time together, and by then we’ll have sourced all the parts we need to finish the full 48×144 sized mosaic. We’ll pick up a Beatles set (Or two. Or five. Damn you, LEGO.) and finish our labor of love. When that happens, I’ll let you know. (And happen it did! Check out the full-length Wonder Woman mosaic here!)
But, for now, this version will hang on my wall, and remind me of one of the best vacations I’ve had in a long time.
Whoa, wait a minute! Before you make an expensive mistake, remember that Ironman and Sith+1 use plates, while Beatles and Marilyn use tiles. Unless you’re specifically planning your mosaic around mixing the two textures, it could end up looking wonky.
I had to go to Flickr and zoom in twice to confirm my suspicion that the upper corners are tiles instead of plates, but those are the only background elements in your reference photo. Are you planning to do something with tiles for the bustier, like maybe raise it one layer so the tiled surface sits just a little higher than the studs on the plates?
And bummer about the gold plates. That takes me back to my childhood, when transparent parts were acrylic, and all trans 1×1 round plates ended up that way at some point (I think they also changed the mold so the base has a little room to flex during removal).
As for the brick remover, I’d have to try one to see how I liked it. I did make a 2-up version for tile removal. It’s just two of the orange removers with a 1×4 plate and 1×4 tile holding the studded ends together. The 4-wide end works a lot better for removing 2×2 tiles because it’s actually capable of doing two at a time, but when I tried a 6-wide version it would just fall apart in my hands. Maybe designing a more robust handle would help, but of course that design would be completely useless for removing plates unless you could put some leverage on the flanges on the 1×1 rounds. Might need a fulcrum to pull that off.
@Purple Dave – Thanks for calling out the tile/plate variation between the Art sets!
We would have been okay, though. We ended up being able to Bricklink all the plate we needed for the actual image. The Beatles sets on our wishlist would just be to have the Beatles sets. And one extra for the 16×16 brick, if we decide not to just brick build those to complete Wonder Woman.
And, yes, the corners of our image were done with tile – we wanted to use some of the DOTS we had bought earlier in the year and it made for a nice subtle contrast around her hair. We don’t plan to mix the textures in the main image, though. (We tried it out but quickly realized it looked super wonky to us)
Thanks for sharing your process! One tip maybe, if I may suggest or ask: did you try putting a little glimmer/highlight in her eyes? Could make her more lively. Just one single 1×1 white rounded plate, or maybe tan/sand or bley? I know it’s gonna be very hard to figure out which of the roughly ten plates to replace, and maybe it can’t be done, but I was wondering. the tiniest sparkle in someones eye (in artwork) will make them come alive and not have dried out (dead) eyes.
@Roloff – Yeah, there will likely be a few more tweaks to the design when we put the rest of it together, and the eyes are on our list. As you mention, it’s a tricky thing to fit into the resolution we’re working at. We had a highlight in earlier drafts and it didn’t read quite right for us, but that was a pre-Remix stage.