Today we’re pleased to welcome Anu Pehrson as a guest contributor to give a special introduction to her latest creation. We spoke with Anu last year about her amazing models, which range from a monastery in Bhutan to the Iron Islands from A Game of Thrones. Her newest model, Master Wu’s Rice Plantation, is just as amazing. She worked on the 20,000-piece model over 3 months, and she’s documented for us the process of how a creation like this goes from idea to completion.

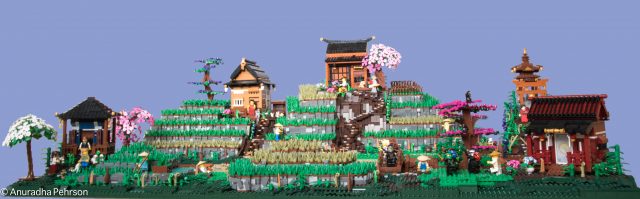
The diorama is enormous, at nearly four feet on each side, and includes multiple buildings, a river, beautiful trees, and lots of incredible landscaping up the staggered terraces of rice paddies.
 The Building of Master Wu’s Rice Plantation
By Anu Pehrson
I wanted to build something in the Japanese architectural style, perhaps some smaller cottages where I could try different building techniques for the windows, wall patterns, roofs, and porch railings. I thought a village-like setting for these cottages would be the ideal layout. The second thing I was interested in trying was terraced agricultural fields, and rounded terraces that are used for rice farming in East Asia seemed like an interesting challenge. So bringing these two ideas together formed the basis of this MOC (My Own Creation). I also wanted to build a working gondola from a lower level to a higher level (but that hasn’t happened yet).
The LEGO Ninjago Movie was just being released as I was building this MOC, therefore, it seemed like perfect timing for to create a place for Master Wu to teach and practice with his disciples.
The starting point was a body of water. For any MOC with landscaping, I think a water body adds color and texture. The important part is to make the water interesting. There are a great many methods of doing this, but I began with using blue in the center and different shades of blue on the edges. At this point, I didn’t know how I was going to add to it, but I later added transparent 1×1 plates in a few shades over top of the blue plates.

The next step was to build stone curved walls for the terraced rice fields. However, it turned out that curved walls were very difficult to build upon as terraces.

I made a second attempt using another method. This gave me a curved wall and a stony effect, but it was too straight on the lowest section. A little more curve and shape was necessary.

I tried various methods and finally decided on a method divide the curve into textured 1×2 brick segments, as high as required (mostly 2-3 bricks high), as seen in the brown-topped terrace below. To curve the wall I placed every 1x2x3 section in front of or behind the next one at a distance of half a stud. This produced a subtle curve. Each section then has a 2×8 or 2×6 brown plate on top that follows the curve. There are several different variations used to make each 1x2x3 section a unique pattern. (Incidentally, this idea came to me while watching the total eclipse that happened last year—the revelation was my own internal move from darkness to light.)

Next, the river bank and the fields had to be brought together harmoniously. I knew I wanted to use plates to build this part, along with a slope or two thrown in. I experimented with colors and decided to use brown and tan and then highlight with a little dark orange. Luckily for us, LEGO has plates in many shapes and sizes, so a combination can produce a nice rugged effect. Also, they can be attached at various angles, so that there’s no monotony.

Here you can see the landscape around the terraced fields. I used larger green plates for the agricultural/fertile land where I knew I was going to add some farming activity, and dark green plates for untamed, wild growth areas. Reddish brown areas are soil ready for cultivation and dark brown is used more as rugged hillside. Both sections employ a similar concept of lighter plates for refined areas and darker ones for untended land.

Since the rice field terraces were a combination of 1x2x3 bricks plus a 2×6 or 2×8 plate, stacked up one row on top of the other, internal structure became a crucial factor. I added 2×16 plates running front-to-back and wider plates at 90 degrees. The wide plates became the base underlying all the sections on the entire curve. Each 2×6 brown plate is attached to the long horizontal plate underneath it either with a jumper plate or with a 2×2 plate (since the curve is achieved by a jumper plate spacing for the half stud offset).

I finished all the fields, first with shorter ones in front and then taller ones in the back. This completed the basic landscaping aspect of the MOC. Now I started working on the little cottages and other details that bring life into a MOC.

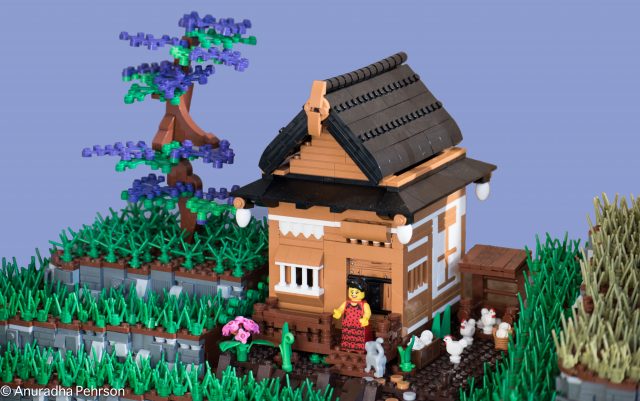
This was the fun part, building the cottages. I played with several designs and for each of them came up with unique wall patterns roofs, and railings, along with interesting windows. I got plenty of inspiration from all the fantastic builders on Flickr, MOCpages, and other websites.
 Back in 2005, I went for my first Sealug (Seattle LEGO Users Group) meeting with a small build of a house with a little water well in the backyard and a flowering tree. People at the meeting were excited to see the tree. I was told that this technique for tree building had never been done before, and they showed me how to post about it on Lugnet and post pictures on Brickshelf, two popular LEGO websites at the time.
The design has been used so many times since then, but I still hadn’t used it on a large scale. This MOC gave me the opportunity to do so, and several of the trees in this creation use that technique. The white tree seen here is the original cherry tree I built in 2005, which I now use as a signature for all my creations.

This picture is taken at BrickCon 2018 where the model was first displayed. The medium dark flesh cottage and the dark orange one in the center are right next to each other. However, while traveling back from BrickCon the internal structure of the two baseplates at the back completely collapsed. I rebuilt it and took the opportunity to change the design a bit.

This is version two, the current version. I’ve spaced out the cottages a bit and added a few more rice fields. Visually, I prefer this to the original version. A MOC becomes interesting to us for many reasons; subject matter, techniques, and color, among other things. I usually try to push the boundaries for good techniques, but interesting color combinations are important too. After all, color is one of the first things that catches the eye.

The finished creation
I’ve added a lot of activity to the MOC. People are working hard on the farms, Kendo fighters practicing, someone is fishing, someone is napping, and Master Wu is teaching his Ninjas.
Here Kendo fighters practice their art. One of the things I enjoyed most was building the stone pathway. It’s a very simple usage of tiles and plates but adding the flesh colored tiles felt like a great finishing touch, as the pathway weaves throughout the scene. Adding it felt something like dotting the i’s and crossing the t’s.
 Master Wu has already started the practice session. One Ninja is late; he’s running across the bridge.

The front wall of this building has no floating tiles—it’s all attached together. The window on the side is made with tiles stuck between plates.

Farmer Frank taking a break from the hard work.

I finished the water with clear plates as the top layer and added a few rocks too. This picture shows the finished river bank too.
 The fields are full of busy farmers, and the path leads your eye through the scene.

Thanks for reading, and I hope you enjoyed Master Wu’s Rice Plantation.
Nice work, Anu! I love that you took quality progress photos throughout your build. We tend to take a shapshot here and there, but nothing like this. Your eye for detail really makes this project shine!
Thank You Jester! I hadn’t planned on using the WIP pictures, they were just for my own documentation, but, yes, they came out pretty well and were usable.