LEGO Space Shuttles are a mainstay of the brand’s space themes, with the company having produced well more than a dozen models across a variety of scales, themes, and degrees of accuracy. But there’s something about the iconic design of NASA’s black-and-white reusable space plane that captures our imaginations and keeps drawing us back. The latest set from LEGO is the largest and most detailed yet. 10283 NASA Space Shuttle Discovery has 2,354 pieces and includes both the Discovery orbiter and the Hubble Space Telescope that Discovery launched on the STS-31 mission in April 1990 (the same year as LEGO’s first Space Shuttle set, 1682 Space Shuttle Launch). LEGO is also celebrating 2021 being the 40th anniversary of the first shuttle flight. The new shuttle set is part of the Creator Expert lineup and will be available starting April 1, retailing for US $199.99 | CAN $269.99 | UK £169.99. Today we’re going to dive in with a full, hands-on review of this massive spaceplane.

The LEGO Group sent The Brothers Brick an early copy of this set for review. Providing TBB with products for review guarantees neither coverage nor positive reviews.
The box and contents
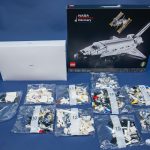
Unpack the hefty box and you’ll find a white inner box and a handful of bags, par for the course with LEGO’s top-end sets these days. The inner box helps the contents stay distributed during shipping, and I’m happy to say that LEGO has finally figured out sorting the bags by number. The inner box contains the instruction manual, sticker sheets, and bag numbers 1-8, while bags 9-17 and the unnumbered oversized parts bag are loose in the main box. Grab the inner box and the unnumbered bag and you’re ready to start building.
A quick word on the 18+ age rating on the box. As we’ve noted on previous reviews of LEGO’s newly branded Creator Expert sets, the 18+ rating is a marketing tactic meant to indicate these sets are targeting adult fans. There’s nothing in the build that a 14-year-old couldn’t accomplish quite handily, or even someone younger if they’re an experienced builder.


The instruction manual has a very brief intro to the shuttle, where it notes that of the five space-flown NASA Space Shuttles, Discovery “flew the most missions, carrying the highest number of passengers, while traveling further and higher than the other orbiters.” It also outlines the LEGO set and its designer Milan Madge, as well as the future of NASA’s space program.


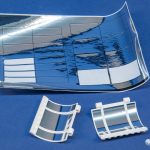
While most of the parts in the set are printed, the sticker sheets are still huge. There are two sticker sheets; one for the huge UCS-style info placards for Discovery and Hubble (you’ll be able to display them together or separately) along with a few small stickers that provide decoration on slopes. LEGO no longer prints on most sloped surfaces, though they used to–which is an oddity I’ll have to delve into another time. The other sheet is vast swath of silver mirrors, which are used to mimic the silver Teflon thermal radiators on the inside of the shuttle payload bay doors. There’s also a double-sided vinyl sheet with punch-out solar panels for Hubble.
 There are lots of exciting LEGO parts in the set. First up, there are three entirely new elements in the set. The most exciting to me is this 3×3 curved corner slope (part 76797), because it opens up a lot of possibilities and fills a long-missing gap in this slope family. There are just two used in the set, where they sit atop the cockpit.

And speaking of the cockpit, the six-stud-wide windscreen is also a new element (part 76796). It’s molded in clear but printed with the shuttle’s distinctive array of six windows.
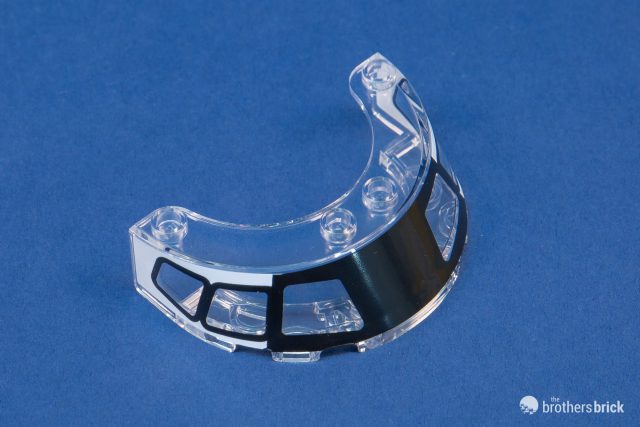
Finally, the large Technic panels that make up the payload bay doors are also a new element (part 76798). The panels are 8 studs long and have the same slope as the classic large 1x6x3 1/3 arch.

A number of elements also appear in new colors in this set. I didn’t scour the parts list exhaustively, but here are some that I picked out. I later noticed, for instance, that the new Technic 1×1 brick with axle hole also comes in black in this set, which is also a new color for it, and the metallic silver 2×2 macaroni tile is pictured with the silver elements below.
 Some other parts aren’t new molds or colors but are thus far pretty rare in these colors.

This set has the motherload of drum-lacquer metallic silver elements, since Hubble’s exterior is almost entirely covered in them, lending it a beautiful metallic sheen that’s not possible with silver plastic such as LEGO’s flat silver color. Only the 2×2 macaroni tile is new in this color, but all together you’ll get 109 pieces in metallic silver, including a whopping 62 of the 2×2 curved slopes. A couple of these bits are used on the shuttle, but nearly all of them are on Hubble.

And of course, we can’t forget about the printed elements, of which there is a pretty generous helping, and about half of them are unique to this set. It is fun seeing some old classics reappear here, such as the light grey 1×2 tiles with three rows of lights, which originated with the first wave of the Star Wars line in 1999, or that white 2×2 slope with the black grille pattern, which debuted in 1986.

The build: Hubble Space Telescope
Whew, we’re finally ready to start on the build itself. Crack open Bag 1, and we’re starting with Hubble so that you’ll have a completed display model to admire while you work on the main course. It’s much bigger than it looks in the box art, as quickly becomes evident once your past the placard and stand introductory steps and start on the satellite itself. The interior is a mishmash of SNOT bricks and brackets to make a core of outward-facing studs.
 Once the core is complete, it’s clad with all of those silver pieces, along with a few small technical greeblies, and the solar panels that unfurl once it’s been launched from the shuttle.


Despite playing second fiddle to Discovery on the box art, Hubble is no throwaway extra. It’s easy to think of satellites as relatively small pieces of equipment, because chances are unless you work in the industry you’ve never seen one up close. But at 43 feet long, Hubble is roughly the size of a schoolbus, and LEGO’s model is appropriately detailed. At 383 pieces (plus another 57 for the stand and info placard) it’s large enough to have justified being sold as as $40 set on its own and it looks magnificent. The silver metallic elements were clearly the correct call for this model. The only way it would have looked better is if the parts had been properly chromed for a truly reflective finish instead of the satin sheen the metallic silver provides, but chrome elements have always been a great deal more expensive and technically challenging for LEGO to produce, which is why the company has moved away from them.
Incidentally, Hubble’s solar panels are the original design that launched with the space telescope in 1990. They were later replaced on a servicing mission by the crew of Columbia in 2002.

The build: Space Shuttle Orbiter Discovery
Like Hubble, the Discovery build kicks off with the info placard and display stand, despite the removable stand not being necessary for the construction process. The stand is a bit more polished looking than many similar stands that have been included in Star Wars UCS sets, featuring a nicely rounded base. It’s not adjustable, but it holds Discovery remarkably firmly, and while it will wobble a bit, there’s no danger of it tipping.

Now, at last, the main affair. We start by laying out the shuttle’s wingspan. Immediately you’ll build the rear landing gear and part of the spring-loaded mechanism that will deploy them. The interior of the shuttle is a multi-colored rainbow to make it easy to keep your place, but it relies most heavily on olive green.
 There are always small details that tickle my fancy, and this little bit to fill the triangular 2×2 gap on the wings is definitely one worth noting as an example of how LEGO’s design sensibilities are evolving. 10 years ago, that gap would have been written off as an inevitable result of LEGO’s limitations. Now, thanks to the triangular 2×2 tile and some simple engineering, it’s rigged in upside down to fill that hole.

Despite this set having over 2,300 pieces, I found the build to move along at quite a rapid clip. I believe the whole build took me only a few hours. The next stop is getting the outline laid down, and with that distinctive silhouette, there’s no mistaking at this point what we’re building. (OK, OK, I guess it could be a Concorde, too.) The leading edges of the wings are lined with strips of slopes to imitate the heat-shielding tiles on the real spacecraft, and the geometry involved in getting it all lined up is truly a marvel. It is deeply satisfying to see it all line up and click into place.
 At this point you’ll also get to see how the landing gear mechanism functions. The center beam of the shuttle is tiled, and has a 2-stud-wide section of plates over it running the vehicle’s length. Pressing the body flap below the engines at the back moves the whole segment, activating all three landing gear at the same time.

Now, clad the whole thing in white tiles, and start building up the fuselage. The lower fuselage is mostly made of inward-facing slopes to create the rounded payload bay floor. Once you get the engines on, you can see the mechanism that operates the control surfaces on the wings via spinning the upper engine.
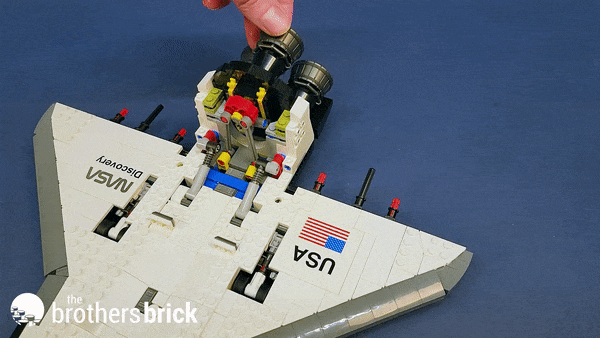
Up front, the mid-deck starts getting some details including a seat for an astronaut which is made with a single blue bracket. Despite this set’s large size, it is not minifigure scale. Its total length of around 69 studs long (55.5 cm or 21.8 in) lands it at just slightly over half the size of a minifigure-scale model, or about 1/67 scale.

Next comes the fun of placing all those stickers that line the interior of the cargo bay. The shuttle’s silver Teflon thermal radiators are a major detail and the model wouldn’t have looked right without them, but they also line the convex surface of a slope. While I’m not a fan of stickers and I found placing all 24 on to be extremely tedious, I do think they were the best solution here, and there’s no discounting the results. (The info placards still ought to be printed on sets like this, though.) Just take your time, use a tool to place them–the back end of a brick separator works great–and try spritzing some window cleaner on the parts before placing them if you’re not sure of your abilities.
 Interestingly, the bay doors are one of the first small inaccuracies on the model. The Space Shuttle actually has four doors, with each side having two independent sections that open. But the LEGO model has locked each side together into a single long door. It’s a change that was likely an intentional decision, since nearly anyone would want all four to open together. It’s also something that could be easily changed for those who want maximum accuracy. You’ll only need to swap out two pieces that straddle the divide on each side and replace them with four very common ones.

Now let’s move on to the cockpit and nose. The nose is a quite complex assortment of SNOT bricks to achieve the correct slopes while leaving room for the cockpit, landing gear, and details such as the nose engine exhausts.
 With the nose and tail finished, we finally have something that looks almost space-worthy. The only pieces remaining are the cockpit and orbital maneuvering engines next to the tail.

Like the nose engines, the orbital maneuvering engines help the shuttle move around in zero G. The nacelles are surprisingly complex, especially if you’ve built any of the previous LEGO space shuttles where they were frequently made of just one or a few elements even on the larger versions.
 The final piece to assemble is the cockpit, which is built as a standalone module and then slotted into place. The cockpit’s consoles use some standard keypad prints which look remarkably good at imitating the 70s computer aesthetic of the highly sophisticated shuttle interior.

The completed model
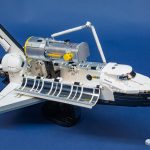
The first thing I have to say is that this model looks pretty darn great. It’s by far the most accurate LEGO Space Shuttle yet, and the combination of the two models together is enough to make any space fan feel a mighty need to have this in their collection.

The shuttle looks great from any angle and the profile is spot on. The large hinges on the side of the payload bay doors are the one thing that stands out as less than great, but the real shuttle’s door hinges are visible too; they’re just smaller and there are more of them.


Even the vehicle’s bottom, which consists nearly entirely of the anti-studs of black plates, looks pretty good. The curved slopes that line the forward edges of the wings are doing the heavy lifting here. Previous versions of the shuttle have employed only stacked plates for the wings, but the slope technique gives a much more polished look.

I’m particularly impressed with the inclusion of the nose thrusters as brick-built details rather than decorated elements. Since the shuttle flies in zero-G, it needs maneuvering engines facing all directions, and that means thrusters in the nose. It’s true the forward-facing nose thrusters should be in sets of three rather than two, but that’s forgivable at this scale, I think.

The cockpit can be accessed by removing the roof, and the mid-deck can be accessed by removing the cockpit module. The two printed windows on the top of the cockpit each have a red DANGER triangle. However, in many images of Discovery, you’ll see only one triangle on the left side. I don’t know exactly when it was changed, but early photos of Discovery–including those of STS-31–show that Discovery originally had one on each side, just like the model. It may be a happy accident since it allows the set to reuse the same part for each side, but it’s a neat piece of trivia that dates the shuttle appropriately to the 1990 mission.


The working functions of the model are top-notch. The body flap below the engines can be adjusted up and down to control pitch during landing (the body flap also protects the engines during reentry). Or push the flap in and the landing gear deploys with a solid, spring-loaded thud.

Once deployed, the landing gear let the shuttle ride in the correct nose-down orientation.

The connected wing control surfaces were a totally unnecessary addition to the model and I wouldn’t have criticized the model if they’d been adjustable the old-fashioned way (by hand, one at a time) but the mechanism is fun and kicks the model up another notch.
 The one working function that leaves a bit to be desired is the control surfaces on the vertical stabilizer. They can move side to side as a rudder or flare outward as speed brakes (both by manually moving them) but they just make the vertical stabilizer look awkward and fat.

Finally, let’s open the cargo bay.

With the solar panels in retracted mode, Hubble fits neatly in the cargo bay (to retract them, pop off the regular panels and add on separate “furled” panel elements). A separate stand is also included to display Hubble being deployed. You can remove a chunk of the satellite’s body to fit the secondary stand in. Incidentally, this removable chunk represents the module added to Hubble in 1993 on STS-61 to correct a minute flaw in the mirrors.
 Together, you can recreate the highlight of STS-31, with the ground-breaking space telescope first being placed into orbit.
 That the set comes with multiple ways to display the models is something that’s sure to delight a lot of buyers. Personally, I think displaying Hubble being deployed is the coolest way, because it’s not something you see frequently. While I prefer the info placards to be attached to the display stands, it makes sense that they’re not in this case, because of that variety of display options. If you’re displaying Hubble being deployed, it would be annoying if the info placard were still attached to Hubble’s independent display base.

Comparisons
I mentioned at the outset that LEGO has produced many shuttles. In fact, in 2003, LEGO even produced a set based on this very mission: 7470 Space Shuttle Discovery-STS-31, which featured the shuttle launching Hubble. Sadly, that set remains on my wishlist rather than in my collection, but I do have a previous version of the shuttle and Hubble in a different scale, from the excellent 2017 set 21312 Women of NASA. These make a beautiful display together.

I also have the most recent large shuttle set, 10213 Shuttle Adventure from 2010 (re-released in 2011 as 10231 Shuttle Expedition). Previously, this was the largest and most detailed LEGO Space Shuttle, and while it was a great model in its time, it definitely shows how far LEGO’s design sensibilities have evolved in just a single decade. Of course, the new set also retails for twice the price and has more than 1,000 additional pieces.

But since we’re on the topic of other shuttles, here’s the new 10283 Discovery next to 10213 Shuttle Adventure, as well as 1995’s 6339 Shuttle Launch Pad orbiter, and the shuttle from 21321 International Space Station from 2020.

Clearly, if you’re a space enthusiast set on displaying all the NASA LEGO kits, you’ll have to be OK with a variety of scales, as the ISS and the new Discovery are in wildly different scales. Nevertheless, they look pretty great together. See also: 21309 NASA Apollo Saturn V (and more).

Conclusion and recommendation
If you’ve been paying attention at all, you’ll know already that I love this set. If I had any significant gripe, it’s that I want more. I want the full booster assembly, and maybe the launch tower too. How about the crawler? At this scale, just adding the boosters would easily make this a $400+ set, but in the age of $300 Ninjago sets, $400 Harry Potter sets, and $800 Star Wars sets, is that really so unrealistic?
All daydreaming aside, though, Discovery is an excellent set that delivers a lot of bang for your buck. I don’t expect many people will be buying it to part it out, but for those who do, the $0.08 per-piece ratio is quite solid, especially for a set that doesn’t have many small, greebly bits. But for most of us, 10283 delivers not just one but two gorgeous renditions of some of mankind’s greatest achievements in space. The shuttle program may have been dogged with issues and budget overruns throughout its 30-year tenure, but it also inspired a generation to get excited about space and science in general. And the Hubble Space Telescope, launched 31 years ago, is still providing some of the coolest science around; as I write this, the latest news from Hubble’s discoveries is just a few days old. It will likely only be surpassed when (if?) the James Webb Space Telescope is launched. LEGO has made an excellent choice to revisit these icons and the incredible STS-31 mission, and the result is beautiful. If you’re a space aficionado, this is one you won’t want to miss.
Creator Expert 10283 NASA Space Shuttle Discovery includes 2,354 pieces and will be available April 1. It will retail for US $199.99 | CAN $269.99 | UK £169.99.
LEGO is also releasing a small Ulysses Space Probe set in conjunction with Discovery, which will be available exclusively to LEGO VIP members for 1,800 VIP points. LEGO has not provided TBB with this set for review, but if they do, we’ll be sure to bring you our thoughts.
The LEGO Group sent The Brothers Brick an early copy of this set for review. Providing TBB with products for review guarantees neither coverage nor positive reviews.
Bonus: even my cat is excited about space now.
 Check out the fully gallery of images below.


Best set of 2021? With nine months left in the year, this is a strong contender – and a definite day-one buy. The 7470 was one of the best sets of my childhood, the 10213 was the first set I bought as an adult, and since then I’ve been trying to collect all the space shuttles. Thanks for the detailed review.
I find the sticker reasoning odd, but I’m glad there are way fewer stickers than I assumed there’d be. I’m curious about the Ulysses set but I haven’t seen any pics floating around yet. No pun intended. Will it be available in lego stores or only online?
I don’t know for sure, but does that 1×1 tile in the cockpit, held by a clip an “illegal” technique? LEGO seemed to stop using that technique in sets for a while
Charles; that technique with the clip and tile seems to have been admitted to the “legal canon” of techniques a few years ago. I’ve seen it in a couple of sets before, and I seem to recall the first set that introduced it was the UCS Helicarrier.
Those clips have gone through a few iterations over the past few years, right? I guess they’ve been reengineered to allow for that connection.