Previously on Tom Servo and Me: Part 1 | Part 2
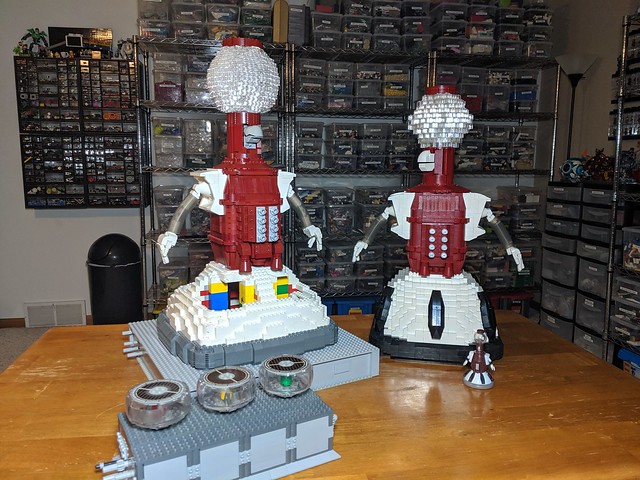
Chris Doyle has been clawing his way out of a grey age, reconnecting with LEGO building by creating a new replica of Tom Servo from Mystery Science Theater 3000. Tom is looking pretty good – his central body is done and he has working puppetry elements. There’s just his hoverskirt and the display base left to go. Should be a quick win!

Or, rather, it should have been a quick win…. Come along with Chris as he journals the final days of this build. Will the end result be worth the effort?
July 24, 2019
Thanks to some vacation time, I’ve been able to dedicate a lot more time to building. I’m leaving for some travel in a few days, and it would be really great to have Tom Servo done before I go. Goals are good things to have.
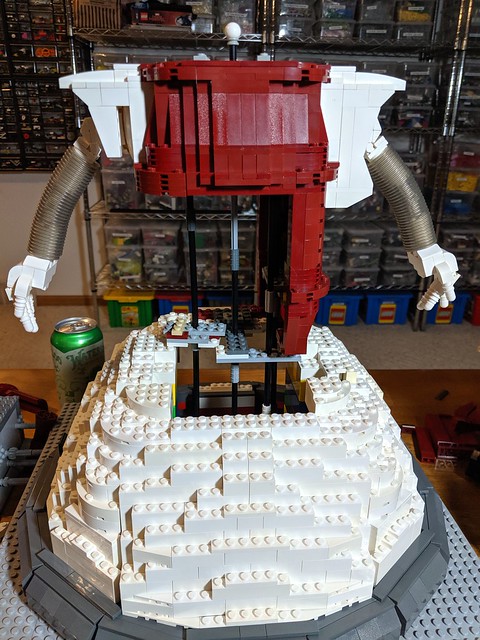
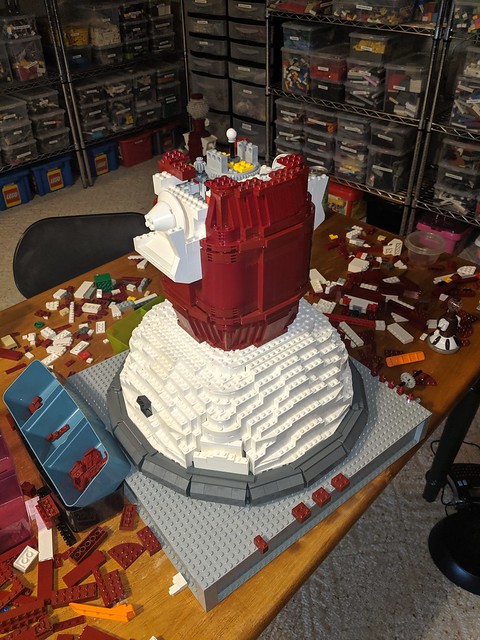
So far today I’ve finished blocking in the base Tom sits on. I was able to hide that broken corner of the baseplate by putting some brick over it. You can still see it if you’re looking for it, but why would you be looking for it? I also put a 2×4 tile in the front for a signature or something. Feels like a bit of hubris to do that, so maybe it’ll just stay blank. I’ve thought about making a Star Wars “Ultimate Collector’s Series” sticker/plaque for Tom, but that feels a bit too much like crossing the streams.
The big hurdle left is Tom’s hoverskirt. In the real puppet, it’s made from an inverted candy bowl with a ring of flex tubing around the rim. The little plastic statue I’ve been using for reference has that ring painted in dark grey, but in reality it’s a speckled-black material. Regardless, I’ve decided to go with dark grey for this version, too. I want a few more obvious differences from Old!Tom. I’m not super happy with the shaping…it’s way too boxy…but I really want to make use of those round corner plates I bought, so I’m pushing ahead with the design for now.

This is another point where I’m thinking my desire to just free-hand this whole project is a very stupid idea. I should really get out a sphere-generation program and follow a plan for this bit. But I want a little more “art” over “craftsmanship”, even if that doesn’t actually make any sense in the context of creating a 1:1 replica.
At the end of the day…
I’ve ripped out the grey ring a couple of times, and have some shaping that is more round-ish. It’s still not great. The arches that connect the base to the torso look pretty good, at least. I’m building them in as modular a manner as I can – I want to replicate the shape on each side to make things look as even and uniform as possible.

We’ll see how much I can get done tomorrow.
July 25, 2019
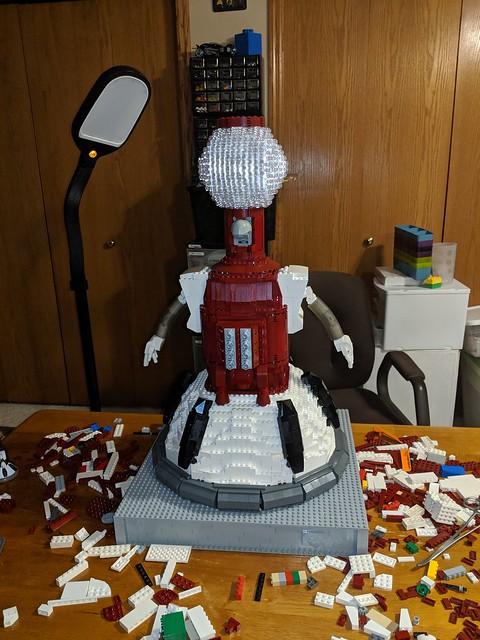
So close, and yet so not. I spent the day building the hoverskirt, hating it, ripping it out, building the skirt, hating it, ripping it out… At the end of the day I had almost closed the gap between the base and the torso. In person it looks pretty good, but in photos you can really see how the skirt is a square and not a circle.
Arrrrgh!
And then my wife asked if I meant to build a square hoverskirt for some reason.
Double arrrgh!
This is going to bug me the whole time I’m gone. On the other hand, maybe a long-ish break from this project will let me come back to it with fresh eyes.
August 14, 2019
Back from traveling, and I have a few days before I’m due back at work. One way or another, Tom is getting finished this week. The hoverskirt has to come out completely, and I think I need to raise Tom up a brick or two to get the general height closer to what I want. These are not trivial challenges, but I think the answer is to rip out as much as I can and start fresh.
Okay, I’ve ripped out all that prior work, and have brought the top of the stand in as close as I can while still leaving access to the gearing. I’ve added another two bricks of height to the vertical run, and things still seem to work okay from the controls. I realized that building the skirt “solid” meant there was no way I was going to be able to get in and fix gearing when/if it breaks, so I’ll have to account for that somehow this time around.

I’ve been at it all day, and have gone though roughly 6 full rip-it-out-and-rebuild cycles. I’m going to bed. Maybe tomorrow will be better.
August 15, 2019
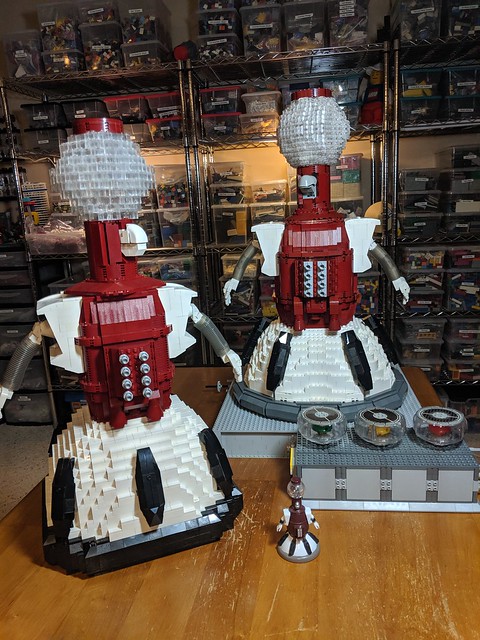
He’s done! He’s done!
I had a breakthrough on how to make the base – I went with eight stud long sections joined by hinged brick. It reads really well as “round” now. The rear quarter of the skirt is even removable to allow access to the interior. Compared to Old!Tom this is such a nice upgrade. Now I just need to finish up detailing on the Mad Lights and take some decent photos. It’s such a relief to be able to step away from this.

August 16, 2019
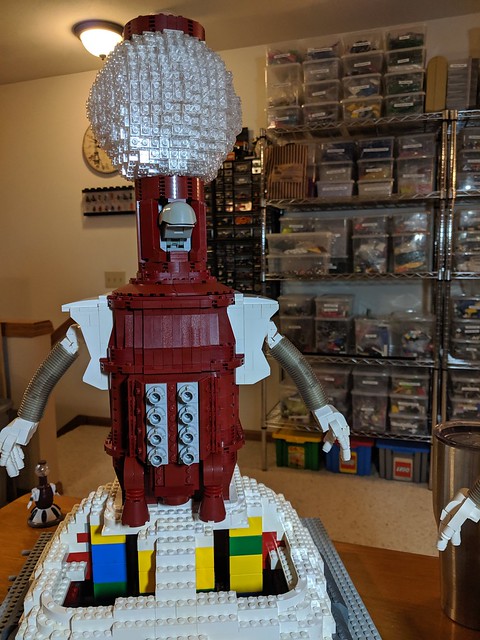
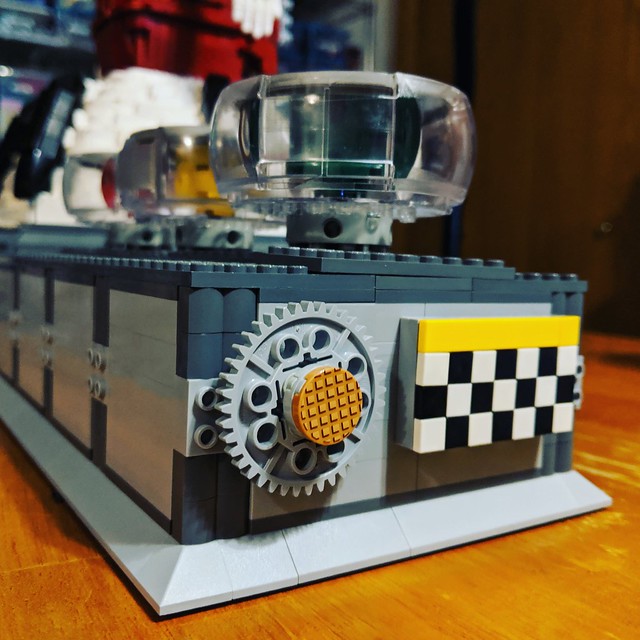
Cleaned up the Mad Light controls today – added a Gizmonic logo, and a waffle tile on the mouth control. I also firmed up the interior of the X-Pods so they wouldn’t fall apart when I was using them.
Of course, now there are a few things that are bugging me about the build. Is it just me or is Tom’s torso just a bit too thin now? The more correct scaling of his head and base are giving the normally husky Tom a Slimfast look. And I think the hoverskirt is probably a brick too tall. Maybe I’ll just do a quick tweak on the chest…I have a little time.
August 19, 2019
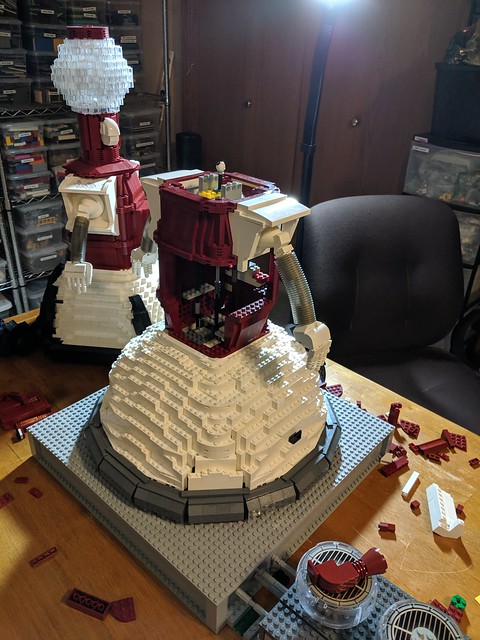
This was a bad, bad idea. Trying to fix the dimensions on Tom’s chest, I’ve basically ripped out all of it. At least I’m not in danger of losing the work I did on the engine block, since it’s removable.

I’m trying to improve the shaping of the barrel to be more round – the hinge solution I found for the skirt won’t scale well for the things I need the torso to do, but I can certainly make it less boxy while I’m revising things. There are bits of the build that should be able to be reused and, luckily, I actually have enough parts on hand in dark red for some tweaks.
Maybe another three hours and then he’ll be done again? Yeah….right.
August 20, 2019
I can’t leave things well enough alone. I decided that while I had Tom’s chest ripped out, I should go ahead and fix the height on the hoverskirt. This is totally screwing up the Technic rod joins I had figured out…and the internal bracing for the rods is just a mess now.
But I’m getting really good at rebuilding Tom from scratch each time. Go me.
August 21, 2019
Tom’s back together. I think the proportions are a lot closer to correct now. He “reads” more like what I see on the TV, anyway.
I think I’m done now.
August 22, 2019
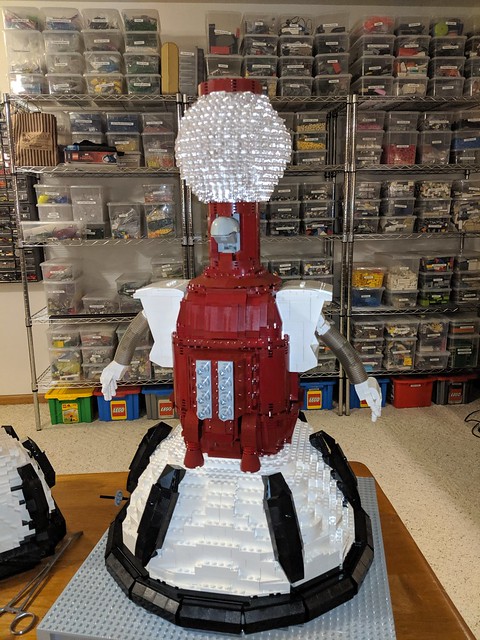
I wasn’t done. From the side, Tom’s chest was way off. I have ripped all of it out…again. But this time I have a solution that may actually survive a few days. I’m rebuilding Tom’s barrel chest from the ground up, working on keeping it “in the round” at all times. That should do the trick.
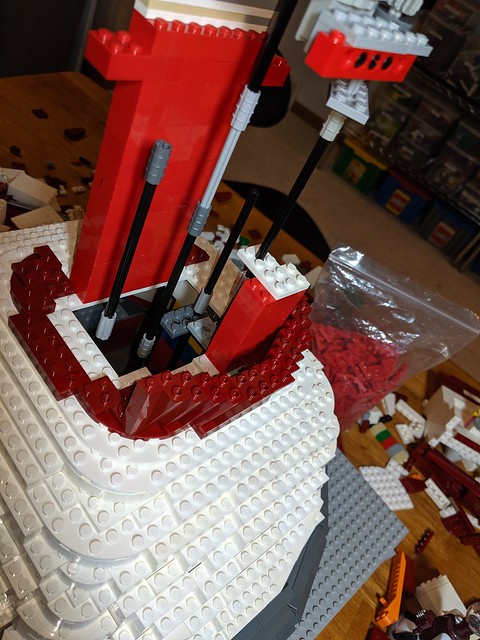
Of course, the problem now is that the slightly wider body has the head sitting poorly. On the plus side, the puppetry rods are really firmly seated this time around. I’m glad I made that access port in the skirt, as I keep dropping bricks into the base. This project is going so totally smoothly that I’m amazed I haven’t been building more often. *sigh*
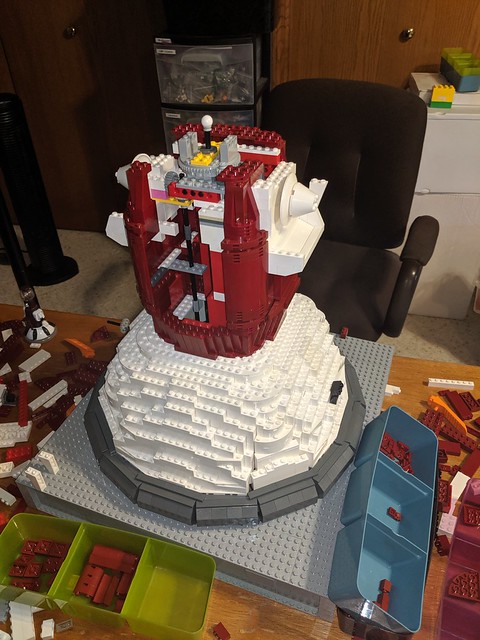
Although I’m kicking myself for not just stopping days ago with a “this is good enough” moment, I have to say the latest tweaks do feel like actual improvements. From the back, Tom is now nice and round in all the right places. Not that anyone is likely to be looking at him from this angle. But I’ll know.
At the end of the day, I think he’s about done. I think I may even mean it this time.
But something still feels a little off. Dang it.
August 23, 2019
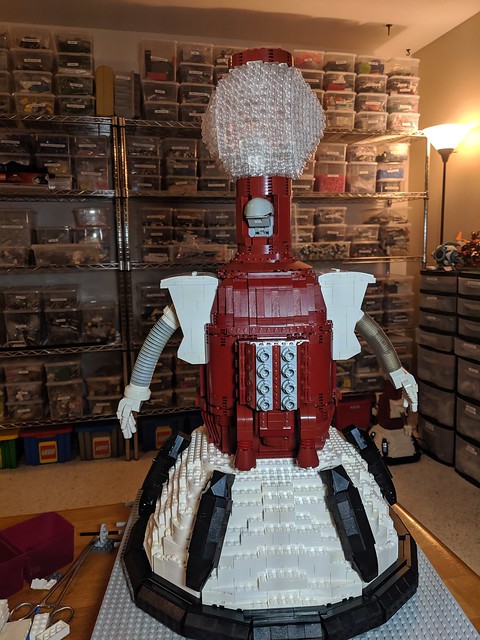
…I changed the hoverskirt ring from dark grey to black. At least that was an easy fix thanks to the hinged construction.
Of course, after taking a photo of the change I realized I could see too much grey in the top of his beak. I have some dark red plate that I could fit in there instead of the grey…that’d look better.
August 24, 2019
Swapped out some brick in Tom’s head, and added back in a few plates of height above the beak. Those subtle tweaks really improved things for me.

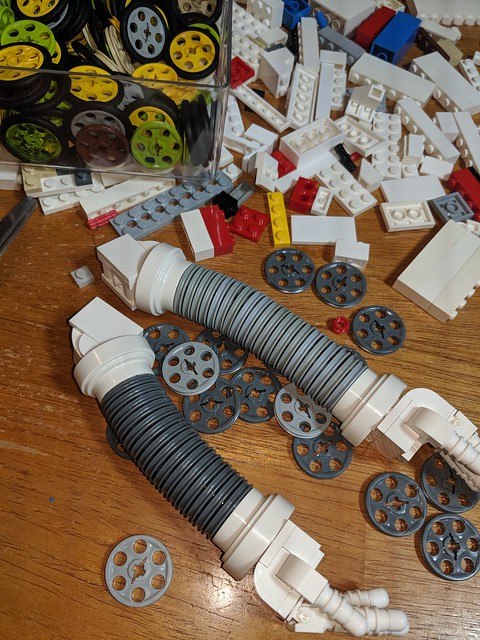
One last tweak, maybe….his arms feel too small with the other increased dimensions. I’ve built a new version that uses a flex tube and a bunch of Technic pulleys to replicate the spring of the real Tom’s arms. I also bulked up the shoulder and wrist connections.

Of course, the new arms are super heavy and harder to turn with the controls, but whatever. It looks better.
August 25, 2019
Yeah, yeah, I know…but one more change. Swapped out the light grey Technic wheels with dark grey ones, and shortened the length a little.
And with that change to the arms…believe it or not…I was actually done with the new Tom Servo! Thank you for coming along with me on this roller-coaster of a build and self-indulgent recapping. I may have been grumpy at times, but finding my way back to building with LEGO was really rewarding for me.
There’s one last article in this series. Continue on with part 4 to see the finished product!
What’s the LEGO version of “frogging” for knitters?
@Dave – I think it’s just “frustrating”.