The LEGO Movie 2’s range of sets has got us excited, not least because of Classic LEGO Space astronauts in multiple colours. But what really set hearts aflutter and pulses racing here at Brothers Brick was the reveal of the massive 70840 Welcome To Apocalypseburg — a shanty town built around a fallen Statue of Liberty, apparently Emmet & Co.’s new home town in the forthcoming film.

70840 Welcome To Apocalypseburg includes 3,178 pieces and 12 minifigures. The set is available now for LEGO VIPs, and is on general release February 1st, 2019 from the LEGO Shop (US $299.99 | CA $399.99 | UK £279.99).
The Packaging
The set comes in a seriously big box. Its front face shows the town of Apocalypseburg under the harsh sun of a desert wasteland, whilst the box’s rear shows the town’s various buildings in close-up, giving a hint to the impressive level of detailing which awaits. There’s also a line-up of the set’s dozen minifigures.

Upon opening, the sheer quantity of bricks inside is not immediately clear as half of the parts bags are packed within another cardboard box, also containing the instruction booklet and sticker sheet. If the internal box is supposed to protect the bags from damage during transit, then it sadly failed. Three of the bags within were punctured and torn, leaving pieces rattling loose inside the cardboard — a hazard, I presume, of having so much weight of LEGO within one package.
Although the bags are numbered from 1-18, many of the bags share the same numbering so there are actually 30 bags of parts. Make no mistake, 3,178 bricks is a LOT of LEGO pieces.

Instruction Booklet
The instruction booklet is a weighty tome — 452 glossy pages covering the 756 instruction steps required to complete the model. Along with the instructions themselves, the booklet contains 5 pages of interviews with the directorial team from the new movie, and with the extensive team of LEGO designers behind the set. It’s an interesting read, although I’d imagine most builders will be keen to get started and will only read the interviews after construction.

The finished model will be large — 19.5 inches tall (despite only including Liberty’s head and shoulders, the model is 2.5 inches taller than the LEGO Architecture version of the full statue on its base). It’s so big, the booklet feels obliged to include tips on how to lift and move the completed town. Hint: Don’t lift it by the Statue’s arm. (Once my build was complete I felt an irresistible compulsion to test this. My experiment ended poorly, and some reconstruction was required.)
There is a double-page spread in the booklet introducing all 12 of the included minifigures, with a short bio, and there’s also a nice breakdown of what the model will look like after each “3 bag” stage of construction. I’d imagine this feature might be appreciated by adults looking to build the set with kids over a period of time — “Tonight we’ll build until we get to this stage.”

As usual, each step of the instructions shows the new parts required, but this booklet also sees them outlined in red where they are added to the model. This is a great initiative, reducing the risk of missing something out or misplacing a part, especially for younger builders.
Sticker Sheet
The sticker sheet is one of the biggest I’ve seen for a while – covered with 55 stickers, each featuring steampunk-y machinery, post-apocalyptic graffiti, or rusty decay detailing. It’s a shame some of the stickers were not replaced with printed parts, but at least there are no really large stickers. Because most of them are reasonably small, sticker-application should go smoothly for all but the clumsiest builders. Further, because Apocalypseburg as a whole has a broken-down-and-beaten-up vibe going on, it’s one of the few LEGO sets where a few squint stickers would likely add to the overall feel rather than detract from it.

The build
The first couple of bags see you create a robust and sturdy base, with a frame of Technic and regular bricks sandwiched between layers of plate. Despite the asymmetrical layout and needing to flip and rotate the model as you build, potential confusion is avoided through the use of different bright colours for internal elements. These “landmark parts” mean it’s always easy to work out where to put the next piece. As ever with a larger set, there are interesting sections included here which prompt curiosity as to what functionality they will enable later in the build. Overall, the construction of the base, usually my least favourite part of a big LEGO set, was actually quite good fun.


Along with the base parts, Bag 1 contains the Emmet minifigure, clad in his classic orange workman’s outfit. He’s also got a cup of takeaway coffee — a nice clue as to what the next phase of building involves.
Apocalypseburg’s coffee shop is the first of the town’s structures you put together. It’s a great start — easily identifiable despite it being furnished with re-purposed petrol pumps and bits of cars. I particularly liked the rat as the prime snacking option on display behind the counter! There are lovely levels of greebly detailing throughout the coffee shop — an early signal of what design delights await through the rest of the construction process.

Appropriately enough, Larry the Barrista is included at this stage. His tattered clothing, spiky shoulder armour, rebreather, and Mohawk hairdo provide a first look at the post-apocalyptic styling undergone by most of the supporting characters in the set.
The Super Secret Police Headquarters is next. Not much of an HQ really, as it’s entirely taken up by a holding cell! I particularly enjoyed the neat techniques involved in the construction of the jail’s curved frontage, and the end result looks great. There’s a cool play feature in the jail making use of some Technic levers you previously hid in the base. If you move a piece of the piping outside the police station, the chair in the cell is thrown across the room — a nice nod to Good Cop / Bad Cop’s chair-tossing antics.

At the end of the second phase of building, you’ve completed the coffee shop and jail, and the modular nature of the set’s buildings is becoming apparent. The upper surfaces feature tiles and only a handful of studs, which will allow the upper floors to detach, allowing for play in the detailed interiors. This functionality is enhanced by the new mold for the the base of the ‘1×4 modified tiles’, enhancing their clutch power, preventing them being pulled off by mistake when the floors above are removed.

The “Bag 3” bags come with Scribble Cop, all set to take over his recently constructed HQ. He comes complete with a dual-molded black and white helmet, and more shoulder armour (clearly this year’s must-have accessory for the fashionable Apocalypseburgian judging by how many of the set’s figures are sporting them).
Next on the building list are structures which look like they’ve been put together from salvaged vehicles — a design theme which will reappear at points throughout the rest of the build. Here we put together a wall section which looks like a bit of a trailer, and then Batman’s gym. The big man does his working out inside a broken-down subway car, and it’s great fun to see it take unmistakable shape. In a nice nod to other famous LEGO locations, the subway car’s destination board says it was originally headed for Brick Square, no less, and there’s a ‘Visit Ninjago City’ advert in there too.

The next phase sees you put together another sturdy base, similar in size and shape to what you built at the beginning. However, there are enough little differences from the earlier one to keep things interesting — including a hidden hatch beneath a manhole cover. On this new base, you work on a central structure which looks as if it’s built from shipping containers. And then there’s another bit of salvaged vehicle design with a big truck put to use as a hot tub bath. It’s impressive how both the original vehicle and its new purpose are immediately obvious — lovely work from the designers and good fun to piece together.

Chainsaw Dave shows up at this point. He’s the new power-tool-wielding version of the first movie’s Surfer Dave, and you get to build him a great broken-down camper-van home. This section includes some nice touches of detail — particularly the curved striping around the van’s windscreen.

And then you’re clicking your two base sections together. It’s an incredibly satisfying moment as you line those clips up and you begin to get a proper idea of the eventual scale the final model will achieve. The finished base is a refreshingly different LEGO structure with a distinctive angular design, and it is a key element in the finished look of the set.

The next phase of the build introduces Post-Apocalypse Batman. Whilst this figure won’t likely have much use in other building themes, he’s definitely at home in Apocalypseburg with his salvage-based outfit complete with car-tyre shoulder pads and tattered cape.
This phase also sees you finally begin to construct some of the town’s iconic centrepiece — the fallen Statue of Liberty. The Technic frame at the heart of the model is extended upwards and the first of many sand green elements are introduced.

There are a couple of notable details in this section — a nicely put-together barbed wire basketball hoop, and the radiator grille from the first movie’s Batmobile used as an air-conditioning unit. The attention to detail that’s gone into Apocalypseburg can be appreciated here – the sticker for the Batmobile’s “Bttitude” license plate is printed on a rusty orange background, rather than the original set’s bright yellow.

Bag 6 introduces Fuse, a warrior with a wrestler’s physique, an eyepatch and biker’s ‘tache, and a graffiti’d welder’s mask. It’s quite the fashion combo.
Some excellent and satisfying Technic framework building awaits as you break through the halfway mark. There’s interesting use of Pythagorean theory to create superstrong right-angled triangles to support the statue. This framework is gradually hidden behind sand green panelling over the next few bags as you build the front and rear walls, and begin to work on the statue’s raised arm. You also start to build out the folds of Liberty’s robes with a collection of curved pieces connected in interesting ways to brackets and sideways studs you placed earlier.

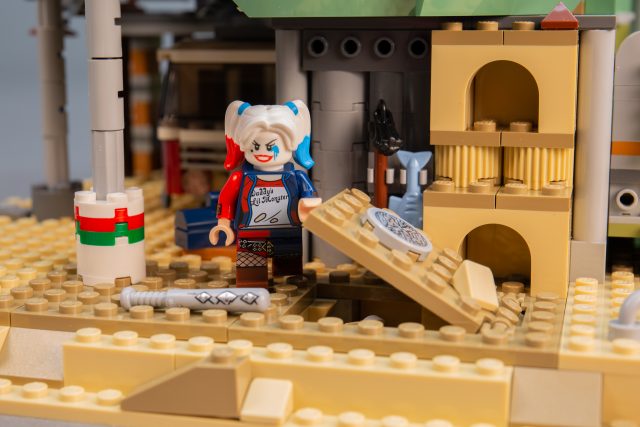
We’ve not had many minifigures for a while, but Harley Quinn shows up in Bag 11, decked out in her Suicide Squad styling and carrying a printed baseball bat. Quite why we’ve got this particular incarnation of Harley is a mystery — maybe we’ll get an explanation in the movie.
There’s a break from all the sand green as the building process shifts temporarily from the fallen statue to the upper floors of the town’s ramshackle structures.
Mo-Hawk is introduced, another Mad Max-esque character sporting a spiky hairdo and brandishing an equally spiky club. She appears to be the proprietor of the armoury/dentist/hairdresser you build next. If this is the primary clothing and makeover store of Apocalypseburg, it may explain the singular appearance of some of the town’s inhabitants. This is a fun area to put together with entertaining details. I particularly like some of the external elements in this section — the twisting pipes, the fencing, and the container doors.

Above the armoury/dentist/hairdresser is another room cobbled together from container and vehicle parts. It sits at a nice off-grid angle via a smart arrangement of turntable parts. It too features a detachable roof ensuring the interiors of all the compartments in the stack can be accessed for play.
And then we’re back to the sand green and the construction of Liberty’s head and crown. Putting together the statue’s face is an absolute treat, with the design a masterpiece of angles and curves built with brackets, clips, upside-down and sideways sections, and — the piece-de-resistance — hot dog sausages for eyebrows. It’s the best part of the build so far — very clever and very satisfying.


By this point we’ve unpacked Lucy, all ready to brood in her lookout bedroom within Liberty’s crown. She’s sporting a rather fetching combined hair and goggles piece, and a cool scarf. And then Where’s My Pants guy shows up to join the fun — right on cue as Lucy’s room includes a Where’s My Pants poster, styled to look like the classic film poster from the original Planet Of The Apes (a cool nod to the inspiration for fallen Liberty).

The hand holding the torch aloft is almost as much fun to build as the head — again we get a brilliant piece of design involving lots of brackets and sideways building. The attention to detail is impressive, with the flame mounted on the torch at a slight angle when it could easily have been fixed straight.
Green Lantern is our final minifigure, included alongside the torch parts. He’s got a cloak and shoulder armour which lend him a meaner aspect than he carried in the first LEGO Movie. However, the goofy smile on his alternative face print doesn’t suggest he’s going to get much more respect in this film than last time around.

Fixing the torch atop the raised arm delivers a genuine sense of accomplishment. It feels like the crowning glory — a completion of the build. It’s a bit of a come-down then to turn to the final two bags of parts, which see you add lookout platforms and ladders to the structure, complete a final section of roofing, and build a sign.
The rooftop snack bar you put together is nicely done — a fun addition to the town’s buildings. But as you complete it, and go around adding small elements of detail here and there, it feels like an anti-climax. It’s a curious design choice — there’s nothing to have stopped these little touches being added previously and having construction finish with the torch. Overall, the final steps are low-key and undermine the sense of achievement — a real shame as the build is otherwise a really enjoyable process.

Parts
There are loads of interesting parts in this set — in some great colours. As you might expect from the scale of the central statue, we get sand green plates, panels, curves, slopes, and tiles galore. A surprising amount and variety of olive green parts also make an appearance in the construction of Liberty — more than you might expect from the pictures. It’s always nice to get more of this relatively rare colour.
If you like building spacey or steampunk creations then you’re in for a treat — the set’s piping and repurposed vehicle sections will provide a plethora of parts for you to fiddle with. And for anyone who wants to dabble further in the post-apocalyptic genre, then you’ll obviously be able to go full Walking Dead with lots of fencing, chains, barbed wire, and spikes — not to mention some of the stickers.
As a general parts pack, the only thing it’s short of is “regular bricks”. For the price you get a great selection of pieces, but if you’re looking to create a LEGO collection, I’d also pick up a medium-sized Creator box of “normal bricks”. With that accompaniment, 70840 would make an excellent (and reasonably cost-effective) start to a significant LEGO collection.
Minifigures

The minifigures in the set are great fun, and will undoubtedly appeal to fans of the LEGO Movies. However, aside from the torsos which might appeal to steampunk and Post-Apocalypse builders, they feel pretty limited in their use in other models or building themes.
Having said that, Post-Apoc Batman is the hero Apocalypseburg deserves, and is an obvious standout amongst the characters.

Conclusion & Recommendation
As a finished model, Apocalypseburg is an excellent LEGO set. It’s impressive in both its scale, and in the detailing which covers every surface. Wherever you look, the model is packed with fun details, functional-looking machinery, and clever constructions that look like repurposed salvage.

Sure, if you don’t “get” the post-apocalyptic town idea then the set appears a bit messy — a jumble of angles, textures, and colours. But that’s sort of the point, and soon as the overall theme clicks into place then fascination and delight will quickly take over.

The set isn’t just a display piece. I reckon kids will love playing with it, exploring its modular buildings, and having fun with the cool minifigures – even more so when they’ve seen the movie and some of the more unusual or weird details and characters are explained. The minifigures are good fun, but I wonder about their reuse beyond LEGO Movie or Post-Apocalypse creations.
I think it’s odd the set doesn’t include a vehicle, even a small simple one. It seems like an easy way to have enhanced play value for kids without introducing much more complexity or cost. However, there are plenty of other features to play with, and it’s an easy thing to add for yourself, with nearly every other set in the LEGO Movie 2 range featuring a vehicle or two.

I find myself with questions as to who this set is aimed at. The price, the complexity, the scale, would all suggest an adult or older teen target, yet the LEGO Movie 2 origin and the emphasis on playability would suggest a primarily younger kid audience. Whilst I’m sure kids who love Emmet and his movie pals would really enjoy this set and play with it for hours, it’s highly unlikely any of them would actually build it for themselves.
Despite this, I’d heartily recommend 70840 to anyone who enjoys the process of LEGO building. It’s an engrossing and entertaining build, packed with interesting techniques and fun details, and the end result is visually-striking and impressive.
70840 Welcome To Apocalypseburg includes 3,178 pieces and 12 minifigures. The set is available now for LEGO VIPs, and is on general release February 1st, 2019 from the LEGO Shop (US $299.99 | CA $399.99 | UK £279.99)
The LEGO Group sent The Brothers Brick a copy of this set for review. Providing TBB with products for review guarantees neither coverage nor positive reviews.


I can’t wait to build this. I just ordered parts for some custom minifigs of Taylor, Nova and their horse. I didn’t realize how much Gorilla Suit Guy was, but I couldn’t have no apes at all.
Thank you for the detailed review and also damn you for it. Now I gotta buy this friggin thing.
Love the cleverness of that hot tub truck. It seems to be a nod to the old Model Team set: 5571-1
One of the trailers had Harley Quinn making a joke that the rescue mission was suicide, hence her incarnation.
Brickset has an interview with the designers. They said WB cast Margot Robbie as Harley, and they kinda felt obligated to slip the Suicide Squad version in. So, I know there’s some back-and-forth between WB and Billund, but I was a bit surprised to learn that the set designers may have had direct input on what the character looks like in the film. It’s a bit sad that they had to give her the kneepad and that odd blue splat on her face.
Harley has that blue “splat” in the Suicide Squad movie. It’s smaller and dirtier, but it’s around her left eye (right if you’re looking at her face). The only difference from the movie is the metal knee pad and brown wrist bands.