Pretty much everyone who hasn’t been living under a rock is acquainted with Nintendo and the Super Mario franchise. Indeed, the little guy and his troupe of friends and enemies are a pop culture icon, and a marriage between LEGO and Nintendo was always inevitable. Whether you’re playing or displaying, there are sets for everyone, even if you’re not a diehard nostalgic fan. The latest addition, Mario’s arch enemy, is certainly no exception. LEGO Super Mario 71411 The Mighty Bowser (which will be available October 1st and retail for US $269.99 | CAN $349.99 | UK £229.99) might just put a smile on the faces of even decidedly uninterested builders. Come with us as we take a closer look at this 2807-piece supervillain.

The LEGO Group provided The Brothers Brick with an early copy of this set for review. Providing TBB with products for review guarantees neither coverage nor positive reviews.
Unboxing the parts and instructions
Unfortunately, the box for this model arrived extremely damaged so it wouldn’t be a good candidate for box shots. The graphics are pretty standard fare anyway. Fortunately, the contents were unharmed. Inside the box are 22 large numbered bags and 1 unnumbered bag with big plates. Without a bunch of small ones, it makes for super straightforward organization.

There is one large instruction manual, which includes several pages of information about King Bowser. It’s actually cool to see that there are a lot more graphics and details about his history other than just the LEGO stuff.


While it seems like this is a set that might include a UCS-style nameplate, it does not. In fact, there are no stickers at all. Instead, we have a few printed parts that we’ll get back to in a bit.
The build
Jumping into the build, we start with the base. In the beginning, it’s fairly unexciting, comprised of lots of plates and bricks. We get a hint of that Bowser flare with 1×1 pyramids studding the edges.


It also contains a hidden slide-out barcode (printed) for the LEGO Super Mario system. It’s nice seeing that thought went into making this a subtle feature, versus the standard Super Mario sets, which are more focused on the gaming aspect.

On just one page, that simple base is transformed into something awesome. The “floor” looks like it has cracked under the flame and weight of the villain.

To complete the ambiance, a pair of pillars are added, topped with fire. Here is where two 2×2 round tiles are printed with Bowser’s insignia and used on the banners.


Finally, a pair of 1×2 bricks with “POW” printed on them are used to create a box hidden beneath one of the pillars. The connection is minimal, so someone playing with Mario could easily “kick” them over.


Now it’s time to work on The Mighty Bowser himself. What’s interesting about this build is that it always has moments that keep you on your toes, wondering what the heck you’re building. It starts right out the gate with a dense section that will ultimately turn into the torso.


A row of Technic beams threaded on an axle conspicuously sits to one side, while a tiled notch becomes a spot for a sliding mechanism. At this point, who knows what this is for? Do take note of how far back those Mixel joints are positioned though.


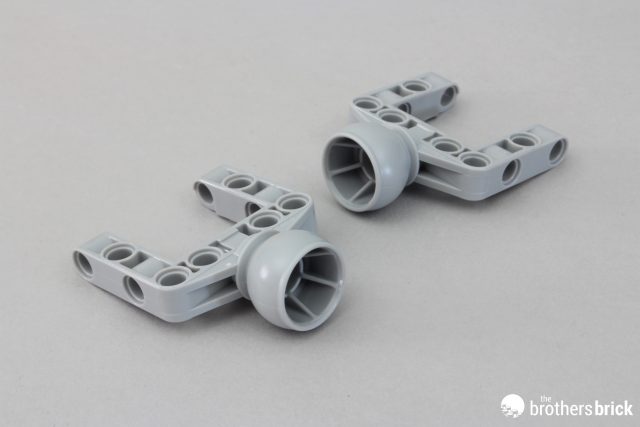
Throughout the build, there is a plethora of cool parts usage. One such part is a set of Technic castors (AKA ball joint receptacles), which ultimately become part of the hips.


Next, we build an odd contraption with a green ring around it. You can begin to surmise that this is likely the neck region, but beyond that, it makes very little sense at the moment.


Once it’s placed on the model, however, it’s slightly more clear. One end of the contraption is what pushes the slide from side to side. Stops on the slide itself prevent the neck from freely turning 360 degrees. The rest of the build is still unclear at this point.


Next, we take a couple of the new large rotational joints and build them into a pair of stud-heavy shoulders.


As we go along, there are a massive amount of SNOT (Studs Not On Top) elements peppering every angle of the model. This ultimately allows for a really smooth, organic, and largely stud-less body shape when it all comes together with the finishing touches.


The model is already quite dense and heavy, despite having a long way to go. For the shell, we make some Technic assemblies to handle all the weight. Color coordination helps you determine which side of the model is which, and where it lines up in the instructions.


Once the supports are on, they are tilted out to the sides so that we can eventually add the shell itself. In the meantime, we also trim out the edges of the shell with white ribs that include 45-degree elbows, new in white.


Taking a break from the shell, we flip him over and complete the belly. Here we use a variety of slopes that are brand new and/or rare in tan at the time of this writing.

From the belly, we flip to the tail. This is a solid sub-build with some funky construction. Remember those deep Mixel joints? That is how far back this assembly connects. Ultimately it not only looks the part perfectly, but it’s also very good at keeping the model stable. This, too, uses new slope elements, this time in yellow.


From the tail, we transition to the legs. The chunky thighs incorporate Technic CV joints to be the counterpart for the hip joints mentioned earlier. Tile and slopes (again, some new in yellow) are added to all sides to complete the shape.


The feet start out very skeletal, with plenty of studs surrounding the base. One of the coolest things about this set is that the connection points are buried deep within each section, making them well-hidden and very strong.

In the case of the legs, angled Technic beams on the lower halves slide deep into holes on the thighs and are secured via axles. The feeling of placing them (with the audible “shunk”) is quite satisfying.

With some more tile, slopes, and toenails, we have thick, strong legs to support the heavy body.


There is actually a fair range of motion to all the joints in the lower half of the body. With the entire thing built (completing the weight distribution), he could probably stand on his legs without the stabilization of his tail. But with it, he is as tough and sturdy as his digital counterpart.


Next, we shift our attention to the opposite end of the beast. Bowser’s head starts off looking very wimpy and weird, but it takes shape fast. At its center sits one of the new mega-shooter elements. It’s now clear that the end of that weird contraption at the beginning of the build process is intended to act as a stopper for the shooter while still being able to rock the head backward.


Printed 2×2 round bricks mounted on turntables give us a bit of character.

Bowser’s trademark mohawk looks a little odd at first, but all finished and coupled with the eyebrows, it looks great. Clips and Mixel joints allow for perfect posing.


Perhaps one of the best use of parts in the build is the snout. This thing couldn’t get any closer to the actual artwork. More new tan elements are used here. But what’s really cool is the use of an ice cream cone inserted into the back of an inverted 1×3 tile with hole to form the tip of the nose.

The result looks fantastic! Around this point, we also add his horns, which incorporate more elbow pieces, new in tan, and Technic disks, new in dark orange.

Bowser’s lower jaw, featuring a cleft chin, is another super-solid structure. It reminds me of the Looney Toons Tasmanian Devil.


At this point, the head is nearly complete and exceptionally expressive. It also has great proportions and is true to character.


To finish the head and neck region, we build a few more add-ons. Namely, his cheeks, collar, and ribbing for the top of the shell. I admire how these elements not only complete the picture but all tie everything together in a structural sense as well. Additionally, they perfectly hide unattractive connection points.


Moving on, it’s time to complete the shell. Here, some nifty uses of click hinges and complimentary shapes comprise an ideal carapace. This includes the use of 3×3 wedges, new in green, inverted radar dishes, new in dark orange, and an entirely new element – a giant tan 3×3 cone. I’ve been wanting to build a huge dragon for a while, and it’s pieces like these that are making that dream more possible.


The center row of scutes (pyramid-like sections) is built flat and then curved to shape before it is connected via the Technic assemblies we built early on. The connection probably looks complicated from an outside view, but it’s actually just mounted to a couple of axle holes.

A pair of mirrored side pieces complete the shell, and the geometry of all this makes me one happy camper. The coverage is quite impressive, with minimal gaps. In fact, the gaps are just perfect for accentuating the individual scutes of the shell.


Finally, it’s time to do the arms. Like the legs and most other sections of the body, the connection points are mostly buried deep within the sub-assemblies. That said, the upper arms, complete with his signature studded cuffs, attach to the hefty joints via somewhat exposed Technic bricks. Ultimately they’re hidden though.


The lower part of the arms gets buried at the elbow, though the click hinges that move them are hidden in the crooks.


The hands bring in yet another 45-degree elbow element recolor for the fingers. The thumb is one of my only gripes with this build, as it seems odd for the thumb connection to be so exposed compared to the rest of the model. We have recolors and hidden connections all over the place, but this seems pretty visible in comparison. That’s especially evident with the joint itself being a dark grey pneumatic piece, set against bright yellow exposed anti-studs. It’d also be cool if the fingers closed to make more of a fist. But this is a very nitpicky gripe. In general, it looks rad as heck and the overall range of movement of the arm is exceptional.


Bowser wouldn’t be Bowser without his ability to spit balls of fire. This is where that shooter and funky internal assembly come into play. The fireball – a new, dual-molded element – rests perfectly on his tongue. A gentle turn of the lever on his side tilts his head back and opens his mouth. Then a sharp turn triggers the shooting mechanism. Unfortunately, this method of operation provides inconsistent results. Sometimes it doesn’t work unless you really torque it hard and fast, and the force with which it shoots isn’t always optimal. The best way to get it to shoot far is to manually tilt his head backward. Then it really flies! To be fair, it is subtly advertised as this being the preferred way to do it.


The range of motion on Bowser’s head is just as impressive as the rest of the model. The GIF below shows the extremes of which it can turn, so it doesn’t go past that point, but in my opinion, this is plenty. The only downside is that, while his head can be rested at any point within this radius, his mouth does not stay open. It returns to the closed position. So no posing with a perpetual roar.

As you do the above-mentioned movements, things are happening in his torso. The only way to have this much freedom while still being strong is for some elements to displace others – meaning part of this mechanism has to be periodically exposed. Fortunately, the designers did a pretty good job of hiding it between the shell and the elbow.

The completed model
As we wrap things up, the end product is glorious. It’s King Bowser through and through, recognizable from a mile away. I really can’t imagine how the designers could’ve done a better job. He’s over 12.5 inches (32cm) tall, heavy, sturdy, and highly expressive. Literally from head to toe, he is picture-perfect and packed with fun features.


There really isn’t much else to say about the completed look, so simply enjoy this 360 GIF of him in all his mighty glory.

Conclusions and recommendations
When I took this set on as a review, I thought it looked really cool, but at first, I wasn’t over-the-moon captivated by it. Once it was in my possession and I saw how large it was, I did get much more interested in its potential, despite the severe damage to the box. (Of course, it’s just like him to ruin it.) But not even a third of the way through, it was entirely game over. The beauty of this model knocked me off my feet and I had a blast. Regardless of being a fan of Super Mario, I think anyone could appreciate it. Plus, for a licensed set, the price really isn’t crazy. In fact, it’s a better value than the Lighthouse, which I recently reviewed as well.

For me, what it comes down to is this: In the world of LEGO sets, most of the time there are things involved that force designers to make compromises or put focus on certain play aspects. While many of the “Adult Oriented” sets are beautiful, I would argue that only a handful truly represent the essence of what’s possible with LEGO. They have the WOW factor. We often call these models “MOC-ish”(My Own Creation) because diehard AFOLs (Adult Fans of LEGO) truly pour their hearts, talents, and bank accounts into every little detail of a MOC. They find creative solutions and use techniques nobody else would think of. I really believe that’s the case with Bowser. Kudos to the designers. And if you’re on the fence, don’t hesitate to pull the trigger on this boss of a build.
LEGO Super Mario 71411 The Mighty Bowser will be available October 1st and retail for US $269.99 | CAN $349.99 | UK £229.99.
The LEGO Group provided The Brothers Brick with an early copy of this set for review. Providing TBB with products for review guarantees neither coverage nor positive reviews.
While you’re here, do check out our other recent reviews and articles about Nintendo and the Super Mario franchise.


Great review! I am not a Mario fan at all, and this kind of set really doesn’t appeal to me, at first. But then, wow! The intricate build, the sense of delight and surprise at how complex shapes are formed ane fit together…that’s what I expect from a big Lego set, and it has me reconsidering getting this just for that build experience.
I wasn’t super wow’ed then this was unveiled but this review really showcases the work and engineering that went into this set that weren’t apparent then. Very cool. Great review!