With the cancellation and controversy around the Technic 42113 Bell-Boeing V-22 Osprey, the Technic Summer 2020 wave has taken a bit of hit. The skies may be empty now, but on the ground, there’s still plenty to talk about. The 42114 Technic 6×6 Volvo Articulated Hauler will be available September 1, 2020 from the LEGO Shop Online for US $249.99 | CAN $319.99 | UK £229.99 It’s part of the “Control+” line, LEGO’s next generation of remote-controlled vehicles. That sounds pretty cool on the surface, but is it really? We take a look at this hefty 2193 piece set from multiple angles to see what sort of “construction” we’re dealing with.

The box and contents
As you’d expect from the $250 US price tag, this set comes in a big box. The graphics are straightforward, with the Volvo posed on some rough ground. There are a couple of warnings that should be heeded: “Batteries not included” is pretty standard, but “Smart device required but not included” probably deserves to be in a bigger font. As we’ll see, they’re not kidding when they say “required.” The back of the box shows the truck in action, along with some details about the Control+ app.

Inside the box, there ten bags with elements grouped for assembly sections 2-4. There’s also a flier for LEGOLAND and a larger white box. Inside that white box are the part bags for section 1, an unnumbered bag, the tires, the 456-page square-bound instruction book, a sticker sheet, and another smaller box. That one contains the electronics for the set.


As the electronics box is packed loose in the larger white box, it can slide around quite a bit. As a result, mine was pretty heavily dinged upon arrival. The contents were fine, though. Inside are three motors (Large, Extra Large, and Large Angular) and a control hub.

The parts
There is a decent smattering of rare parts and recolors in this set. All the electronics are nifty, of course, and the large angular motor has only been seen in the Spike Prime set previously. It appears here for the first time in a grey color scheme.


Parts-hounds will be happy to see a selection of rare Technic panels, including the first appearance of the 3x9x2 wheel arch in grey. The downside is you only get one of them. So, unless you’re willing to buy two (or more) of this set, you’re going to be hitting the aftermarket to complete any mirrored building. Also slightly on the bummer side is the large yellow arch as it has black printing along the rim, limiting its potential for reuse. (I’m somewhat mixed, actually, as applying stickers here would be worse. Probably.) Two other re-colors are the 3x13x2 curved panel in yellow and a solid-orange robot claw.


On the gearing side we get a new differential casing, a rare gear shifter, and clutch assembly last seen in the 42100 Liebherr R 9800 Excavator. (And also concurrently in the cancelled Osprey) There are also a selection of metallic silver elements that just cry out for inclusion in custom models.


The build
I’m new to Technic sets at this scale, so I started out the build by doing a bit of amateurish knolling. This is the assortment of parts that comprise section one – the first 173 steps (109 pages) of the instruction book. There’s a good variety of pieces in enough quantity to inspire other projects. Admittedly, the two cups of connection pins drive up the part count without a lot of added value. Still, I guess that’s a necessary evil.

The age range for this set is “11+”, which is justified by the complexity of the build. The gearing is dense and intricate for the non-mechanically minded folk like me, a fascinating opportunity to try and figure out how things work.


Before too long, that orange gear shifter is in place. Soon, things will be connected to a motor and locked in place, but you can still twist a Technic rod and see things happening at this point. The range of motion is limited by that purple wire clip.

Speaking of motors, the L and XL motors go in starting on page 85. They each get stickers that will be visible in the completed build.


This is the point where I realized I was in way over my head in the mechanics department. I could follow the instructions, and it was still fun to spin gears and watch things move.

At the end of the first section, the bulk of the truck’s rear chassis is complete. It’s at this point where things stop being able to be manipulated directly for the most part. The motors lock things in place, and you can’t just hook up the hub or a battery pack and run them willy-nilly. You don’t have much choice but to pay close attention to the instructions and hope that when you turn things on in the end, it’ll all work somehow. It was nervous going as I knew if I screwed up a step, it would be nigh-impossible to figure out where and what I had done wrong.


The second section’s focus is on the hauler’s cab. Once again, I took the time to lay everything out (somewhat) neatly. There was a decent variety of Technic elements in useful quantities. There were also three more large piles of connection pins to deal with.

The angular motor goes in around page 140/step 221. It turns the whole front cab, while the gear on the top rotates the steering wheel to match. The motor locks most of the gearing in place, so there’s not much in-progress testing that can be done.

The hauler’s cab makes use of that grey wheel arch to form the dashboard. It also has a tilting chair and the steering wheel mentioned above. There’s a small gear-shift sticker that gets applied to the chair’s right, but that’s it for instrumentation. That’s probably for the best, as it’s pretty hard to see into the cab in the completed model. A minimalist approach feels a bit less cluttered.

At the end of the second section, the foundations of the hauler are all in place. There are a few exposed connection points, and the motors aren’t connected to the hub, but there’s very little Technic building left to be done.

Section three is mostly about putting a beautiful finish on the cab section. This batch of parts has a lot more Technic panels and detail elements. I’ve broken out even more X-Pod containers from my personal stash to keep the glut of Technic pins organized.

The control hub for the motors is held upright behind the cab. The build here is a bit iffy – if you have to go in and replace/remove the batteries, it can take some real effort to get things to snap back into place. (It gets even worse when the truck bed gets added later.) This is a bit of a design flaw, as I had to reset my hub a couple of times during testing, and the only way to do that is to take the batteries out. Yellow wire clips help keep things organized between the hub and the truck bed, but inside the cabin, the wires are just wadded behind the chair. It’s not a great look. The orange light on top is part of a knob assembly that presses the on switch on the control hub. That part works pretty well and is much more beautiful than trying to jam your hand in to toggle things directly.

Also, on the positive side is the engine design. When connected to the rest of the build, the yellow bushings become the top of tiny pistons that raise and lower in series as the truck moves around. The detailing around the engine also looks sharp, and each side is built at an unusual angle. The Volvo logo is a sticker, though.


There are more stickers for the serial number and the external vent details. The vent stickers go over surface details on the curved Technic panel, so printing probably wasn’t a workable option for that part regardless. Also, slightly irksome was the orange safety railing. It was a bit fiddly to assemble, although not drive-train-level-fiddly. I mean just regular “LEGO system building fiddly.” The curves look good, though.

The last bit of detail building is the side mirrors. These are made from 2×4 black tiles with a silvery sticker. It’s not a foil print, but they’re glossy enough to work a little. In the detail shot below, you can see the orange of the railing casting a reflection.


Entering the home stretch, it’s time to add the wheels and put the hauler’s bed. There are many sturdy Technic panels in yellow in this batch, which should please builders looking to reuse parts.

There’s not much in the way of exciting techniques in the bed construction. It’s a very sold build, though, and should hold up to a lot of play. There are a few significant gaps between the pieces towards the rear, so filling it up with actual dirt is probably not the best idea. The Volvo logos are all sticker-based.


Page 432/step 687 adds the lift arms, and then it’s just adding the wheels to finish up this model. It’s a hefty beast, and I had a pretty solid sense of accomplishment when I attached that last hubcap in step 691.

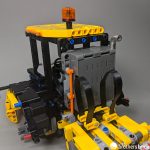
Completed Build
Since this model is based on a real-world vehicle, some comparisons should be made. The general shape looks beautiful to my novice eye, but those more in the know have had a few complaints. The cab is apparently at least a stud too tall, and the bed’s shaping is off as well. My guess is that these were compromises needed to use existing Technic beams and panels, but I’m sure there will be some upgraded fan versions of this build in due time.

There’s also a large amount of exposed gearing and connection points. Not really a “minus” from this angle, as seeing the gearing for the lift-arms spin is kind of mesmerizing.

The hauler’s back looks pretty good, but the taillights are easy to bump and knock out of alignment. It would have been nice had these been fixed in place a bit better. As there’s no functionality to enjoy, there’s also a little too much exposed brick showing at the bottom rear for my taste.


There’s also a lot of exposed parts on the underside. There’s really no good way to see any of this in action, but at least you can look at the complexity.

Play Features
Before I talk about the things this model can do, let’s take a moment and talk about what it can’t. Without the remote control app running on a Bluetooth-enabled smart device, this LEGO model is just that… a model. You can’t roll it around as the wheels are all locked in place. You can’t lift or lower the bed. You can force the cab to turn from side to side, if you don’t mind that worrying whine of an unpowered motor being manipulated unwisely. It’s not a toy you can play with at all, really. It just…sits there. Granted, it looks good doing nothing. But…it still feels wrong somehow.
The main play feature is driving the hauler around – and that works pretty well. The app allows you to play with either automatic or manual transmission. While not fast, it moves along pretty cleanly. The turning radius is the main issue here, as it takes a LOT of space for this thing to corner.
In “display mode,” there is at least one nice feature to share. The engine cover can be raised and propped open using a Technic rod. As I noted earlier, the engine build is pretty sweet, and having a way to show it off is a plus.

You have to have the hood open to see those pistons in action, too. This is another place where it would have been nice to have the hauler be able to be pushed around under human power. This is the sort of detail best viewed in a very short range, pushing the hauler forward and backward. Doing so from the remote control is possible, obviously, but really distances you from the action.

The other play feature is the raising and lowering of the bed. This works really well, and the app has some pretty realistic sound effects to enhance the experience.

As mentioned earlier, the exposed gearing is pretty satisfying to watch. There is a small problem in that the exposed control wires can get smushed when lowering the bed. You can take up some of the extra slack and cram the wires closer to the hub, but that’s not ideal either.

LEGO Technic Control+ App
So I already talked about how you have to have the Control+ App to play with this model. As big of a minus as that requirement is, there’s very little to complain about with the app itself. I was able to get early access, and I’ll take you through a few of the key features. The Control+ app gets a new entry to handle the Volvo, obviously, using the same art as the box to identify things.

After a few setup steps to connect my phone to the control hub, and another couple of minutes of calibration tests, things were ready to go. ( I had to reset things a couple of times, but I think that was mostly due to the firmware in the hub auto-updating.) The main control panel has two views: a “realistic” view of the cab and a more optimized version that makes play a lot more straightforward. As mentioned earlier, the app has some great sound effects. These include engine noise, the horn, and even a “backing up” beep while in reverse gear. You can choose between manual and automatic transmission, shift between three gears, raise and lower the bed, and add a “virtual load” to simulate materials in the bed. Indicators track the wheels’ position and the angle of deflection between the cab and rear of the truck. The vehicle is very responsive to the app, and even the beta version I got to play with was very stable.


There is also a set of “quests” to complete. These step you though basic tasks and help you understand the different things the app and model can do, and add some interest beyond just “here’s the controls.” The press material says there’s “inspirational content” in here somewhere, too. I wasn’t able to figure out what that was supposed to be, other than award badges for finishing quests using as little time and fuel as possible.


The only issue I had was that I skimmed the tutorial and couldn’t figure out how to do a couple of the tasks the quests were asking for. I ended up resetting the app so I could run through it a second time. It would have been nice to have been able to do that without resetting all my progress. But that’s a pretty minor nit overall.
Conclusion and recommendation
I have some real mixed feelings about 42114 Technic 6×6 Volvo Articulated Hauler. From the standpoint of a remote-controlled vehicle that you build yourself, LEGO did a great job here. The construction is intricate and challenging, the control app is put together well, and the remote controls really…remotely…control…things? From a LEGO Technic standpoint, though, I felt a bit let down. Without the app (and a decent charge in the 6-AA batteries you need to supply), this is just a lump of plastic after you finish the build. You can’t even reuse the motors or the hub in your own creations currently. (Unless you’ve have access to the Spike Prime control modules, anyway) And that’s decidedly not fun.

At $250 US for 2,193 pieces, the per-part ratio comes in at just over 11 cents. But considering that around 850 of those parts are just connecting pins, the “real” ratio is closer to 19 cents. Maybe that’s balanced out by the cost of the four electronic components, but that’s up for debate. Anyway, as a parts-pack goes, this is not exactly a sweet deal. There’s also a mixed balance between the printed parts and stickers. It feels like there’s not enough printing for the price, and the parts that are printed end up limiting reuse unnecessarily. Volvo enthusiasts will also have issues with the inaccuracies in shaping, although I don’t think that’ll bother more casual builders.
If you’re looking for a solid remote-control building experience, this feels like a hit. If you’re looking for a standard LEGO Technic model, it feels like a miss. So just be sure you’re looking for the right experience before you pick this one up. I just wish LEGO had made the difference a little more plain on the packaging.
42114 Technic 6×6 Volvo Articulated Hauler will be available September 1, 2020 from the LEGO Shop Online for US $249.99 | CAN $319.99 | UK £229.99. It will also available via third-party sellers on Amazon and eBay.
The LEGO Group sent The Brothers Brick an early copy of this set for review. Providing TBB with products for review guarantees neither coverage nor positive reviews.
Check out our full gallery of images.


That’s a great review. Thank you.
I’m quite disappointed with Lego’s move toward app-based control. That works for now, but once phones change or the app loses support, this set will just be a brick. I’d love to see some kind of standard wireless Lego controller that could be used as an alternative.
I worry all the good technic stuff is going to go app-only, and hence stop working in two or 3 years, or when ever Lego go bored and stop updating the app.
My motors from ~30 years ago still work. Doubt these app things will !
Nice review, thank you. I’ll echo others – I am extremely hesitant to spend money on motors that cannot be integrated into a MOC! What the hell, Lego, have you lost your minds? The whole point of the bricks is building whatever you want, using your imagination and creativity. (And this isn’t even getting to the idea of long-term app support).
“You can’t even reuse the motors or the hub in your own creations currently.”
That’s just not true.
“At $250 US for 2,193 pieces, the per-part ratio comes in at just over 11 cents. But considering that around 850 of those parts are just connecting pins, the “real” ratio is closer to 19 cents. Maybe that’s balanced out by the cost of the four electronic components, but that’s up for debate.”
There are expensive parts and cheap parts. If you remove all the cheap parts from the list the ppr rises – especially if you assume that 850 pins cost $0. Larger Technic sets always contain a lot of pins, but not always that many panels. It’s usually better to remove electronic parts from the calculation (bricklink price maybe) to get a compariable ppr – if someone for whatever reason cares about ppr.
Besides these two points: Nice review with great images. Thanks.