Today we’re pleased to welcome Caleb Watson as a guest contributor to give a special introduction to his latest creation. We’ve featured some of his amazing models in the past such as the iconic ‘I am your Father’ Scene and the opening temple from Raiders of the Lost Ark. His newest model is starkly different from his past works being a chromosomal model designed for a project in his 11th-grade genetics class. He worked on this several-thousand-piece model for about two months and he explains his processes for designing it along with the scientific background behind the project.

The Building of an NF1 Chromosomal Model
By Caleb Watson
It’s no surprise that school is one of the biggest factors in my life that dictates how much time I’m able to build my LEGO models (along with friends, family, and running). As a result of this, I’m always looking for opportunities to integrate LEGO into what I need to do for school, which is how I came to build this model.
Right now, I’m wrapping up my junior year at Ballard High School in Seattle, and along with that, the final year of the three-year Biotechnology career pathway, a set of STEM-focused classes organized in a small cohort that takes biology, chemistry, and genetics. The first-semester project for genetics this year was to write a 9-page research paper covering everything about a genetic disease. I selected the disease Neurofibromatosis because it is quite common yet not well known, and has many interesting and unique attributes. For the second semester and capstone project of the Biotechnology Career Academy, we had to use the information we’d learned in our research papers to create a science project for the Student BioExpo at Shoreline Community College. Seeing the opportunity, I chose molecular modeling with the intent of building a LEGO model for my project.
In order to explain this model, I’ll need to begin with an overview of some simple genetics and the basis of neurofibromatosis. Neurofibromatosis, or NF, represents a fascinating set of three heterogeneous genetic disorders with a complex combination of attributes that make up the disease. It is primarily characterized by neuroectodermal tumors, which are tumors that can appear anywhere on or in the body, along with many other symptoms ranging from completely unnoticeable and benign to malignant and life-threatening. I focused on Neurofibromatosis Type 1, or NF1, because it makes up over 90 percent of all cases of the disease. From my research, I identified three incredibly unique aspects of this disease: there is an extreme range of symptom severity, it has one of the highest spontaneous mutation rates known, and there are over 3,000 distinct point mutations that have been identified that make up the disease.
To represent this in a model, I knew I would need text. This took fruition in putting the letters representing DNA nucleotides A, G, C, & T on two cubes which would rotate in 90° increments with the words “Mutates to” between them to illustrate that there was an abnormal point mutation in the DNA causing the disease. While there are up to 3,000 known mutations possible with the disease, the letters in the model show 12 different single nucleotide mutations that could show up. These letter cubes could be motorized to flip through every sequence of the nucleotides to symbolically represent this aspect of the disease.

Before this, I’d only done lettering once before and my results were difficult and not compact. Recently, however, I built the modular Creator Expert Detective’s Office which used an amazingly simple and elegant lettering solution with clips and bars, which I was able to adapt to my model.

After this, I had to figure out how to get the two lettered cubes to oscillate in 90° increments. This meant using a stepper mechanism to convert continuous rotary motion to controlled shifts. The difficulty here was in order for the two cubes to shift through all the combinations and not show the same letter at the same time, one of them had to rotate three times for every one time the other cube rotated.
This required a double stepper on one side that would shift in 120° increments that attached to a lever, which would then push the normal 90° increment stepper once every three rotations. The key piece to these stepper mechanisms was the Technic knob wheel. I used 10 of these for the various stepper mechanisms.

In my planning, I thought the steppers would be the hardest part, but that was not the case. The steppers were just for the base, but the vital piece of the model would be the chromosomal model on top. The NF1 gene which encodes for the tumor-suppressing gene neurofibromin is located on the long arm of chromosome 17. My model represents the two copies of chromosome 17 (everyone has two copies of each chromosome) with a visual indicator at the approximate site of the NF1 gene. NF1 is autosomal dominant, meaning that to be affected, you only need a mutation on one of your two copies of the chromosome.

To show the connection between each shift in the nucleotide letters in the base of the model, I designed it so that the indicators around the NF1 gene would shift also to show these mutations happening at different places within the gene. The reason this was significant is that the tumor-suppressing protein neurofibromin, for which the NF1 gene encodes, is massive in comparison to other proteins. There are 8,454 nucleotides (A’s, T’s, C’s, & G’s) that encode for the 2,818 amino-acid peptide/protein groups called codons. This incredible size is what causes it to have such a high spontaneous mutation rate, because there are simply more places for the mutation to happen.

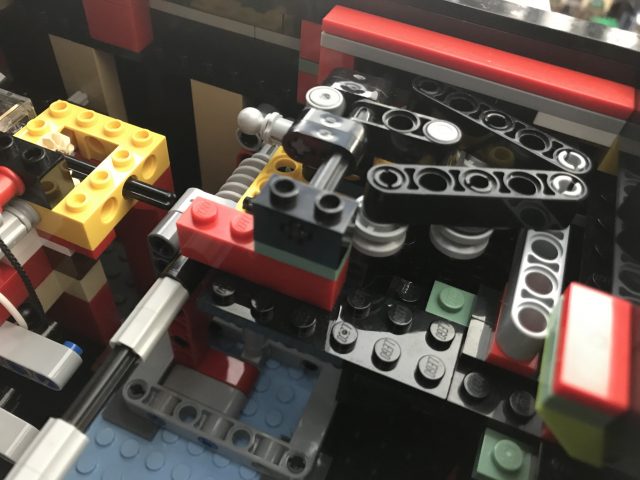
Within the base, I employed the same mechanical principle as a music box, whereby a barrel rotates and knobs sticking out at specific intervals on the sides hit triggers to produce a specific pattern. In this case, the barrel rotates in sync with the lettered cubes and the knobs hit a lever which pulls on a complex pulley system that runs up to a specific indicator in the chromosomal model above.

There were numerous problems to overcome with this aspect of the model. I designed the barrel with a 45° shift in the middle to allow for there to be eight indicators aligning with the studs instead of only four. I liked this design because it takes advantage of the geometry of the new 1×1 bar and pin holder, but it proved to have too little structural integrity. After some experimentation, I ultimately replaced this with a heavier duty design which takes advantage of the anti-studs on the bottom of a 4×4 round brick paired with 1×2 jumpers to create the 45° offset along the barrel’s length.


This ‘music box’ barrel was connected to the rest of the primary drive train and required its own stepper to be in sync with the lettered cubes. In addition, it needed a gear ratio of 1:2 using the 10 to 20 tooth gears. If it connected directly, each turn of the stepper mechanism would produce 90° increments instead of 45°, which consequently would only allow for four outputs around the barrel’s diameter rather than the eight unique outputs I wanted.

However, it was the pulley system which took the longest to figure out. It is a great example of how mechanical solutions can be elegant in theory and less so in execution. In theory, pulleys were a super easy solution to transfer motion from down in the base up into the irregularly shaped chromosome model. In execution, it was difficult to maintain constant tension in the pulleys throughout the system while not producing so much friction that the mechanism would break. One issue of working with LEGO is that it’s all plastic, and plastic bends when stressed. I battled elastic deformation in various pieces of the model where the ABS plastic would flex and absorb a lot of the motion I wanted to transfer. This was in addition to fighting the normal backlash between gears and connecting axles due to the accumulation of small variances in tolerances. I eventually got it to work through a great deal of trial and error of altering the positions of pulleys, the intensity of tension on each lever, and trying to reduce friction throughout the system.
 Thankfully, with previous models I’ve learned that to deal with these complex mechanism, they need to be designed in a way that they can be accessed easily. I designed the entire top to hinge upward using the Technic Rotation Joint Disk pieces (which are one of my favorite hinges) so it is easy to access and repair the mechanism within.

This machine certainly wasn’t the easiest thing I could have built for this project, but it was completely worth it to find another way to tie LEGO into my school work. While I was building this, there were several times on the weekends when my parents found me building and asked why I wasn’t doing homework. It was fun to be able to say that I was, in fact, doing homework. In 8th grade, I designed a LEGO shake table to simulate earthquakes, and tested the structural integrity of different modifications to a standard building template in an earthquake. In my freshman year of high school, I designed a basic gravity-powered impeller to agitate bioluminescent algae. This model significantly trumps either of those science projects in my mind, not only because I enjoy explaining the deeper scientific background for this model, but also because the mechanisms are far more complex.

While I didn’t win anything at the BioExpo for which I created this project, I still feel successful with it because of all the time I put in to figure out how to get the mechanisms I envision to function smoothly. I was also the only person I saw at the BioExpo that had a motorized model. Presenting my model to my peers was also fun because everyone knows I’m an avid LEGO enthusiast which, as you can imagine, has lost a lot of popularity by the time you reach high school. Let’s just say, after presenting this model, people understand I’m not just sitting on the floor building a simple multicolor house. These mechanisms are more complex than anything we learn in the entire curriculum of my four-year engineering class pathway at school. I’m proud of what I pulled off with this model. I found a way to present an incredibly complex genetic disease in the form of an equally complex mechanical model. It was fun to try to figure this out, but with summer right around the corner, I’m looking forward to returning to my usual building genres and styles to prep for my last Brickcon before college.
 Thanks for reading! I hope you enjoyed my model and I hope I’ve given you a greater understanding of some of the science behind it as well.
How is it possible that he didn’t win?