LEGO FORMA is the company’s first foray into crowdfunding. It is described as an “experience designed for adults looking for a fun and engaging way to reconnect with their creative side”. The LEGO FORMA crowdfunding exercise began in late September 2018, and finally shipped in January to UK supporters, with shipments to US supporters following up in mid-February after a brief delay from shipping issues.

During the campaign, the base setup cost $85 USD in the US Market and $88 USD in the UK Market, and included the box set 81000 with the default Koi Skin Pack, and 3 additional separately packaged skins. Fans could also take the less costly option of just getting the base pack (single Koi Skin Model) for $45 USD (US) $46 USD (UK) and additional skins at $15 USD (US) / $16 USD (UK) each. Now that the crowdfunding is completed, if you’re looking to pick one up, the only way currently is to turn to the secondary market such as Bricklink or eBay where they’re already commanding a premium. Let’s do a quick dive into the details of this unique experience from LEGO.
Packaging and Instructions
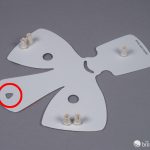
Upon slicing the manufacturing seals, the box material reminds us of the quality used in the Lego IDEAS sets. Inside the box, we get 3 unnumbered bags, an instruction booklet, two pieces of prints of the Koi skins, and a thank you note from the LEGO FORMA team, acknowledging the support of the pilot project on the Indiegogo platform.


As mentioned, the Super Box level of the Indiegogo pledge also comes with 3 additional skins, each of which are packaged with thick cardboard that’s sized similar in width and length to the FORMA box. They are numbered sequentially 81001 for the Shark Skin, 81002 for the Splash Koi Skin, and 81003 for the Ink Koi skin.

The Build
Building the main mechanism is simple and quick. As with any Technic builds, I tend to double or triple check each step as I go along, since from past experience I know that even a slight misalignment can render mechanisms less than perfect and require tedious troubleshooting.

The whole setup, including parts with the crankshaft and gear placements, would eventually remain exposed in the finished build.

The completed mechanism box is encased in two technic 5×7 lift arms with the open center frames. Axle connectors are placed around the edges to attach the base for stability.

The stability brace goes all around the box in white round connectors.

The second layer of the brace is built with a smaller perimeter and at an elevated height.

Four Technic lift arms are then stacked on top of the mechanism. While the gears provide the movement, the angle and placement of these are where all the movement magic happens.

The base build is set aside for a moment while the body frame is put together.


The main bulk of the body is based on the same Technic 5×7 square lift arms used in the base mechanism.

Once the body is completed, the only remaining steps are the placement onto the base, supported by 3 long axles.

Placing the body on the mechanism is tricky, and this particular step needs to be exactly placed as depicted on page 46 of the instruction booklet, as evidenced by this diagram from the manual. Inserting it any other way will render the movement crippled.

At this stage, the build of the base and mechanism is complete. Here’s what the movement looks like before application of the skins. One thing I immediately felt was that the action of the crank is a two-handed action. Because of how light the model is, you’ll need at least two fingers to hold the brace down while the other hand turns the crank. Attempting to do it with one hand is futile and a struggle.

Skin placement
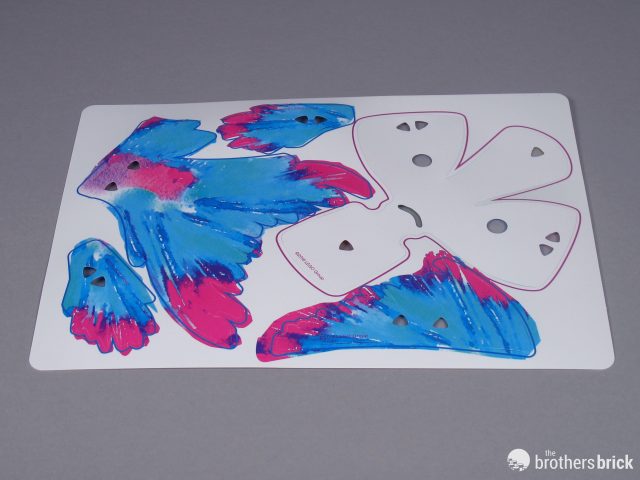
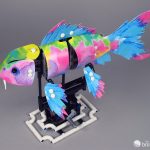
The Koi Skin comes default with the base set. It comes in two sheets that are sturdy yet flexible. While I can’t name the exact type of paper this is printed on, the best description I can give is a balance of high quality flexible and water-splash resistant paper laminated with plastic material. It will crease if you do a hard fold on it. One of the pieces of the sheet is printed on two sides, and the other is only printed on a single side.


The skin sheet contains macro perforations where it allows the skins to be separated from the frame simply by tearing along the dotted lines. The perforation tears do require some careful removal, and the best way I found to do it is to press the parts down onto a table or hard surface and pull up the areas that need to be separated. Some areas do require a tighter tug for release than others, especially curved areas.

I was surprised to discover a new part during the fixture of the skinning process – Technic pins which have a ridge and rounded edge. A quick comparison of other familiar pins side by side is shown below.


The pins are inserted into a rounded triangular hole in the skins. The skin fits in between the ridges and the caps of the pins.

Getting the pins into the rounded triangles can be tricky if you don’t want to damage the skin sheets. I would suggest doing it lightly and with care, and I would give the same advice goes for removing them. The image below shows how they are placed with the image on the left before the pins are pushed in, and on the right, after it’s been depressed in. You can see that the piece of skin has some room to wiggle.

Once they’re all in, the results is quite lovely. The parts where the skin wraps around the eyes of the fish do so with remarkable accuracy, and it’s quite delightful to see the koi come alive in such a satisfying way.

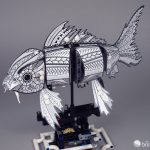
While most of the parts are symmetrical, the dorsal fin will show the exposed mechanism if the Koi is facing to the right, as in the image below.

How accurate is the Koi Fish? I’m a hobbyist of all things LEGO, not a hobbyist of all things fish, so I did some quick research on Koi fish and found that anatomically, the parts are all covered. The pectoral fin (check), ventral fin (check) are present. The caudal (tail) and anal fin are merged together as a single piece (check). But ultimately, as a decorative piece on your desk, it shouldn’t matter too much as long as the basic anatomy and overall look are recognizable.

Here’s the Koi swimming in action, it’s not exactly perfect and the movement is not as smooth, but it gets the job done.

Now let’s take a look at the other 3 skin packs individually and see how they compare with the default skin.
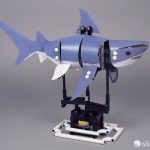
81001 Shark Skin
I was personally delighted to see the Shark Skin as an alternative look and wondered how it would eventually look up close in its final form.

Unwrapping the alternative skin pack, it was a surprise to see a packet of more of the new Technic pins, along with an instruction booklet.

Though the Shark is based on the same frame, there’s a slight difference in the placement of the headpiece and the fins, thus the cutouts and templates for the shark are different. Once again though, the skin consists of 2 sheets with 3 printed sides.


The pelvic and pectoral fins are reversed in direction, so a slight modification to the underlying model is required.


These are the 4 parts that will need to be reversed in direction for the shark fins to be attached as per the instructions. Not a difficult task, but easy to miss if you don’t pay attention to the details on the instructions.

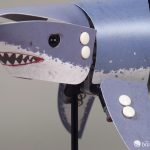
The headpiece of the shark skin requires a tighter fit and a little more struggle to get it affixed.

As much as I had initial excitement when I first saw the release of the shark skin, the final result left me a little less enthusiastic. The color scheme isn’t very exciting, and perhaps I missed the mystery of the movement, which I’d already discovered with the application of the first Koi Skin placement.


The Shark in its animated form is as expected, somewhere between menacing and a tinge of cuteness.

81002 Splash Koi Skin
The splash koi skin is a unique take on bringing a different feel to the same build of the Koi.

It comes with the same formula of 2 skin leaflets and a pack of special Technic pins.


While it wasn’t my favorite during the support phase of the Indiegogo campaign, seeing the colors in front of me made it my instant favorite of the lot.


The colors of the Splash Koi skins are vivid and come alive right in front of you. Of the 4 skins included with the set, this is the most eye-catching.

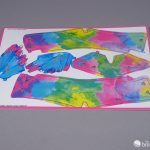
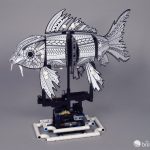
81003 Ink Koi Skin
The final skin that was made for this kit is the Inked version. As a simple black-and-white pattern, it’s intended as a blank coloring pattern for you to create your own custom skin colors. However, it reminds me of Maori-like designs and finishing patterns, so I left it as is. 
Once again, by simply providing a couple of sheets of prints, the overall look and feel of the Forma kit is transformed. As with the other skin packs, it comes with the instruction set and additional Technic pins.

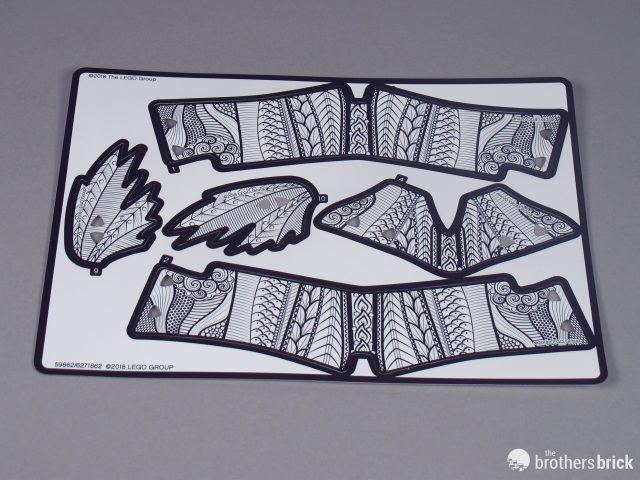


This skin provides a unique art piece that melds in closer to the overall colors of the Technic frame, which is mostly black and white.


The Ink Skin Koi has its own unique appeal. It’s quite refreshing for a LEGO playset to take a different dimension of activity.

Summary
A company has to constantly innovate and explore new ways of either finding new markets or remaining relevant in current ones. In my view, FORMA is an attempt to step towards both providing something different to the current Adult Fans of LEGO and perhaps enticing new adults to their products. Appealing to the adult market will require bold steps like this, but whether it is a success or not, it’s hard to tell at this point until it’s exposed to a larger audience beyond crowdfunding. With only a few thousand sets sold through Indiegogo, bringing a product like this to store shelves will be the true test.

While I was doing this review, a non-AFOL spotted me cranking the Koi for movement and the first thing they asked was, “Why do you need to crank it manually? Doesn’t it have a motor?” This may be one-off feedback, but perhaps LEGO needs to do more research around this area. As shown by the FORMA team in the early stages of the campaign, and even to current fans, it’s not too difficult to motorize the Koi. But I somehow do feel that for a desk-adorning piece in the office, a design with a motorized experience out of the box is needed. The current cranking method requiring two hands for a decent movement is not acceptable for a classy (and expensive) showpiece. As for the movement itself, the mechanism is not perfect, but it is acceptable for a simple build like this.


On the crowdfunding campaign page, there’s a clear indication that the price for the campaign pledge is a special discounted rate, down from a $109 USD retail price. Does this mean that it will eventually be available at retail? I tried reaching out to the FORMA team but did not get an answer to this, so we’ll just have to wait and stay tuned. At that price, it’s not something that I’d recommend picking up. Even at the current special campaign price, I was a little hesitant at the play value versus price. Having said that, I do think this is a unique experience that fans of LEGO will want to try first hand before actually making a final call, and I do look forward to more experimentation by LEGO in the near future.
Check out our gallery of images:


It’s always nice to see LEGO trying new things, but in the swimming creature game my vote goes to Jason Allemann.
https://www.brothers-brick.com/2019/03/09/a-new-swim-on-lego-creator-set-31088-deep-sea-creatures-video/
man now i wish i went all-in on the skins! i only got the original koi and the shark
@Ricardo Nunes:
I remember watching the video of his first shark built on a modified Forma frame, and I wasn’t impressed with the shark or the movement. Somehow I must have forgotten to watch the video for the new Creator shark (which is one of the best shark models they’ve designed), and I think the movement looks a lot more like a real shark, during the daytime when they’re just cruising around lazily to keep water flowing through the gills. But I’m still glad I bought a second shark skin.