Here at The Brothers Brick, we tend to specialize in certain kinds of news, LEGO creations, and reviews, but thanks to our partnerships with other LEGO websites, we’re able to bring you more kinds of content. Please enjoy this excellent analysis of a unique new part available now in NEXO Knights sets, which originally appeared on New Elementary.
The LEGO® NEXO KNIGHTS™ theme introduced many exciting and useful new elements into the LEGO System in 2016 and this trend continues into 2017. Today we look at a highly unusual piece which is set to take your building into totally new dimensions, literally!

BrickLink are yet to name it and I haven’t discovered TLG’s official name for it but in marketing materials it is referred to as the “Combo NEXO Power shield”. They seem a little unsure of this mouthful of a name though, as the official Nexo Knights page also refers to it as the Combo Shield and Combo Plate. I’ll call it the hexagonal plate (as my other idea, “Nexogon”, is a tad too silly). The part number (a.k.a. Design ID) is 27255 and it comes in one colour, Medium Stone Grey [TLG]/Light Bluish Gray [BL], as Element ID 6173203.

Isn’t it beautiful? Particularly the underside. It comes in the new Nexo Knights pocket money sub-theme called Battle Suits, and I will review the two sets that I bought in a separate post but the main thrust is: these are large shields held by mecha that can treble your fighting powers within the Nexo Knights app. Today, however, let’s see what it can do to your building prowess in reality!
Fittingly, the hexagonal plate embraces three of what I call ‘connection families’ within the LEGO System: studs, 3.18s and Technic holes.

Most obviously, the hexagonal plate has an area of 2×2 studs on three of its edges, with the corresponding anti-studs on the undersides. There is additional space in the centre of the top so that Nexo powers can be attached, which I’ll show in a moment.
The other three edges have a raised, chamfered design with a 3.18mm bar in the middle. Using pieces with clips, you can join hexagonal plates together, as shown here, which is the one used in the supplementary set from this sub-theme, 70372 Combo NEXO Powers.
The centre of the plate has a Technic pin hole. This descends form the underside for a distance equal to the height of two plates, as I will show later.
I won’t examine the Technic connections in detail in this post, as I am no great Technic freak, but let’s see what is possible with the stud and 3.18 connections.
Connecting via studs

As mentioned, the main intended purpose of the hexagonal plate is to host three Nexo powers, which are printed onto transparent pentagonal tiles (Design ID 22385) however I have opted for Medium Stone Grey ones in this photo as it is a lovely effect to see this in monotone, which highlights the chamfered edges of both pieces.
The pentagonal tile was introduced for Nexo Knights last year and has proven extremely popular with builders. You can see some innovative ideas from New Elementary’s Nexo-Classic Space parts festival. It’s great to see this part inspire another new part that is a pleasing extension of the pentagonal tile’s geometry.

A similar effect is achieved using Design ID 3049, the “Slope 45 2 x 1 Double / Inverted” or “attic” slope, which is a shorter piece than the pentagonal tile. This left space for me to use another 45° roof slope (3043) to connect multiple hexagonal plates together. This looks like the beginning of something Blacktron, I think!

Connecting multiple hexagonal plates together is, of course, the very first thing you want to do and six is clearly an ideal number to use. Again, I think the underside is much prettier… or should I say, more industrial. Oh, and a belated Merry Christmas, dear readers!

My next port of call was to examine how the hexagonal plate interacts with wedge pieces. The results were a little frustrating as no angles match perfectly. The 2×4 double wedge plate (51739) is really close but not quite, as you can see below.
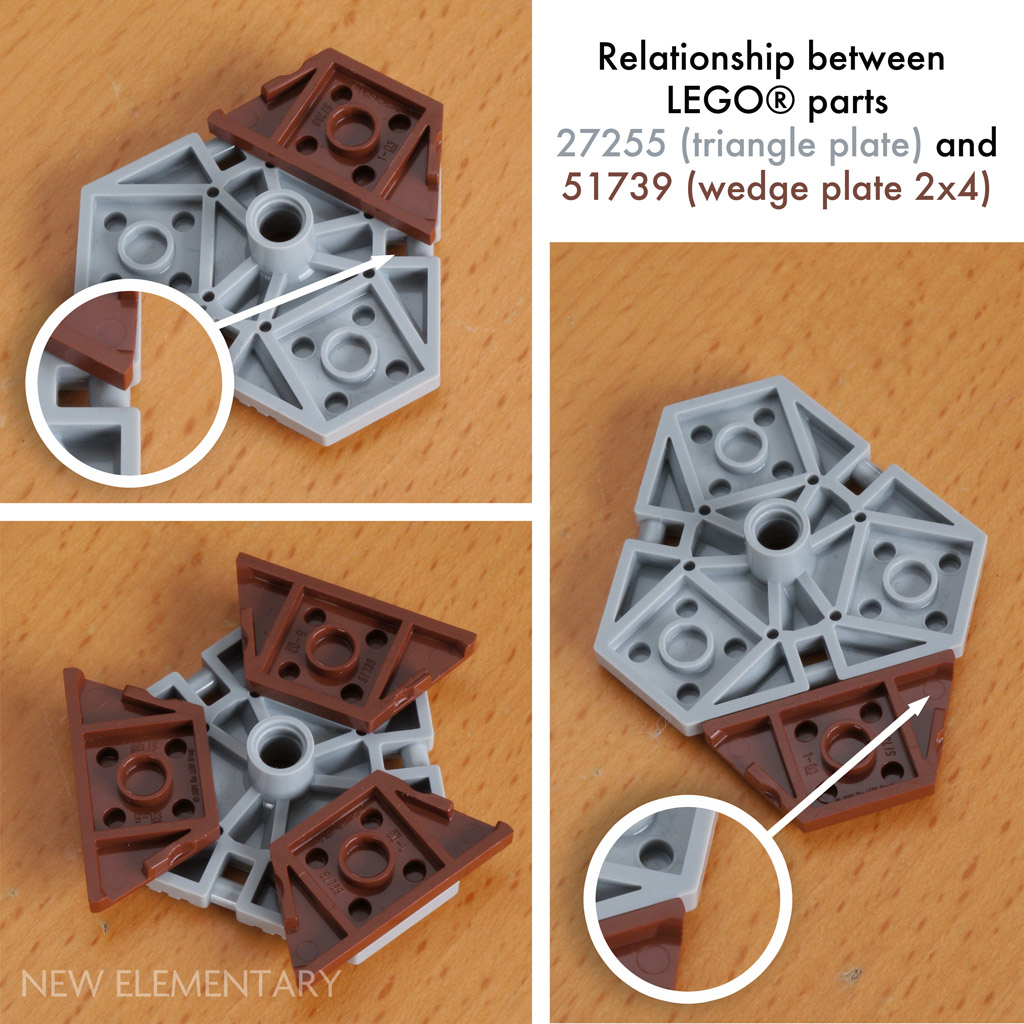
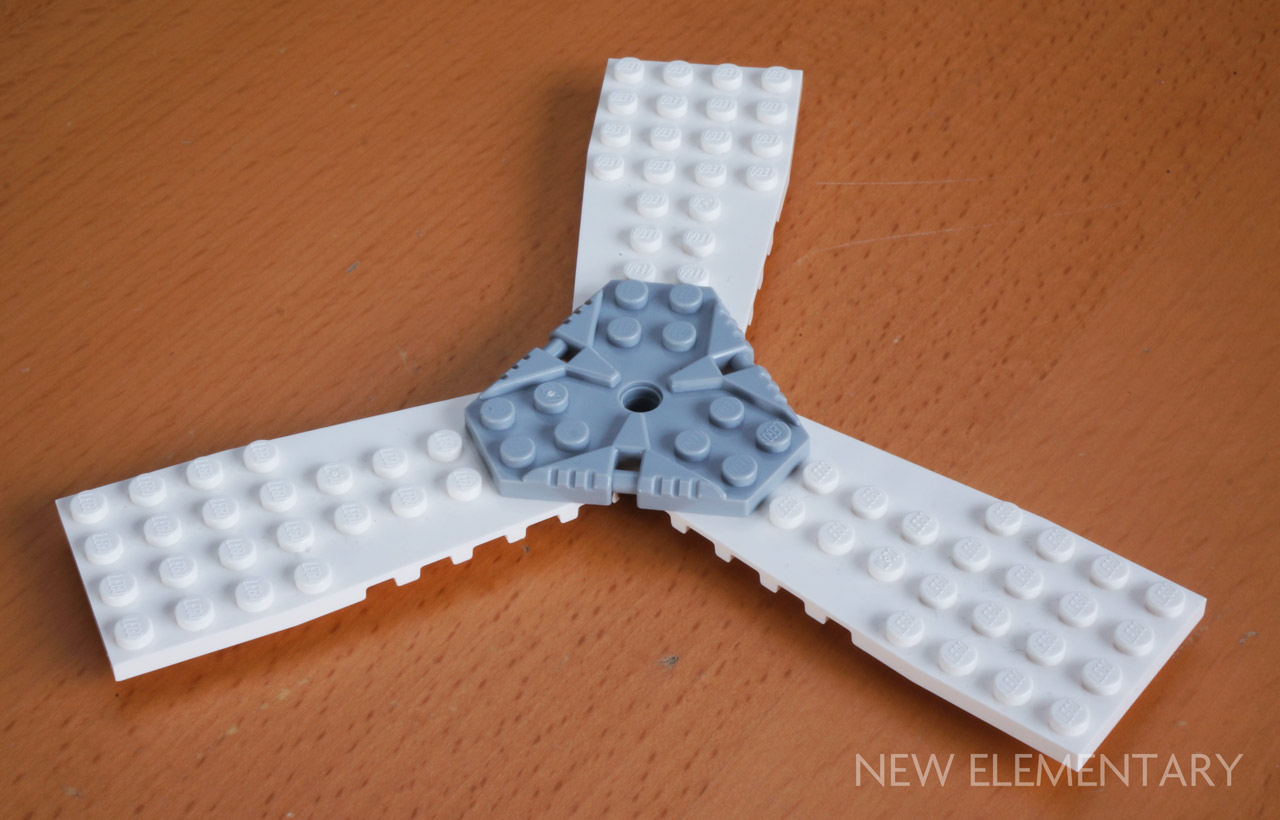
You can’t attach three of these underneath a hexagonal plate as the angled edge is fractionally too long. The nicest effect I achieved was reversing their direction to create the sort-of-nuclear symbol shape shown bottom left of the photos above.
You may have noticed that the underside of the hexagonal plate does not have ‘notches’, presumably because these reduce the aesthetics of an element. When wedge plates first appeared in the 1970s they didn’t have notches but did get them in later iterations of the designs, which improves the functionality of the parts. Without notches, the parts that can be attached underneath a hexagonal plate are limited to those with two studs on the end. An example that may be useful should you wish to expand a hexagonal plate for a larger build is the 4×9 double wedge plate (14189 or the old version without notches 2413), shown below.

Of course you can already achieve triangular or hexagonal structures in LEGO building using hinges, so what fun can you have combining hexagonal plates and hinges? Here are a couple of ideas.
As mentioned, the descending section of the Technic hole is the height of two plates, so you can stack hexagon plates either by putting two plates in between them (as shown below) or simply connecting with a Technic pin, which would provide the additional possibility of rotation.

I think it looks like a microscale Brutalist car park!
Connecting via bars

Roadsigns proved very pleasing and I combined the three square ones with three 2×2 tiles.
This worked even better when combining round roadsigns and round 2×2 tiles, shown here in White: a perfect fit and the tops of the roadsigns and tiles all end up at the same level too!
Triangular roadsigns were, surprisingly, less satisfying as the position of the clip means they can’t point into the centre of the hexagonal plate. Using just two, aligned in different directions, could be useful though.

I won’t show you all the clipped parts I tried but believe me there is a lot of fun to be had trying them out. However I did feel the one above is worth sharing; “Panel 3 x 5 Solar/Clip-On/Deltoid” (Design ID 30034) from the Exploriens theme in 1996. Despite being hexagonal its geometry isn’t especially compatible with the hexagonal plate but they undoubtedly look beautiful when combined, and very Spacey indeed.

As mentioned, the 70372 Combo NEXO Powers set comes with pieces to connect hexagonal plates together using plates with clips, tiles and boat studs. Quickly you can imagine interesting Spacey flooring or walkways.

Again, connecting six together is satisfying and beautiful. Widening the connecting sections to four studs creates a dodecagonal hole.

I was surprised that this hole is eight studs in diameter, meaning I was able to add parts to create a tight 8×8 round circle in the middle.
3D LEGO Polyhedra
Let’s move away from two dimensions now, as the hexagonal plate offers thrilling three-dimensional building opportunities.
Building with four Combo Nexo Power Shield triangular plates
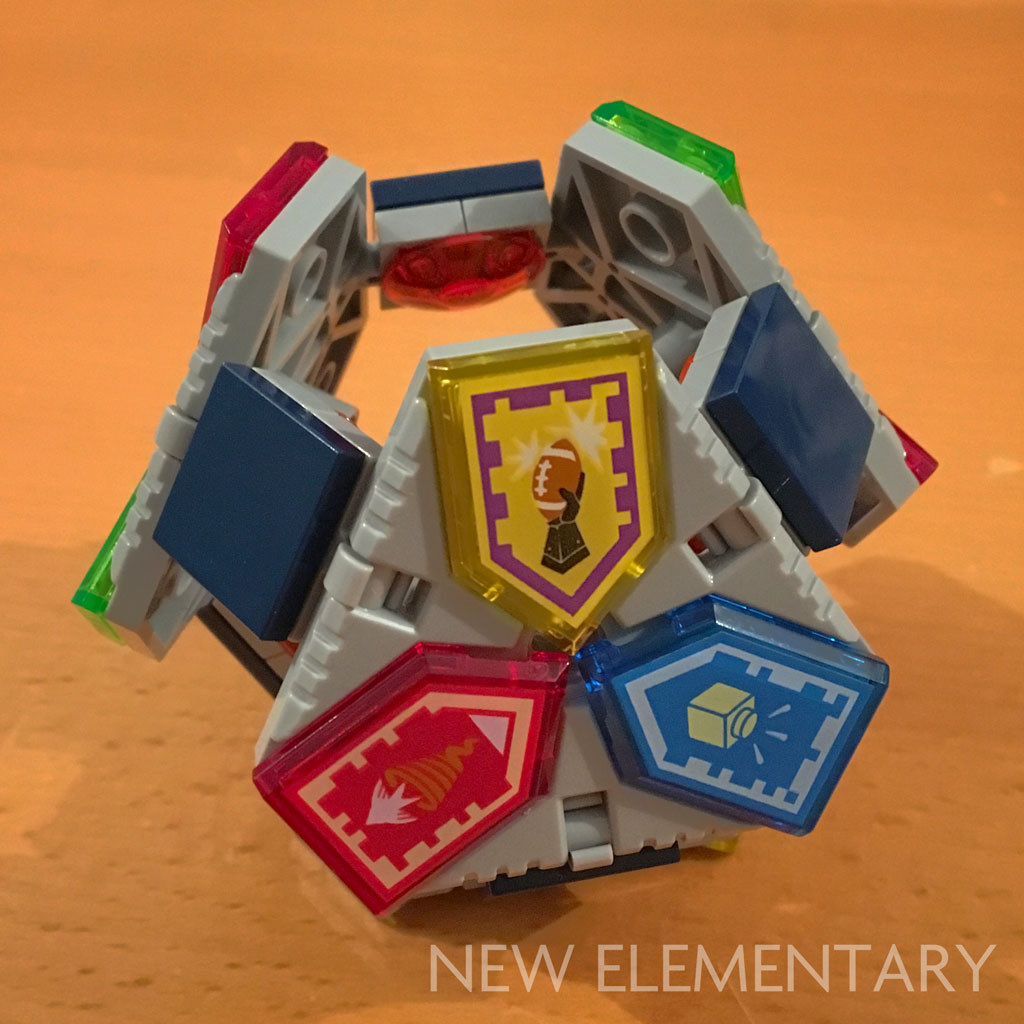
Indeed, 3D building is encouraged by TLG. The leaflet inside 70372 Combo NEXO Powers shows that you can combine multiple copies of this set to create the exciting shape shown here, which I think would be called a truncated octahedron if all its sides were solid. If the connecting sections are 4×4 instead of 2×2, there should be space to attach a further four hexagonal plates in the gaps somehow, but I haven’t tried this yet.
The leaflet states you need six booster packs to build this model; while you only need four of the hexagonal plates, you need six connections between the four plates, for which you need 12 of the 1×2 plates with clip (Design ID 11476) and two are provided in each pack.
You can make some more complex irregular forms with six of the hexagon plates however the real fun is when you own eight of them, which is the number I purchased.
Building with eight Combo Nexo Power Shield triangular plates

With eight hexagonal plates I was able to create this shape comprised of hexagons, rectangles and octagons. Filling in the octagonal face proved a little tricky and this clumsy arrangement was my best effort before moving on.
I moved my attentions away from the 3.18 connector and instead used hinges to attach hexagonal plates via stud connections. A bar/clip hinge probably would have been best to use but I have lost my box of these parts! Surprisingly, “click hinges” – which can only be angled at fixed increments of 22.5° – worked out just fine and indeed provided for more stable models, which I was even able to roll like giant Dungeons & Dragons dice.

Again, these represent truncated octahedrons and there are a variety of ways to connect these pieces. The photo above left has the hexagonal plates underneath the hinges whereas above centre they are above the hinges. Above right, all pieces have been reversed to expose those lovely undersides.
In the photos above I have expanded the form by one stud. This brings the shape closer to a perfect cuboctahedron, which I have tried to emphasise by pointing pentagonal tiles outwards. I could not find a way to fill in the ‘square’ faces of any of the above, but surely there is a way — certainly if you keep expanding the form.

And so I kept expanding. You don’t have to expand every edge uniformly; indeed just expanding half of them created this intriguing form. At this distance I found I was able to use the 3.18 bars to connect the gaps by adding clips to eight-long plates (below).

The other faces could be filled in with wedge plates. This is just an initial experiment to inspire you — I am certain the possibilities are just as infinite as your imagination and LEGO!
Further exploration

These five plates are the beginning of a truncated icosidodecahedron, for which I will need 20 hexagonal plates (and to locate my lost bar/clip hinges instead of using click hinges, I suspect). Other more complex and beautiful geometric forms will be possible, as the below image suggests.

And of course you don’t need to stick to ‘solids’ – the hexagonal plate offers any manner of strange and wonderful shapes, as shown above.
Author: Tim Johnson. Copyright: New Elementary
Thanks to Tim and New Elementary for another great in-depth article!
Personally, I feel it takes us closer to Megabloks…!
“I feel it takes us closer to Megabloks…!”
Is this good or bad?
What a great and intriguing read!! The pictures are beautiful!! I applaud your creativity and effort , well done! =)