


A little while ago, Alyse Middleton and I (Chris Doyle) shared the process behind our Wonder Woman LEGO Art mosaic. We didn’t have the time (or parts) to finish our vision then, but as promised we’ve returned to share the completed project – a 48 x 144 stud tribute to Lynda Carter. Consuming over 7000 pieces, (6,912 of them 1×1 round plate/tile), this has the same form-factor as the giant Darth Vader and Iron Man “Ultimate” builds.

Picking up where we left off, the first thing we did was to make a few tweaks to the upper portion of the mosaic. A few plates were swapped out to improve coloring or to make some curves a little less hard-edged. But, in general, we remained pretty pleased with the results we got the first time around. Adding one more row of 16×16 squares to complete her neck and shoulders really improves the stand-alone image. Too bad we didn’t have the parts on hand last time to get things to this stage.

The skin tones in the center of the build were the most challenging portion of this project for us. As we talked about previously, we had a few runs from the LEGO Remix program to work with, but we just didn’t like the hard edges that the software identified in the shading. In the end, almost all of the center section was hand-built. We focused on using large regions of color, and on removing as many 1-stud wide “dividing lines” as feasible.
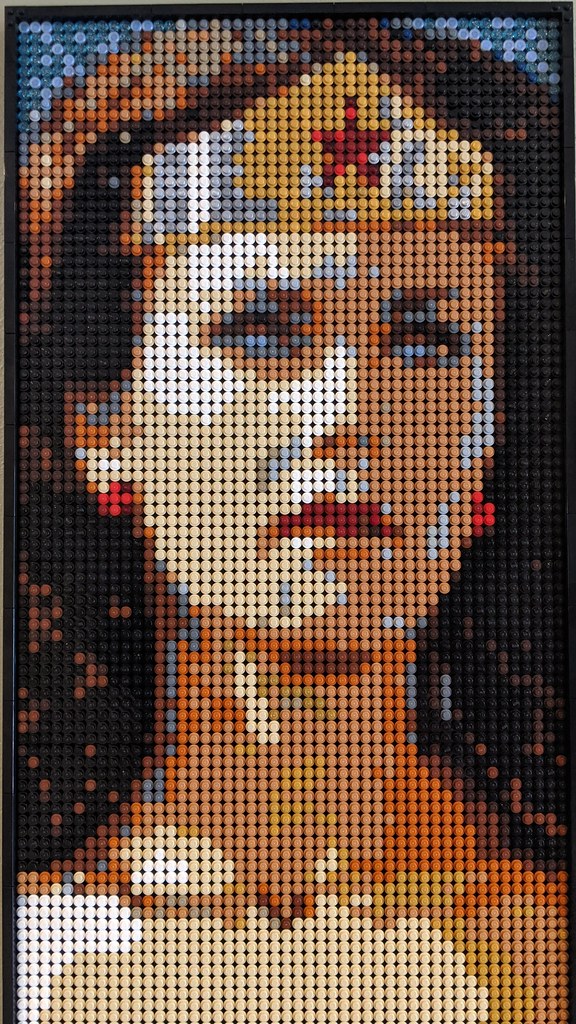

The final section of the build was a solid combination of Remix and hand-crafting. The gold in Wonder Woman’s eagle only needed a few color replacements, but we had to really up the contrast along the top edge to get it to not blend in with her bust. We also added quite a bit of light grey and silver to echo the colors in the tiara and make things read a bit more metallic.
The red of her top was another area where we found we needed to step in – the “fingers” between the gold had to be heavily enhanced with reds. They’re small sections of color, and the gold tones had overwhelmed them in the Remix runs we did. The bottom portion was initially solid red, but we went back in and added details from the source photo to darken it up and and add some needed texture. Luckily we had enough dark red and reddish-brown on hand to not have to order even more parts. This was an expensive enough project already!

All in all, we’re super stoked with the way this turned out. It was a great project to work on, and we’re looking forward to what we can make together in the future. The big lessons we learned were “be ready to try something just to see if it’ll work” and “be ready to rip out large sections that didn’t work the first, second, or third time you tried something.” At least LEGO is a forgiving medium for that sort of iterative work. As Alyse pointed out to me, you don’t get that sort of leeway when you’re making soap or dying fiber. So…yay LEGO!
Hopefully, this project has also inspired some of you to go out and create your own mosaic builds. If you’re looking for ideas, check out our archives for more great creations.
In case you missed it:
Here’s the first part of the creation of the Wonder Woman Portrait journey
Idea to actual: How we made some Wonder Woman LEGO Art [Feature]
Read about the official set review of the Iron Man Mosaic
LEGO Art 31199 Marvel Studios Iron Man mosaic + 7,000-piece Ultimate Build [Review]
Learn how to create your own mosaics
Create your own mosaic masterpiece with Lego Art Remix [Review & Interview]