Four years ago, our Alexander reviewed a thoroughly unusual set: a LEGO shoe. That set was among the first of a big push from LEGO into the world of brand tie-ins targeted at more than just AFOLs, and now, we have some more legendary footwear to contend with. This time, we’re shooting some hoops with LEGO Nike 43008 Nike Dunk! And it’s an altogether different vibe to the Adidas Original. With 1,180 pieces, this snazzy sneaker hits the court on July 1 for US $99.99 | CAN $129.99 | UK £89.99. You may also find it on third-party retail sites like eBay or Amazon. Is LEGO’s latest basketball collab a slam dunk? Or are brick fans about to get skunked? Let’s find out!


The LEGO Group provided The Brothers Brick with an early copy of this set for review. Providing TBB with products for review guarantees neither coverage nor positive reviews.
The box and contents
I like how colourful the box for this set is! The white border reminds me of a jigsaw puzzle for some reason. This is a far cry from the black backgrounds we’ve grown accustomed to.


Some of the features are shown off on the reverse, including the extra laces and spinning basketball. You can also see that this is one of those boxes with a removable lid.

We have two different types of bag inside: 10 plastic ones containing the pieces, and a paper sleeve enclosing the instruction booklets and sticker sheet.


The instructions are of two different types as well. The shoe and basketball (made up from bags 1-3 and 8-10, respectively) get stapled booklets, while the Dunk logo stand has a beefier bound booklet. The printing on the basketball book is noticeably darker than the other two.


The build
As alluded to above, the build is split up into three parts: the shoe, the stand, and the ball. You could feasibly build all three independently. We’ll do it in order though, starting with a layer of plates and bricks. On either end, we have some click hinges and rails that will help us attach the toe and heel later.

Next up is a big old wall of brackets! These span a couple of bags, and by the end we have 5 rows of 2×2 bracket tapering towards the top. They’re gradually covered up by a mix of tiles and jumper plates as we go.


In bag 2, we come across two printed parts that capture some of the Dunk shoe’s finer details. There’s some stitching on the bigger curved slope, while a 6-wide cockpit piece includes the breathing holes on the toe.

The former gets used first on the tongue of the shoe. This has a double joint at the bottom which allows it sit nicely atop the toe.


A bit of heel-and-toe next! Both use very similar construction, with a clip providing a loose connection to the aforementioned click hinges.

The heel makes use of more printed pieces: two symmetrical quarter-circle walls, and a large tile adorned with the Nike and LEGO logos.


Once they clip in, our Dunk is looking a lot more shoe-like.


When it comes to swooshing, I’m more used to it in the context of spaceships, but in this case we get a brick-built Nike swoosh! It’s deceptively simple; the complexity comes from its alignment on the jumper plates on the side of the sneaker. As you can see, both it and the stickered eyelet sub-assembly line up nicely with the heel prints.


It is a bit tricky to find the right connection point for the studs; I’ve tried to show it off as best as possible here. I’m fairly certain there’s only one combination that will work, though, so it’s just a matter of waving it around until you feel it click.

Our final step is to make up the laces, and we have a new element here! This is a combination of the 1x2x2/3 and 1x3x1 curved slope – a useful part indeed. There are 8 of each in blue and , to use its official LEGO nomenclature, spring yellowish green. I’ll call it pastel green for short – we’ll be seeing a lot more of it shortly…

The lace detail is made up with stickers, which are now all used up with the set barely one-third complete. The blue ones go on the shoe for now, with the green ones left in the toe drawer.

The next step is the stand – and while we pull together some SNOT bricks, let’s talk about spring yellowish green. It’s existed since 2012, but has been used sparingly in sets since then; only 12 parts have appeared in more than 10 sets, and the vast majority were locked to one set only. That means that virtually all of the parts included here are either newly recoloured or rare.


After that initial burst of pastel green, we end up with an exclamation mark-shaped base. It doesn’t take long before we start building a wall on it…


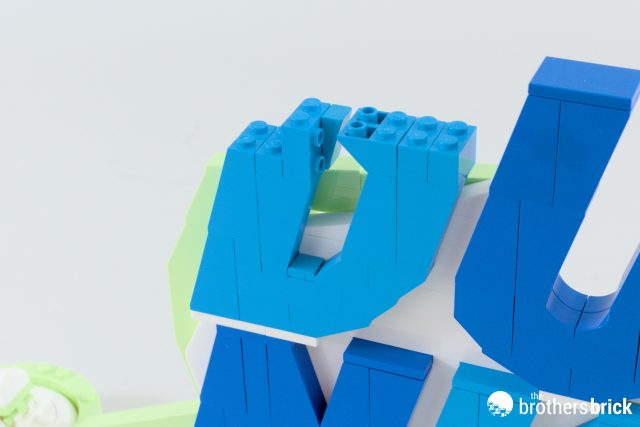
… Or the letters! It’s a good set for fans of medium blue, too, as there are a good number of slopes included to make up the K and D (which comes later).

We alternate between building letters and background as we go. The bottom two letters are one-stud wide, but are still connected at various junctures to the back. Occasionally there will be a rogue sideways slope, but for the most part it’s all very straightforward studs-up building. It creates some nice shapes, though.


It’s starting to get quite tall as we build the now two-stud-wide U, so a light bley pillar lends some additional support. No spoilers, but it doesn’t look like this is going to be a model that can be viewed from behind…


In the last bag (7, for those keeping count), there’s a short break to make the pedestal which the shoe will sit on. That 2×2 plate with bar might well end up being another of these pastel green pieces that’s locked to one set – this is just the fifth colour it’s been made in.


The big D (stop laughing at the back of the class!) is made up in much the same way as the other letters, but it is one of the more parts-intensive. About halfway in, the last of the background gets made up, including a 1×2 brick with Techni pin.


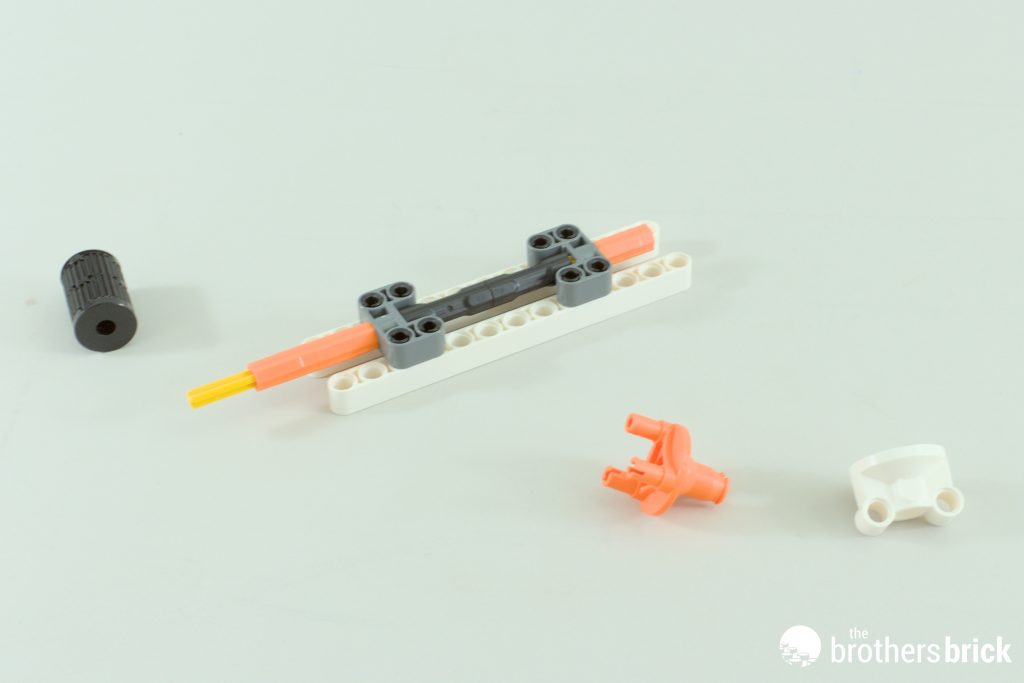
That brick’s use becomes apparent from the remaining parts. This is the actuator which will allow the basketball to spin. I believe the hub elements are new in white and orange. There’s an interesting connection at the top, too, although I use the word ‘connection’ loosely. That black wheel sits snugly between the three Technic pins, but it’s by no means secure – tip it upside down and it will fall out quite readily. It is worth noting though!


All we have left now are a bunch of orange bricks to make the ball. The first step is a mildly complex arrangement of Technic axles. There’s also a slightly random coral pink axle joint in there.


The ball itself is a variation of the so-called Bram sphere. What makes it slightly more unusual is that the faces are all an odd number of studs wide. The middle of the 5 studs is what links to the Technic axles. The first two have some nice shiny logo printing on a curved slope.


It’s a case of same-same but different for the remaining faces, with details changing depending on the layout of the black ribs. The last face, of course, has a gap to allow it to sit on the actuating stand.


It doesn’t bounce particularly well, but if you get the orientation of the axle sticking out right it does roll nicely!


We’ll pull the ball, stand and shoe together shortly to take a look at them as a whole. But first…
The minifigure
… Let’s take a look at this set’s unusual minifigure mascot! This is B’Ball Head, who appears to have been created specifically for this set. They’re kitted out in full Nike drip.


Most impressively, their dual-moulded legs also have printing on the side, showing off their own set of Dunks! I’m amazed how much detail the printers managed to cram into this space. They actually look like the shoes, too.

B’Ball’s head is of course a new mould. Its single stud connection means it can double as a basketball from the right angles – as long as you don’t think it’s too weird to try and dribble your own head.

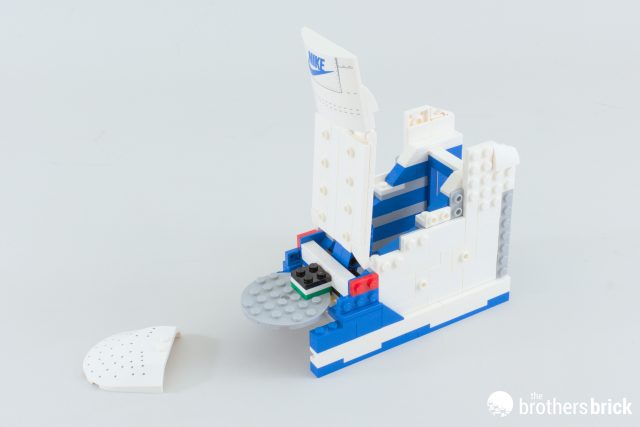
The finished model
It’s quite an eye-catching display piece. Having finished the review I’ve left it built on my desk, and I’m struck by how often I find it catching my gaze.

The same can’t be said of the back, but it’s clearly not intended to be viewed from here. But look at all that glorious pastel green!

The ball spinning function works well, but it’s a bit awkward to get too. You either need to reach up and over or round the side. It is very well concealed, though, and wouldn’t be very difficult to motorise.

Let’s inspect the Dunk sneaker. These shoes were originally introduced in the ’80s for basketball players (no surprises there), but also found favour with the skateboarding community in the ’90s. This is the high-top version, and it looks really rather good!

Unlike LEGO’s previous famous footwear model (that being 10282 Adidas Original), the Dunk is completely studless, which no doubt helps it look as lifelike as it does. The downside is that it is smaller (it’s about a kids’ size 13 in the US). The shoe is the best bit of the set, but it only accounts for about a third of this set’s pieces.

I appreciate that the designers have made it more than just a shoe as well. B’Ball Head (or anything I suppose) can be concealed in the heel, and the drawer contains the laces as we’ve seen. The space under the tongue can also be used for storage, although I neglected to take photos of this. Suffice to say it’s enough for some pens, paperclips or other knick-knacks, but nothing huge.

Although I never owned a pair of Nikes, I did rock a pair of knock-off high-top shoes when I was trying to be a skateboarder as a teenager (it didn’t go very well). But one of the first things I did was swap out the black laces for some neon-blue ones, so I’m very taken by the colour-swapped green laces here! I think I actually prefer it to the regular blue.

Conclusion and recommendation
I have to confess at this point that I am neither a massive basketball fan, nor a sneakerhead, so my opinion on this set may be slightly more lukewarm than anyone in either camp. (If you are in one of those, I’d be interested to hear what you make of this set in the comments.) Compared to the more adult-oriented Adidas Original, this has been clearly designed with a broader appeal – it’s 10+, colourful and has more features to it. But it is still, fundamentally, a display piece, and not a subtle one at that. That’s not necessarily a bad thing, though. Of all the sets I have on display (and there are a few), I’ve found this is the one that catches my eye the most.
My only quibble – and it is a big one – is how unbalanced this set feels. The Nike Dunk that gives the set its name is a very small part of it. The logo makes up most of the set, which doesn’t feel very exciting to me; it feels like your $100 are essentially going towards a Nike storefront advertisement. The saving grace is a good amount of parts for the price, and if you’re a spring yellowish green fan then you will certainly want to find this set somewhere. Otherwise, it’s a perfectly fine set, but it certainly wouldn’t be near the top of my priority list.
LEGO Nike 43008 Nike Dunk contains 1,180 pieces and one minifigure, and will retail for
US $99.99 | CAN $129.99 | UK £89.99 from July 1. It may also be available on third-party retail sites such as eBay or Amazon.
The LEGO Group provided The Brothers Brick with an early copy of this set for review. Providing TBB with products for review guarantees neither coverage nor positive reviews.
Check out our full gallery of pictures: