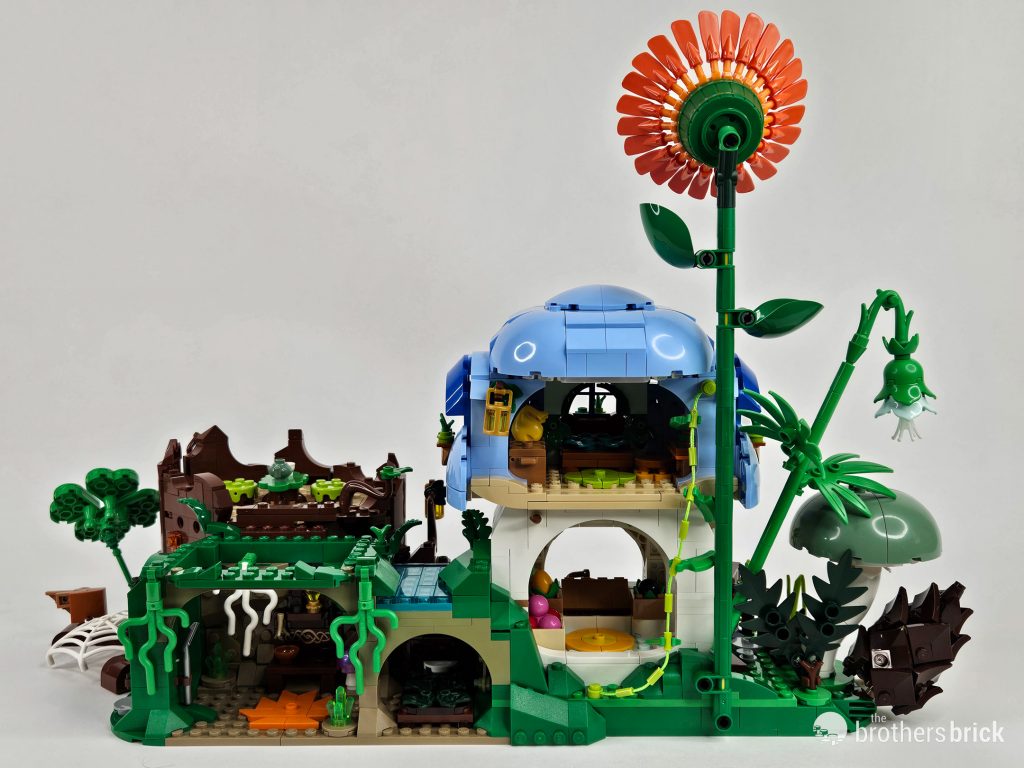
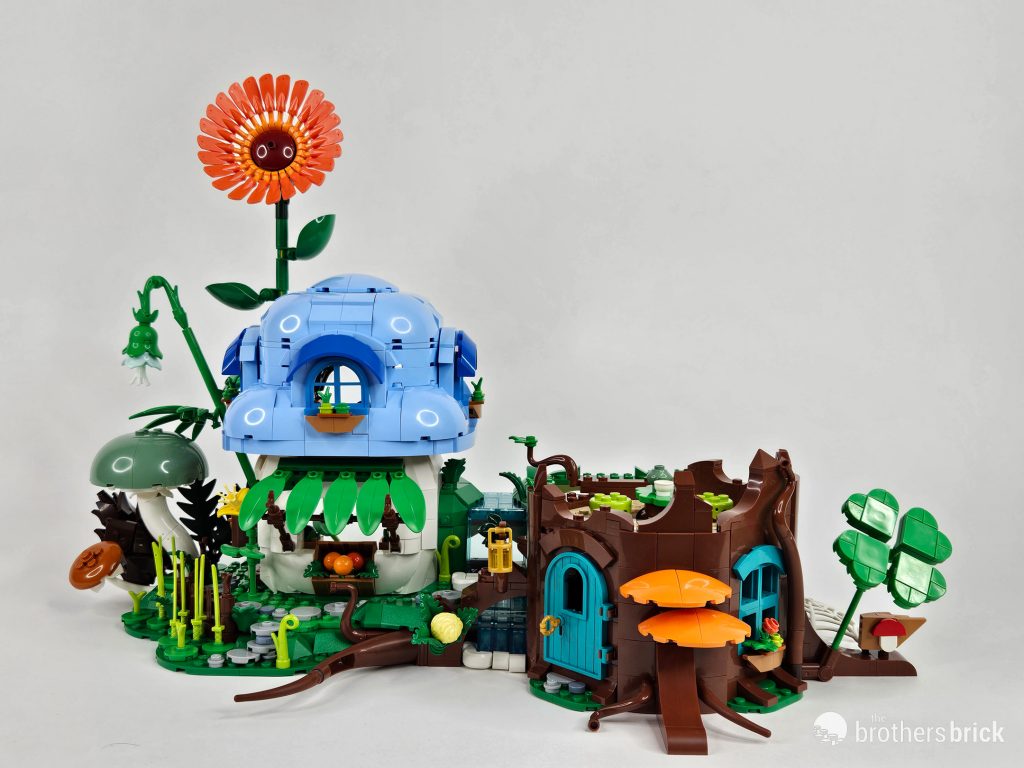
Jonas Kramm is a LEGO builder that comes up frequently in the archives of the Brothers Brick. His revered style covers the gamut of subject matter, but has been focused on a series of creations featuring the Lilliputian denizens of a mushroom kingdom. One of our first forays into this theme (called “Tiny World of Wonders” by its creator) came in Series 2 of the Bricklink Designer Program with the Mushroom House. And this month, we return once again with LEGO Bricklink Designer Program Series 5 – Mushroom Village. Complete with 2,436 parts and 7 minifigures, TBB was able to review a copy of the set before it becomes available for pre-order on June 10th at 08:00 PT. BDP Series 5 – Mushroom Village will retail for $209.99 USD. Read on for our thoughts on this second dance with the mycelium.


LEGO sent The Brothers Brick an early copy of this set for review. Providing TBB with products for review guarantees neither coverage nor positive reviews.
The Build
As there are no final instructions or packaging available so far out from shipping this product, we’ll once again begin this BDP review by hopping straight into the build. And as this is a fairly intricate creation with lots of steps, I thought it best to separate things into subsections. While there can be some bouncing around from time to time, assembly of the model does have an overall flow.
The accessory builds
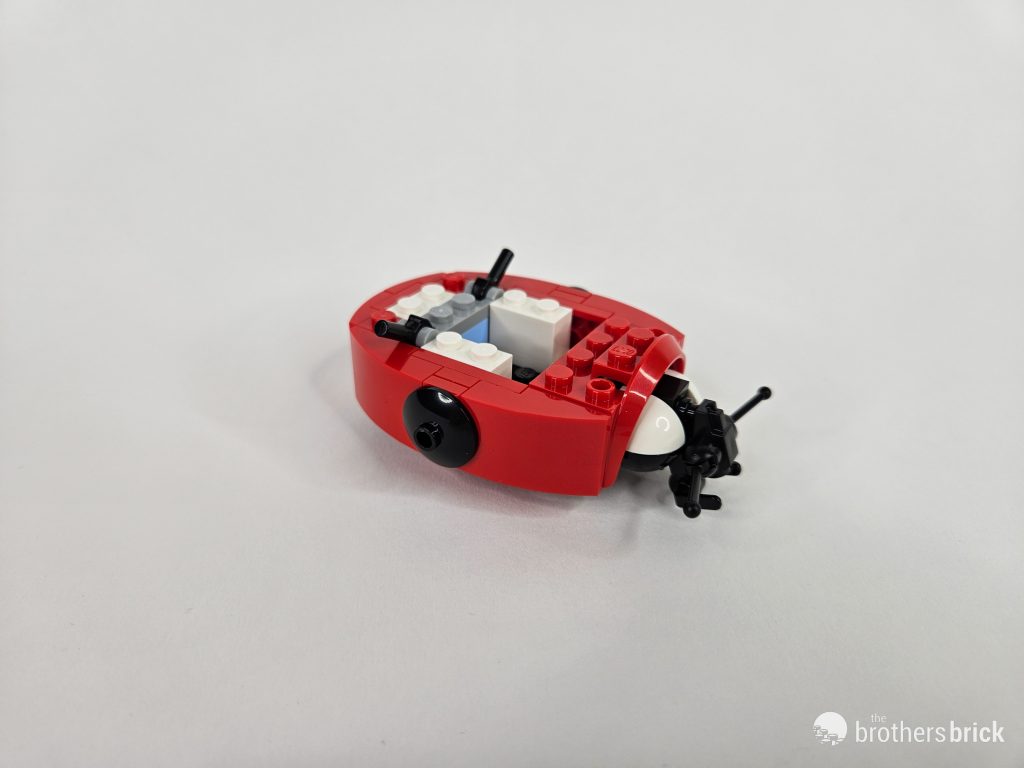
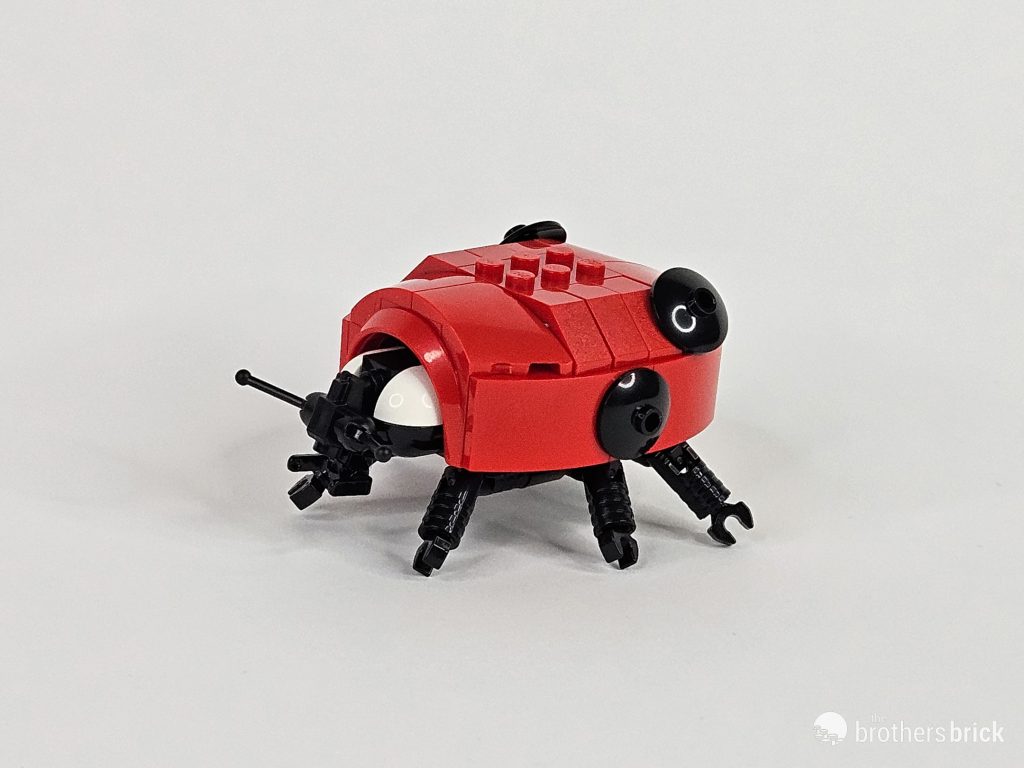
We begin with an adorable ladybug mount. We begin with the base of it’s carapace, utilizing rounded slopes and studs facing out from the body. The use of the mudguard to form a hole for the head is quite clever.


The ladybug’s head is a wonderful design, all centered around a minifig blaster with studs facing every-which-way. Rounded corner slopes form the white faux-eyes on this insect, while a bucket handle makes for an excellent set of mandibles.

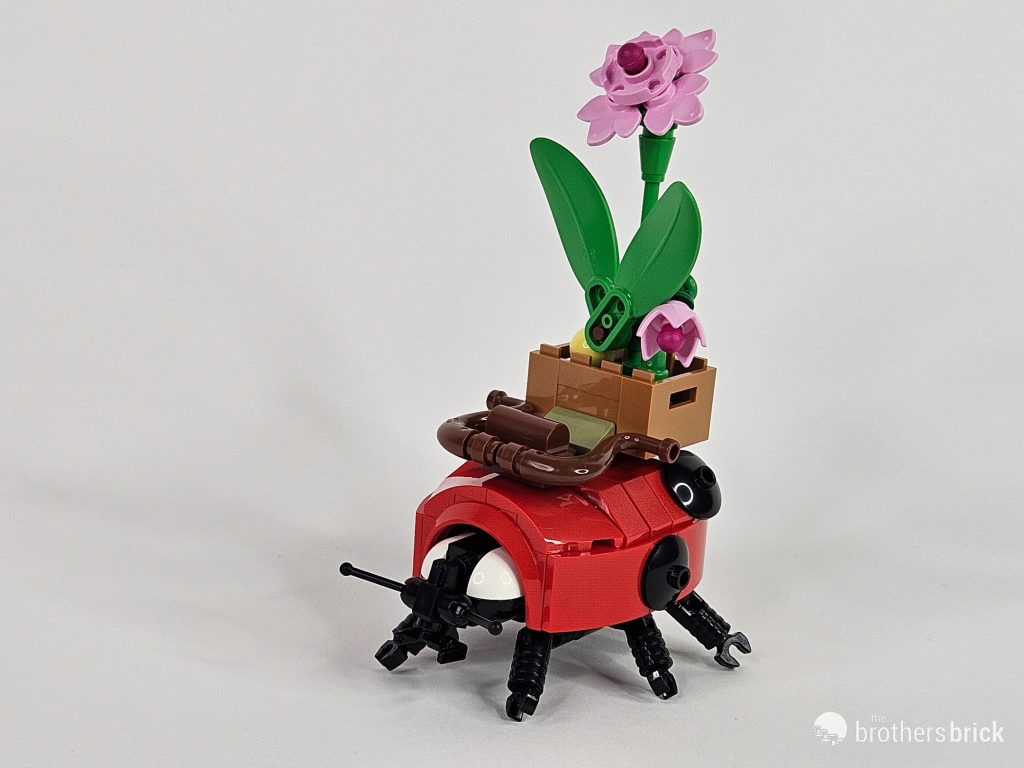
Continuing on with the ladybug, we finish out the carapace and add on a sextet of legs. Black 2×2 dishes dot the outside of this shell using some clever techniques, while the top stays flat, ready to load on cargo.

And load up that cargo, we shall! A quick saddle is assembled, along with a crate of various flowers. While not terribly complex, the techniques used for this vegetation feel like unexplored options in the growing list of LEGO botanicals.

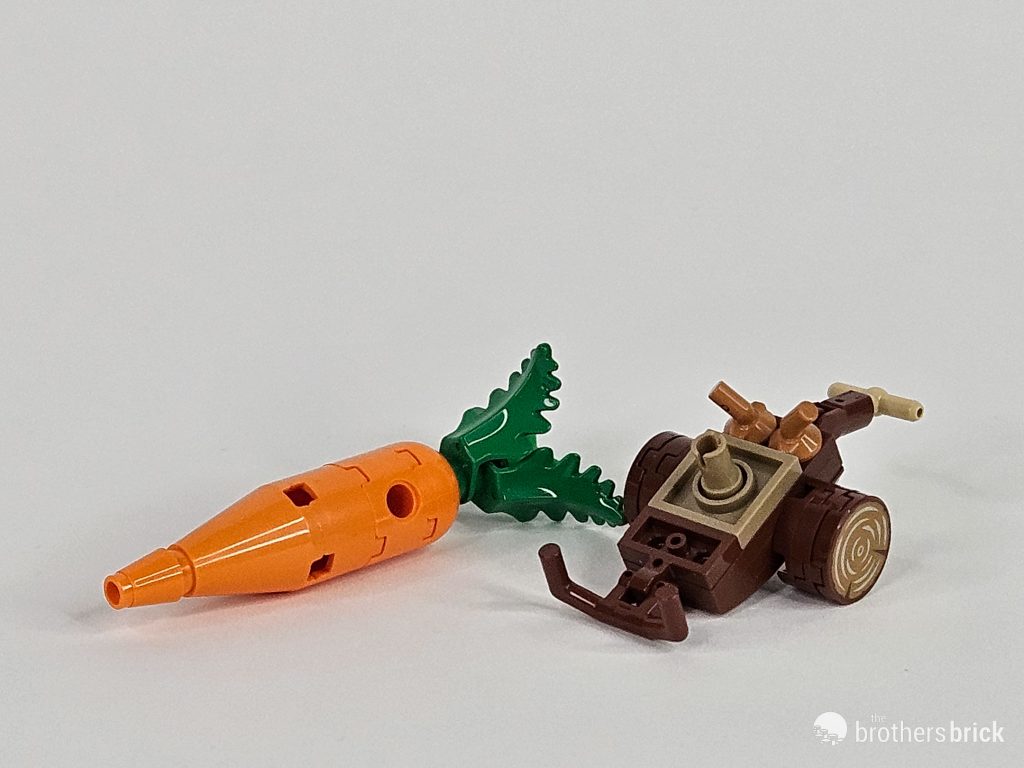
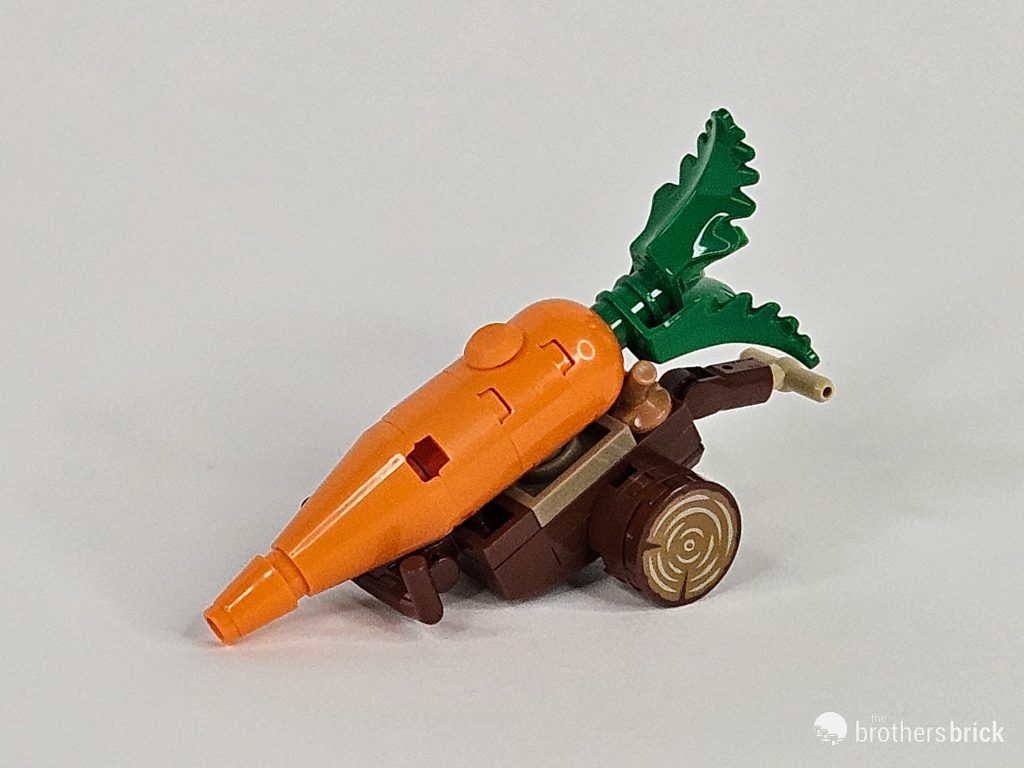
Our next accessory build is a “giant” carrot on a cart. This was the one piece of the model that felt out of place for me, not well-scaled with the rest of the tiny world. But both the carrot and cart designs are wonderful, utilizing a Technic connection to stick the two together. And I adore the orange rubber stopper plugging up the open Technic pin hole on the carrot!


The base
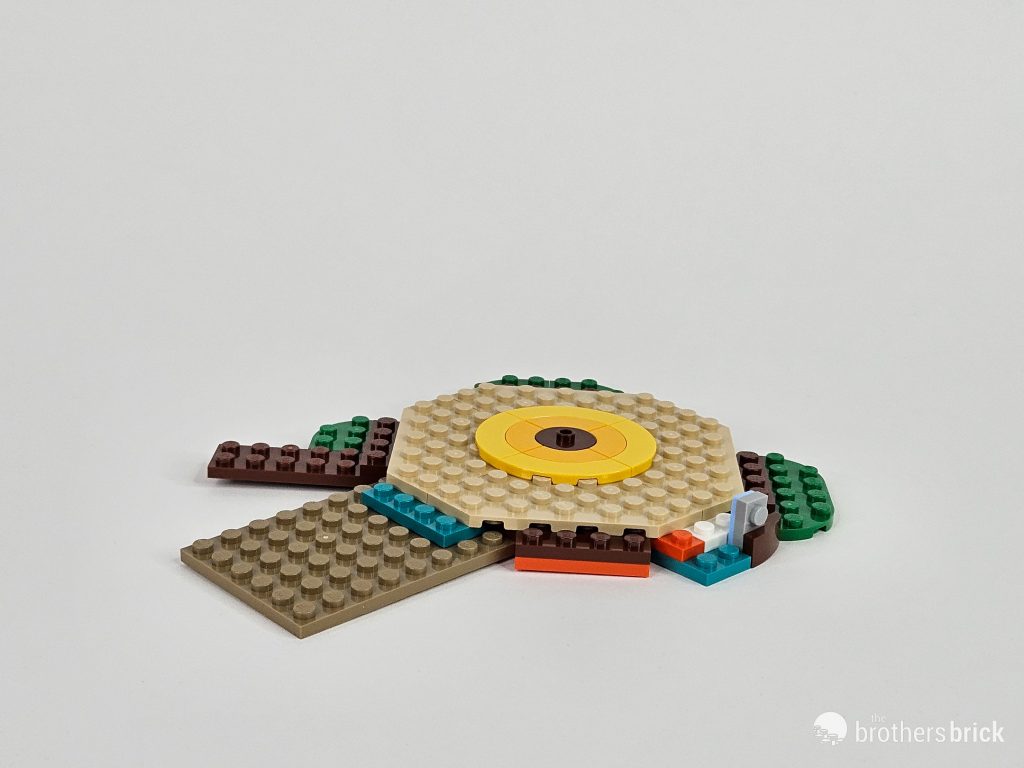
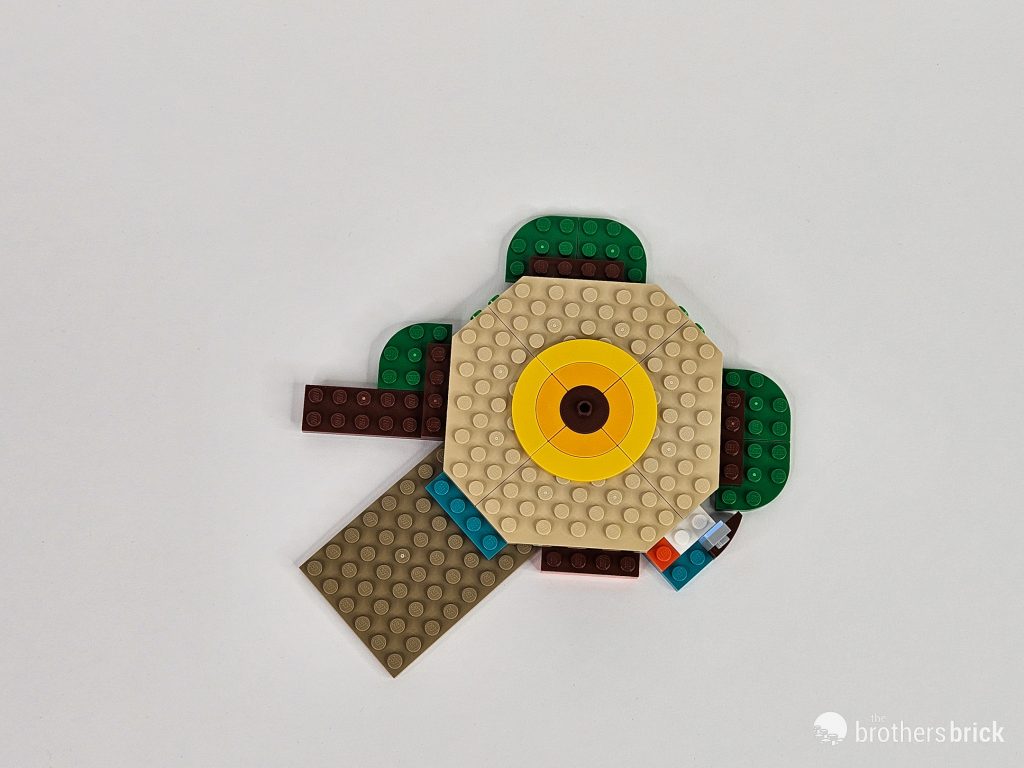
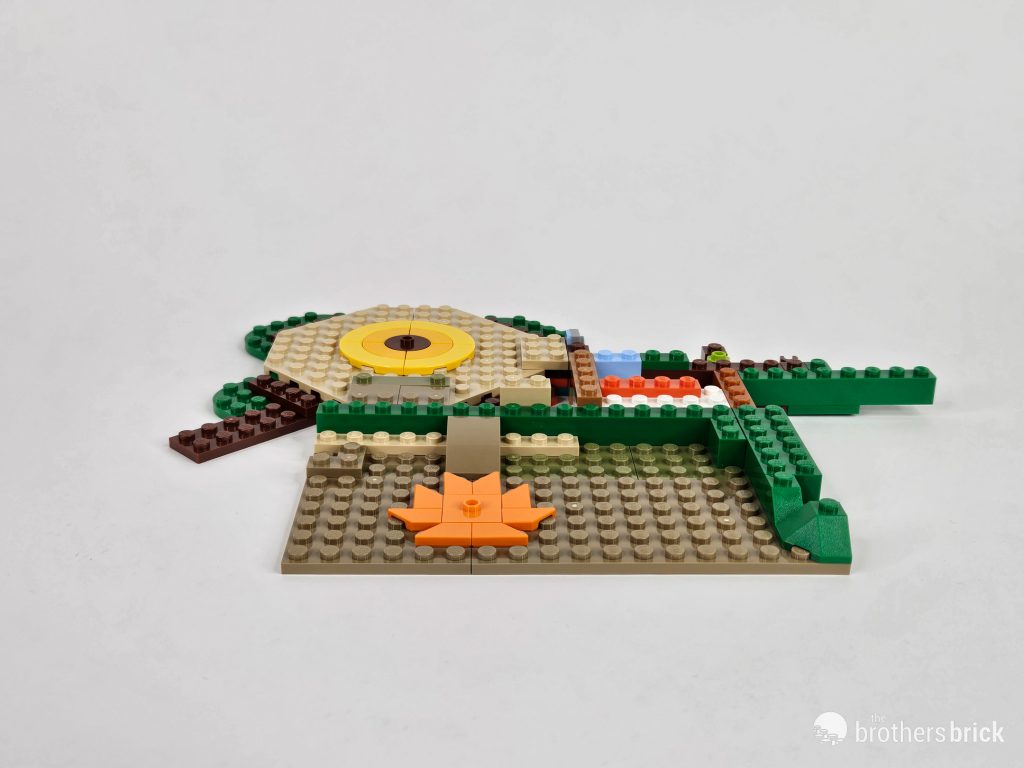
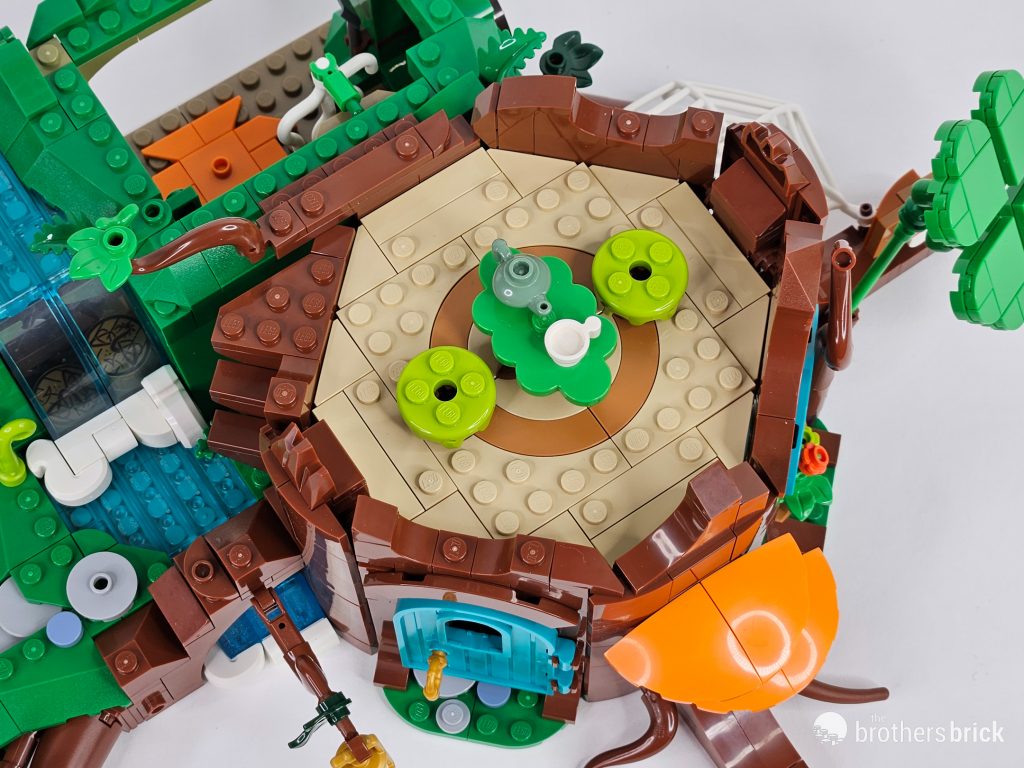
And with our two accessory “vehicles” out of the way, work on the main build begins. We start by assembling a patch of octagonal floor, which will eventually become the stump building. The tiling in the center will come to be a central rug in that room.


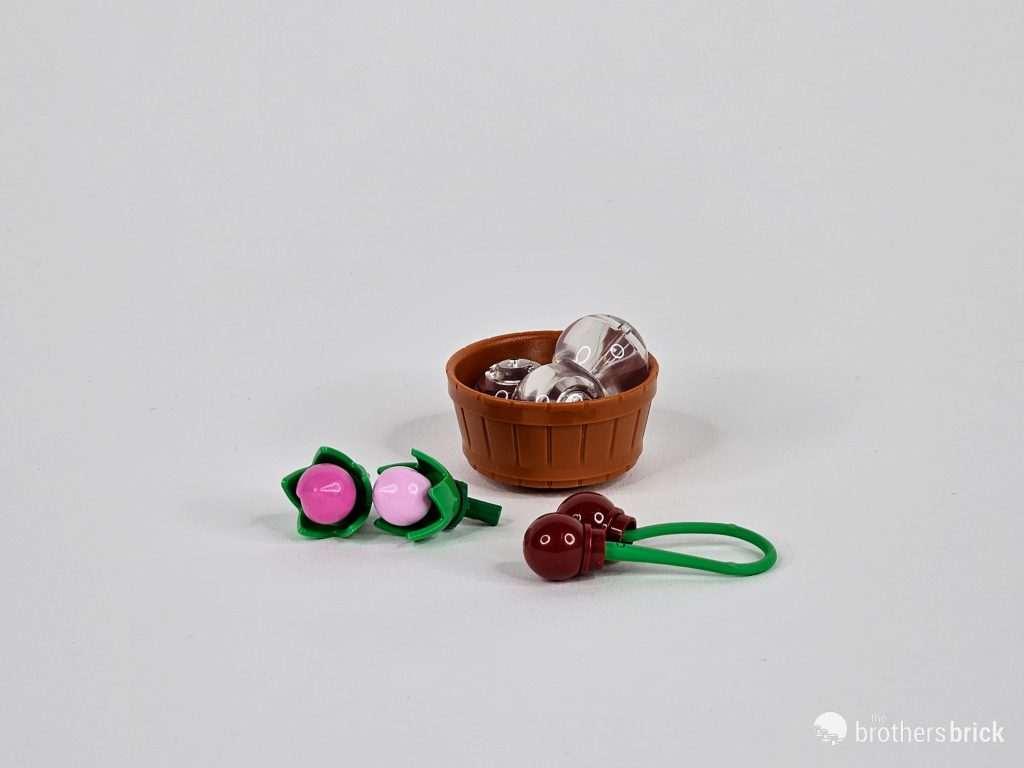
And before we get too far in these instructions, we’ve also got some bits and bobs to throw together. A bucket of dewdrops, a pair of buds (not of the Airpod variety), and a pair of berries also come with this chunk of parts for the main model. None of these accessories are called for later in the instructions, and merely act as set dressing in the final build. I especially appreciate the inclusion of the newer peach part from the Animal Crossing line, used at the center of each bud.

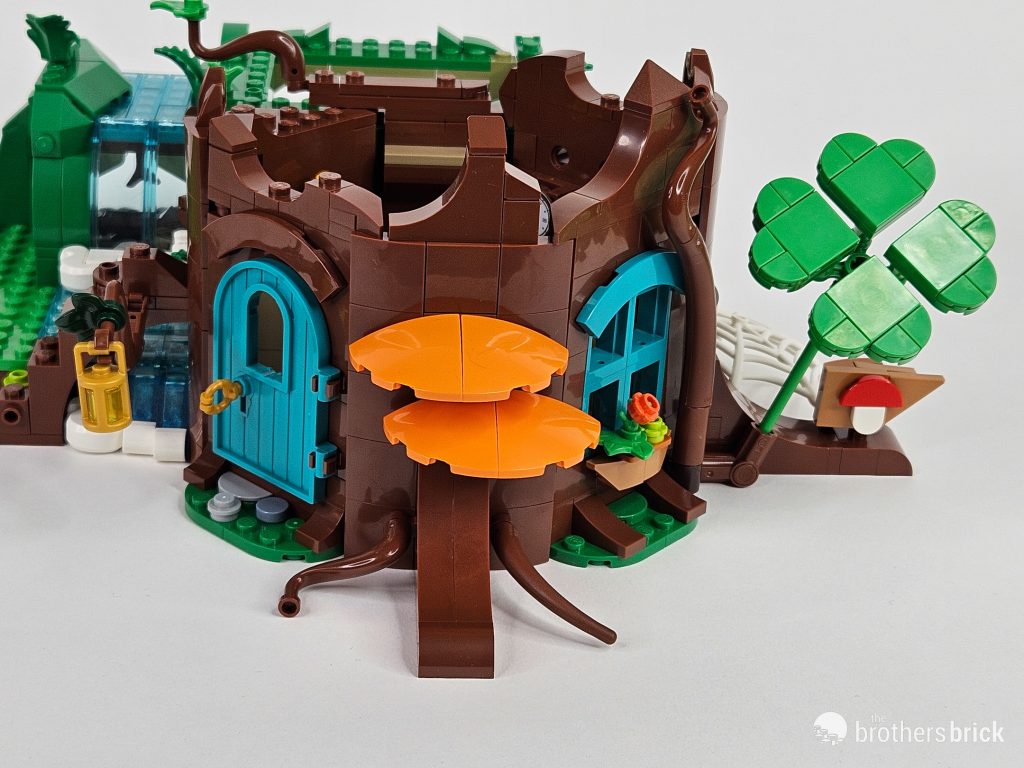
With that side quest complete, we return to the main model. There’s more of the base to complete, adding in the floor of the sand green-capped mushroom. There’s a rug in this room as well, this time shaped as a pretty orange leaf.


But there’s another half of the model that needs attention. The base surrounding the blue-capped mushroom forms in the next step. There’s plenty of open connection points which will come into play later on. And don’t sleep on that cute little cobblestone path that starts in this section, too.

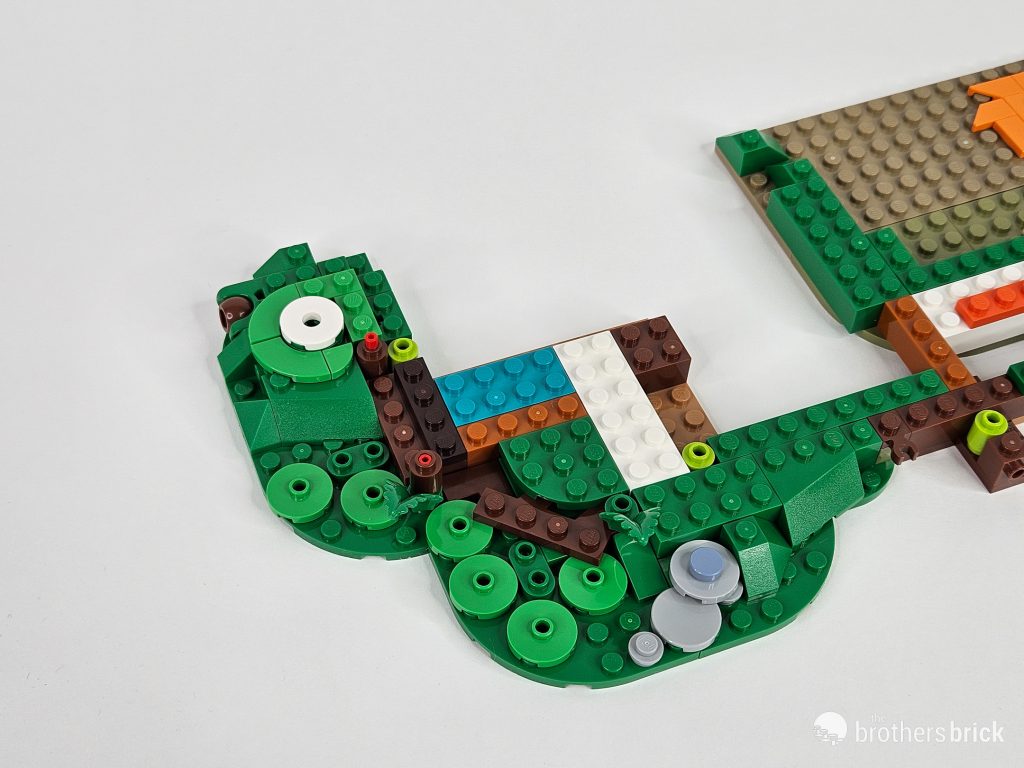
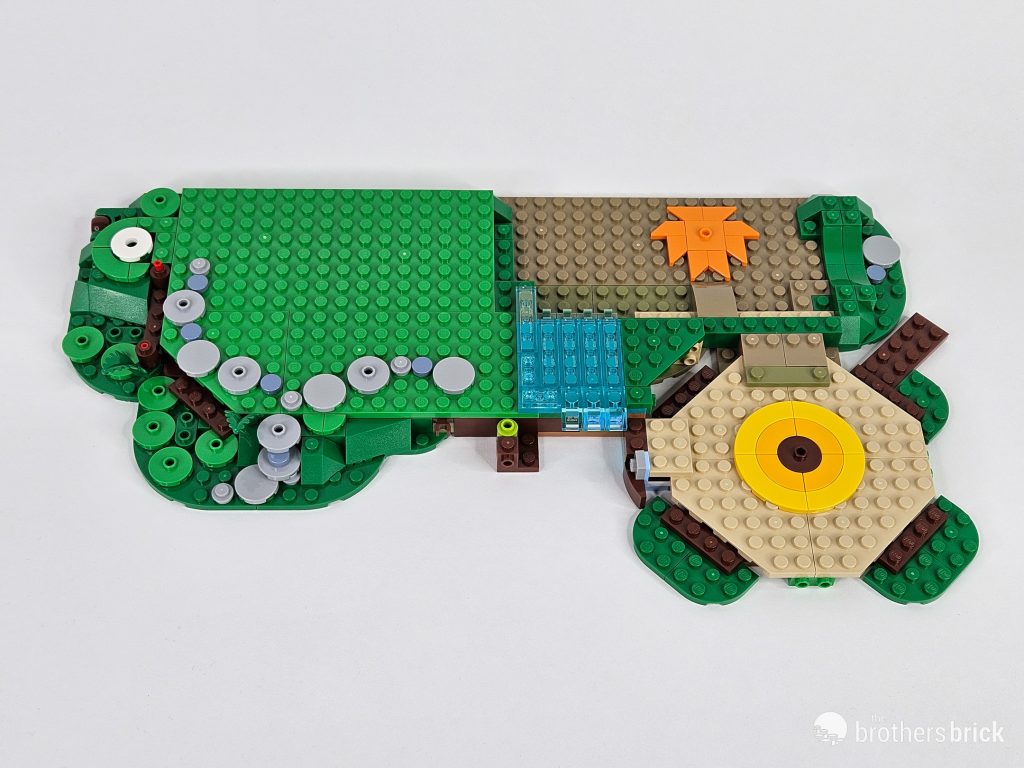
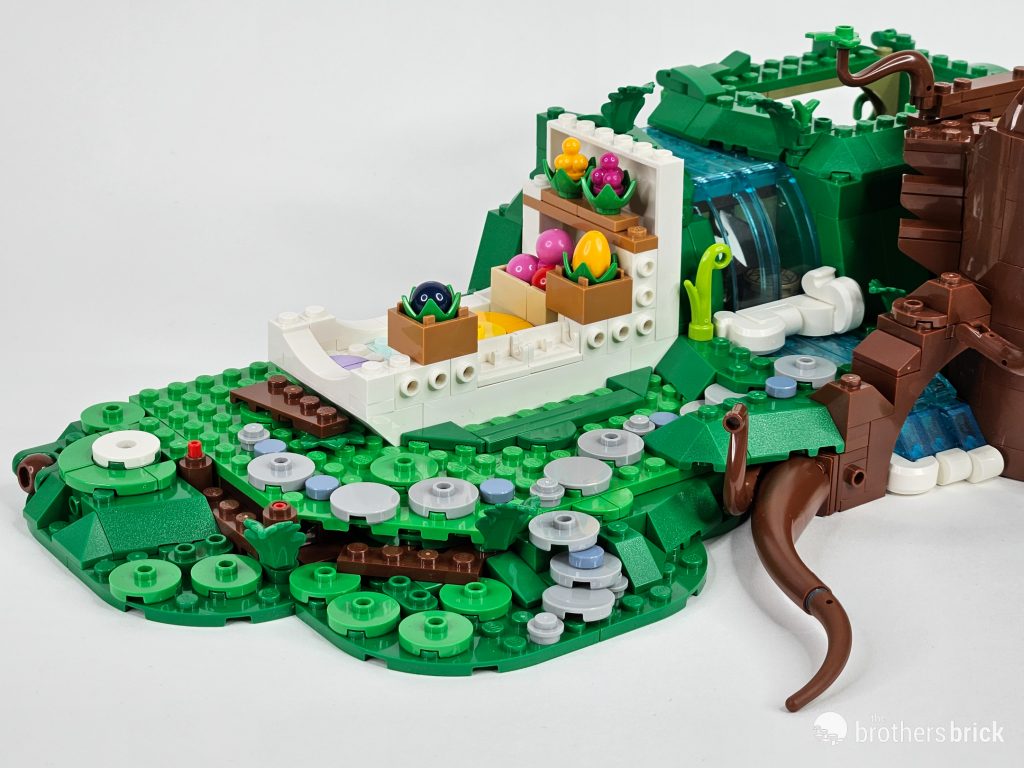
Our next section of building completes the base under the blue mushroom, which sits above the base for the rest of the model on some bright green plates. We also flesh out the rest of the path in this step. Also of note here, we begin a small stream that flows through the model. There’ll be plenty more trans-light blue in future steps adding to it.

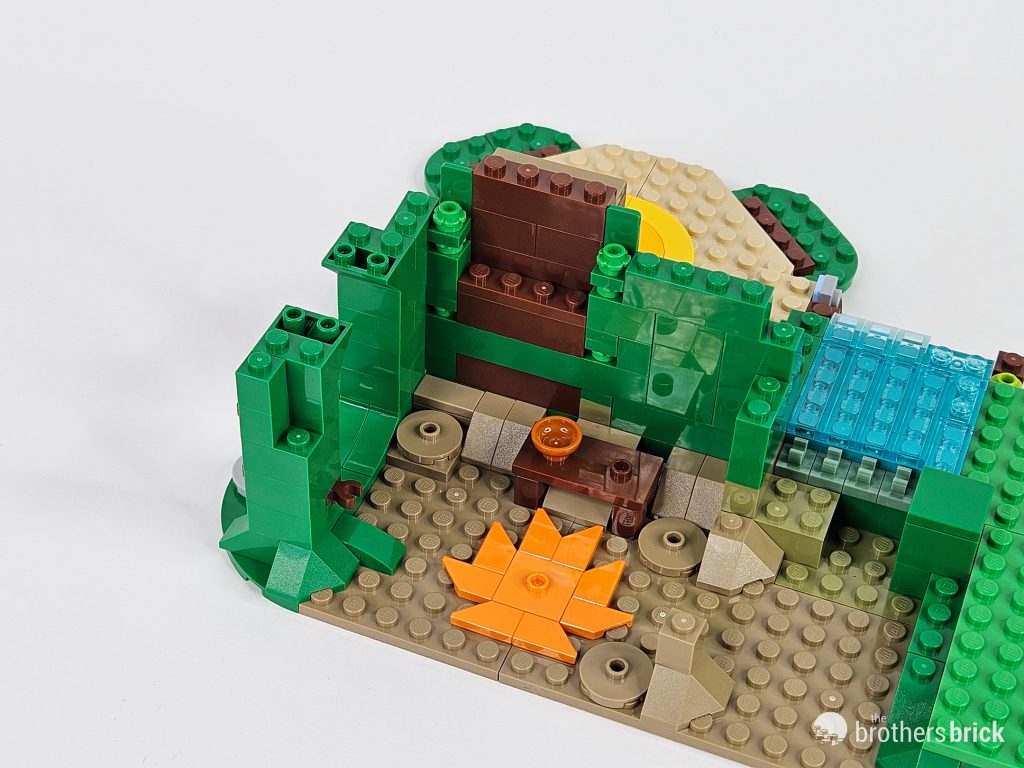
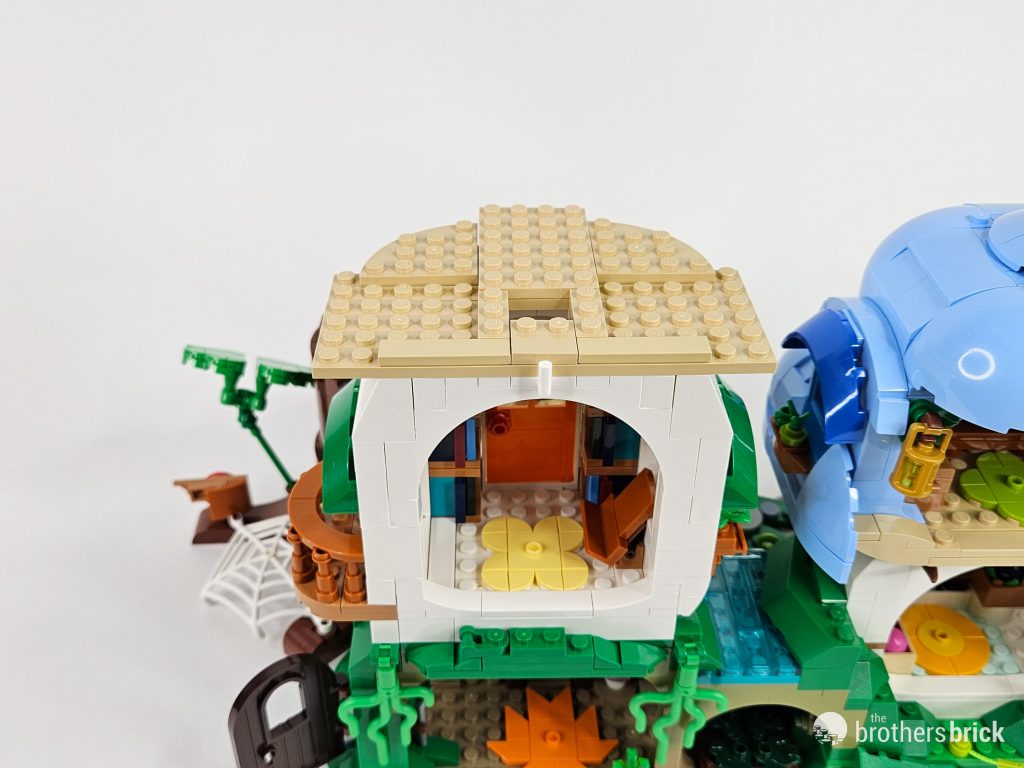
With the landscaping complete for now, we begin work on the first floor of the sand green mushroom house. While it’s mostly walls at this point (walls that will form a hill for the sand green mushroom to sit on), we can see some other details enter into form like a table and the start of a side door.

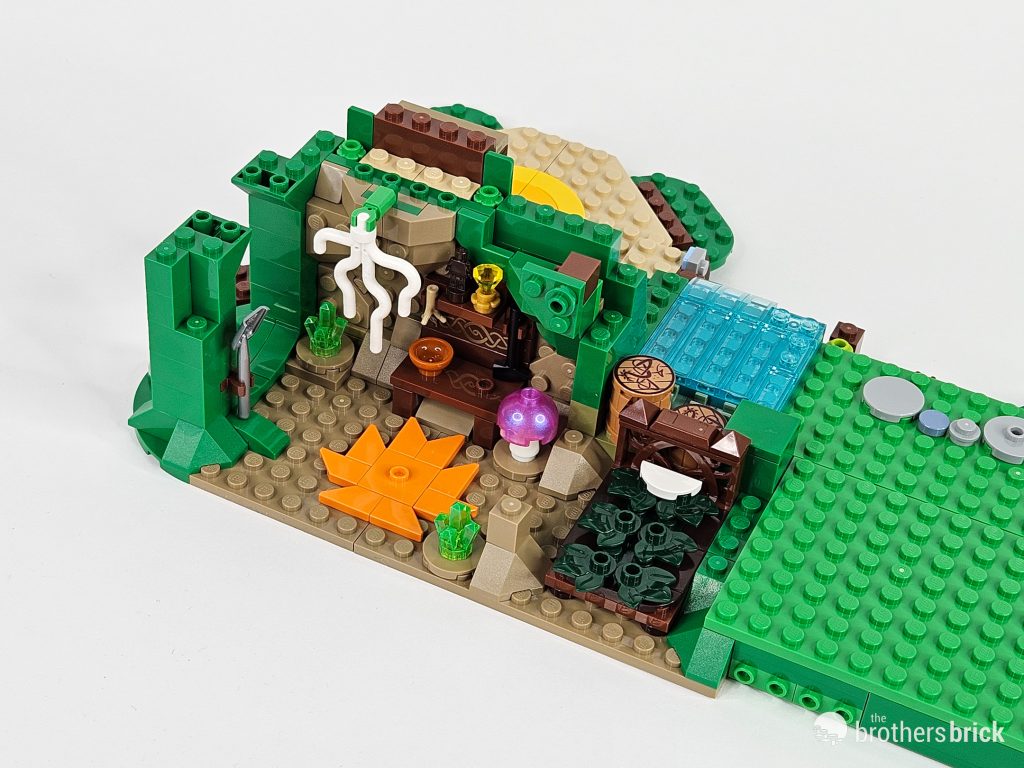
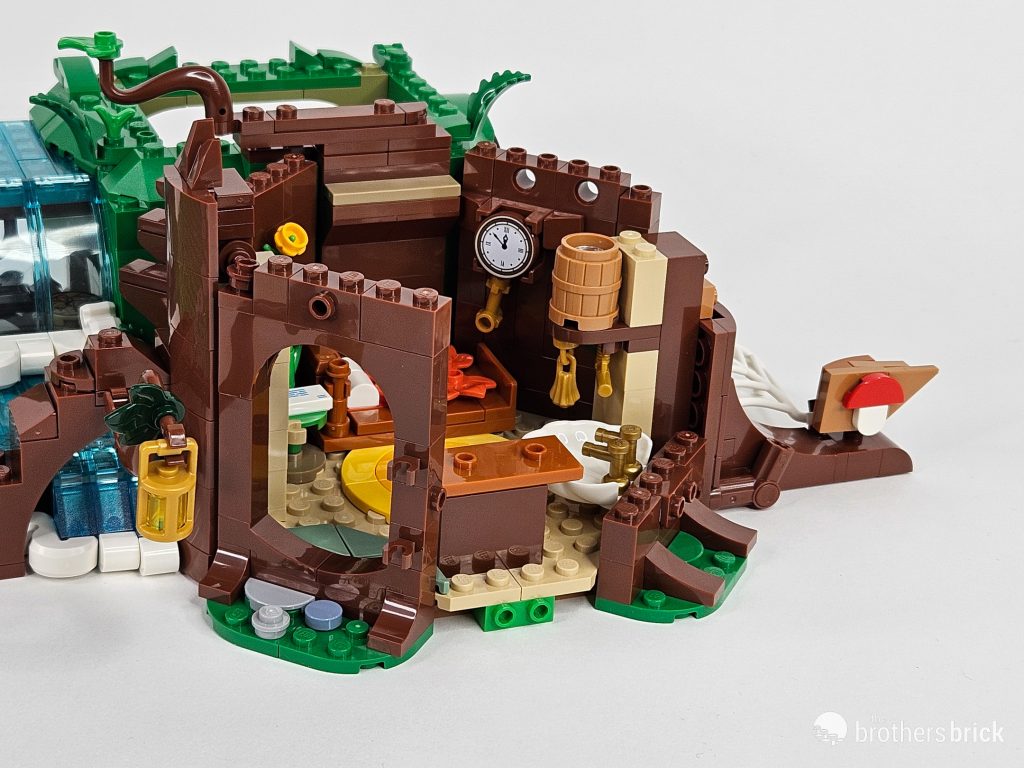
Those details kick into overdrive in the next step, adding much more to this basement room. A leafy bed, storage barrels, a full workstation, and some mystical green crystals all appear. And don’t miss the hanging mycelium from the mushroom above this room.

The leaf-covered bed is removable, revealing a secret map underneath. This shot also gives you a better view of the storage barrels behind the bed.

Another wave of bricks closes off this room a bit more, and adds in further detail. Note the continuation of the stream over that small bedroom. Looks like we’re in for a waterfall on the final build!
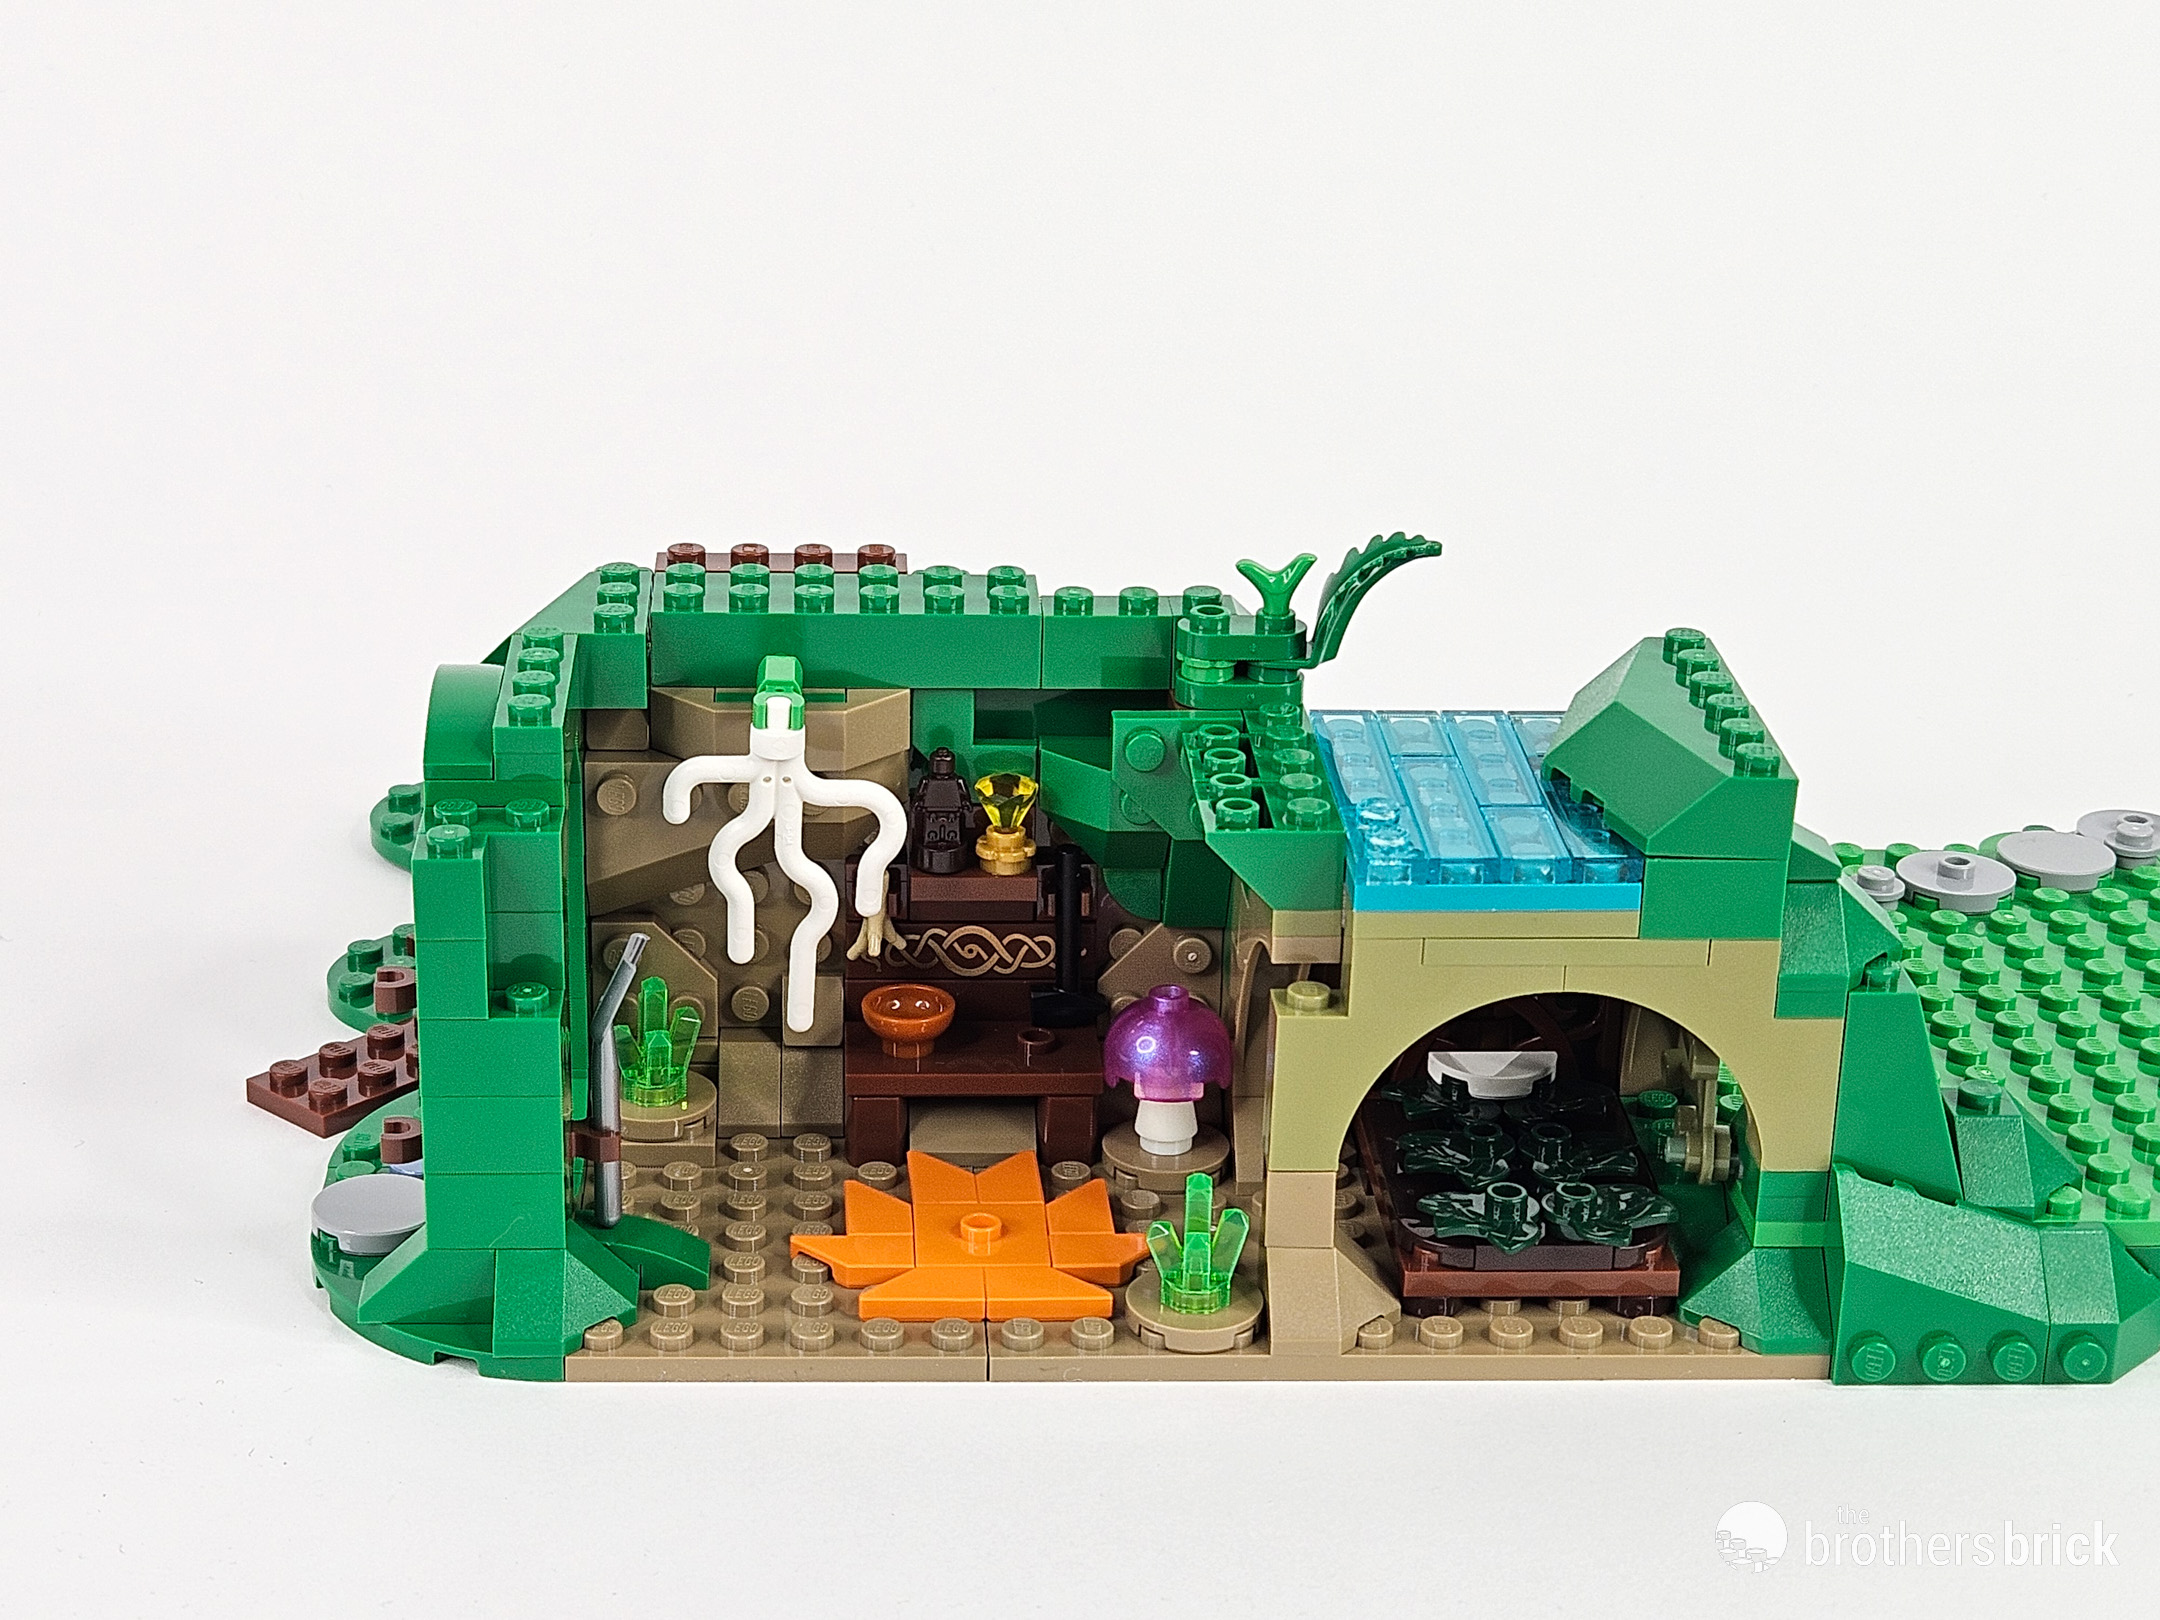
Looking in from the side, I can show you one of my favorite details from the build. The bedroom has a side window formed by placing a 4×3 small leaf part within an arch piece. The effect forms a “natural” window that would feel at home in any elven environment.

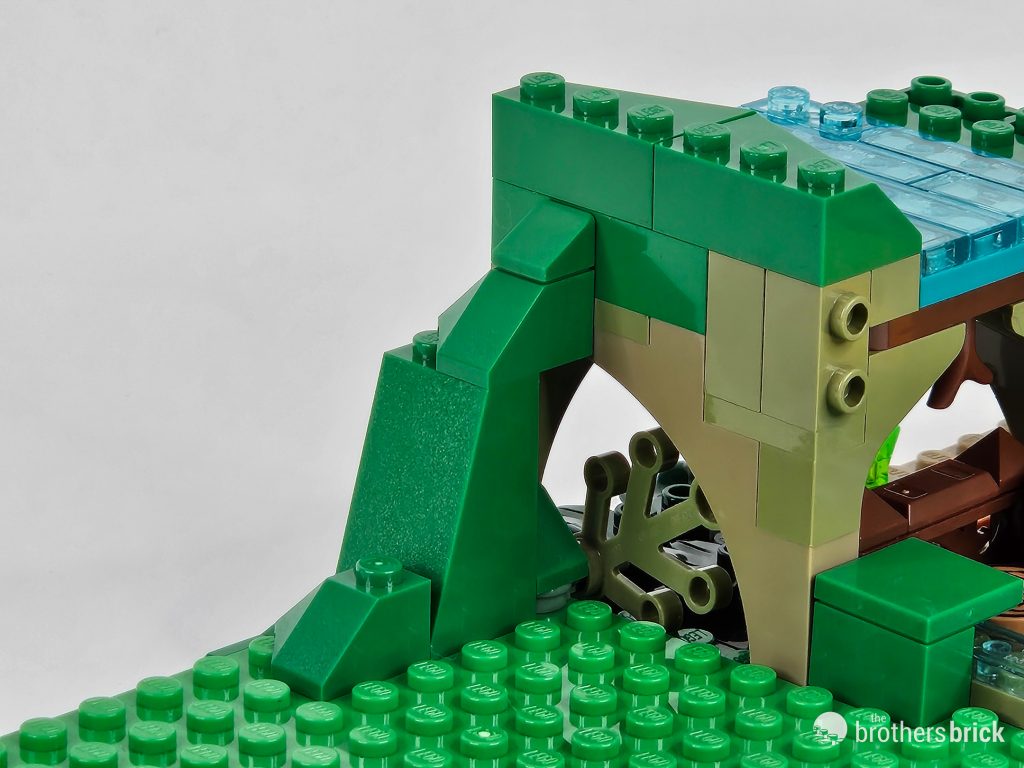
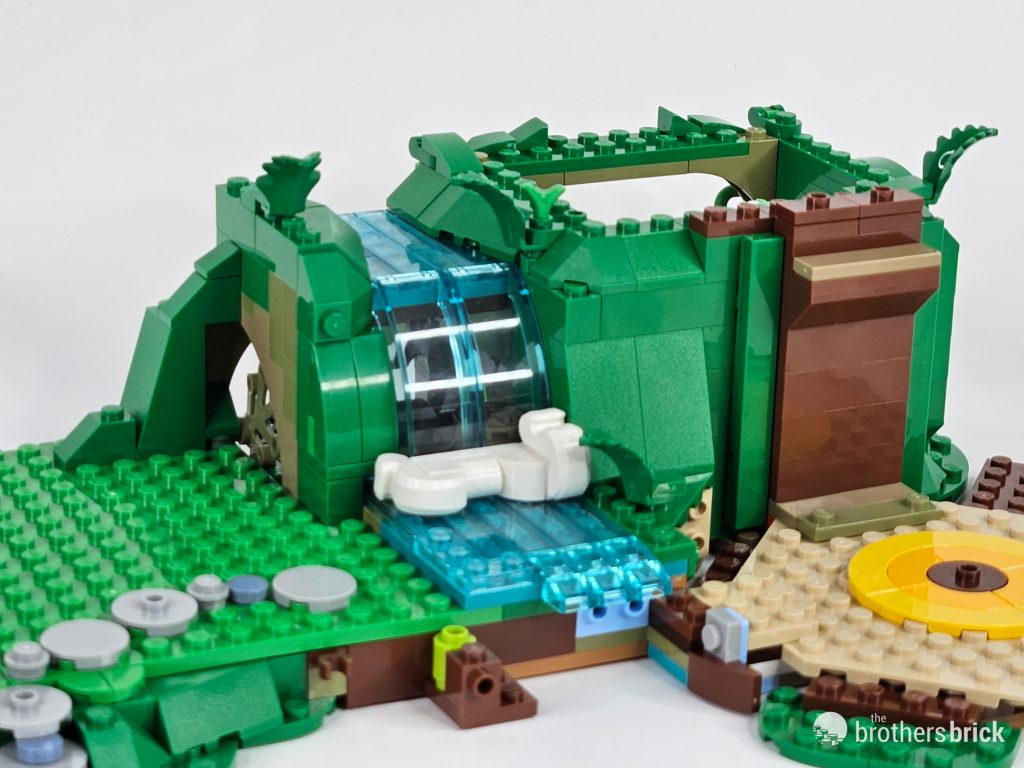
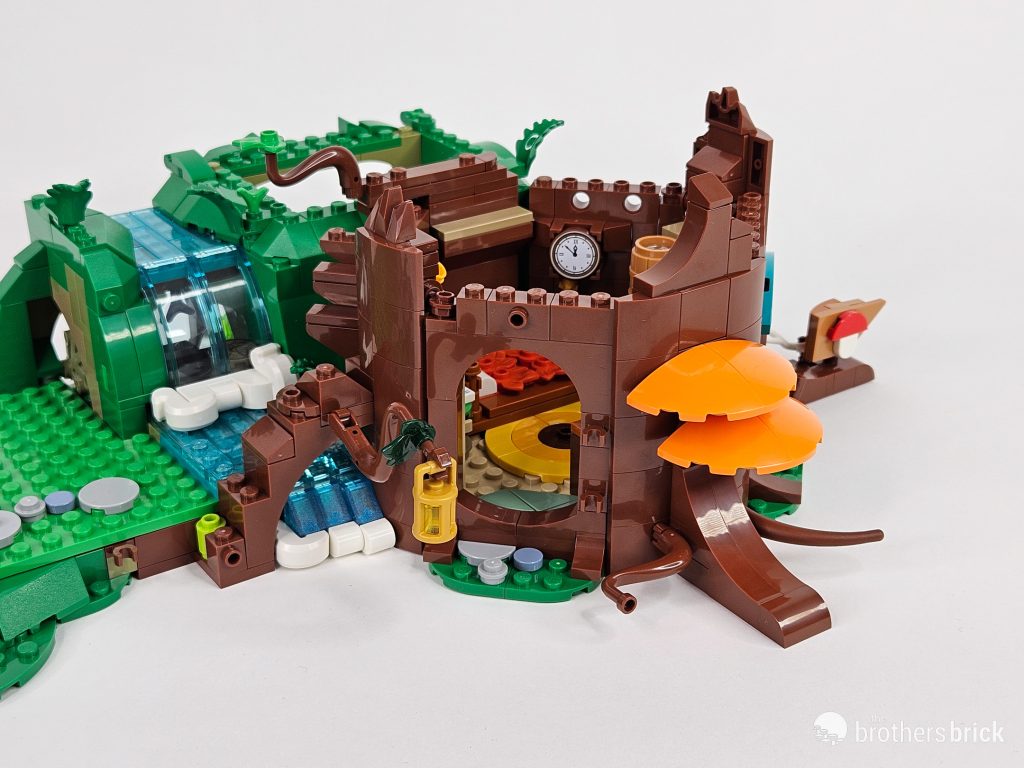
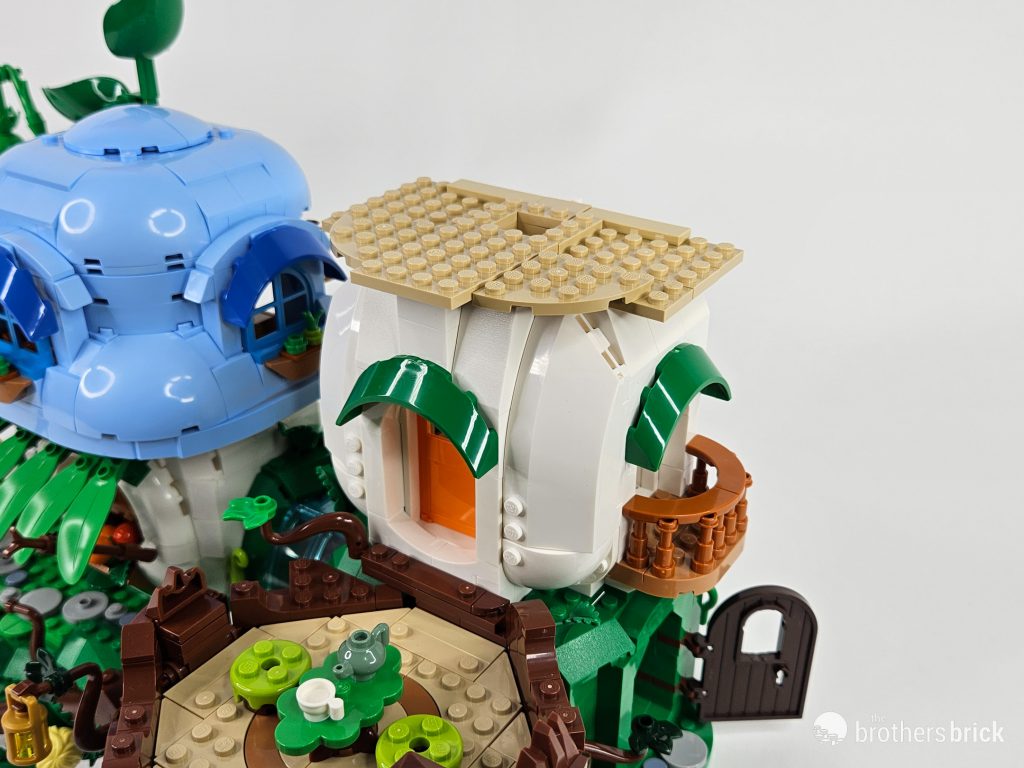
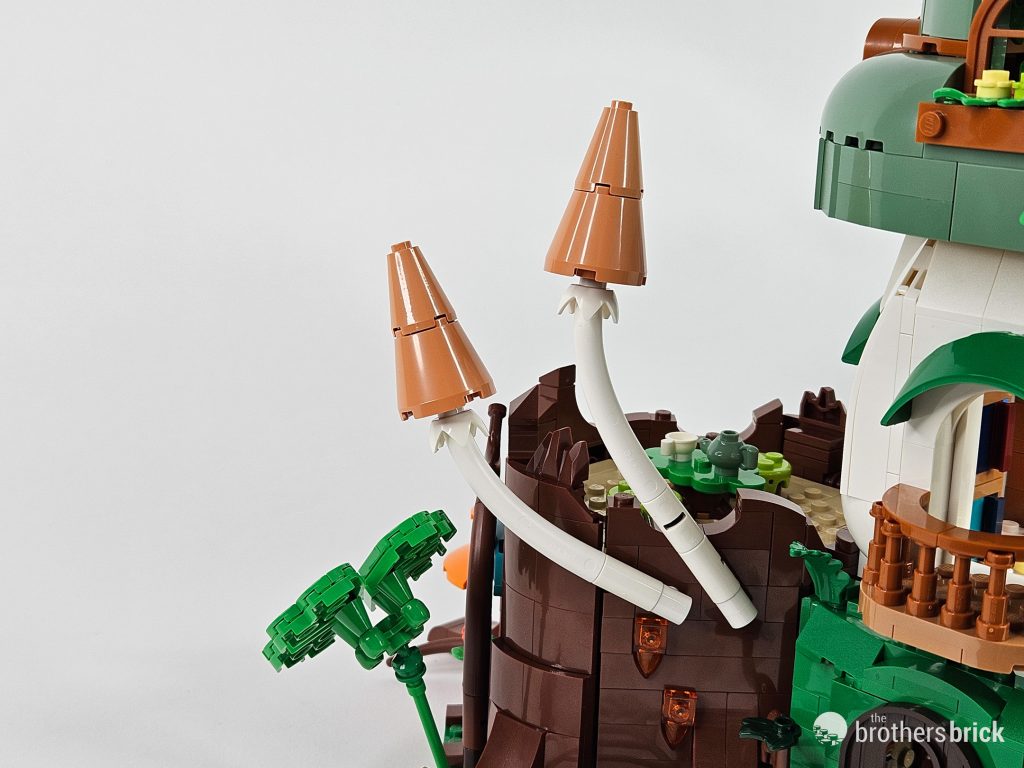
We’re now at the point where we can clip in that waterfall, as well as build up more of the surrounding terrain and vegetation. More hanging vines help frame the basement room from the rear, while around front, the first wall of the tree stump room gets set up.


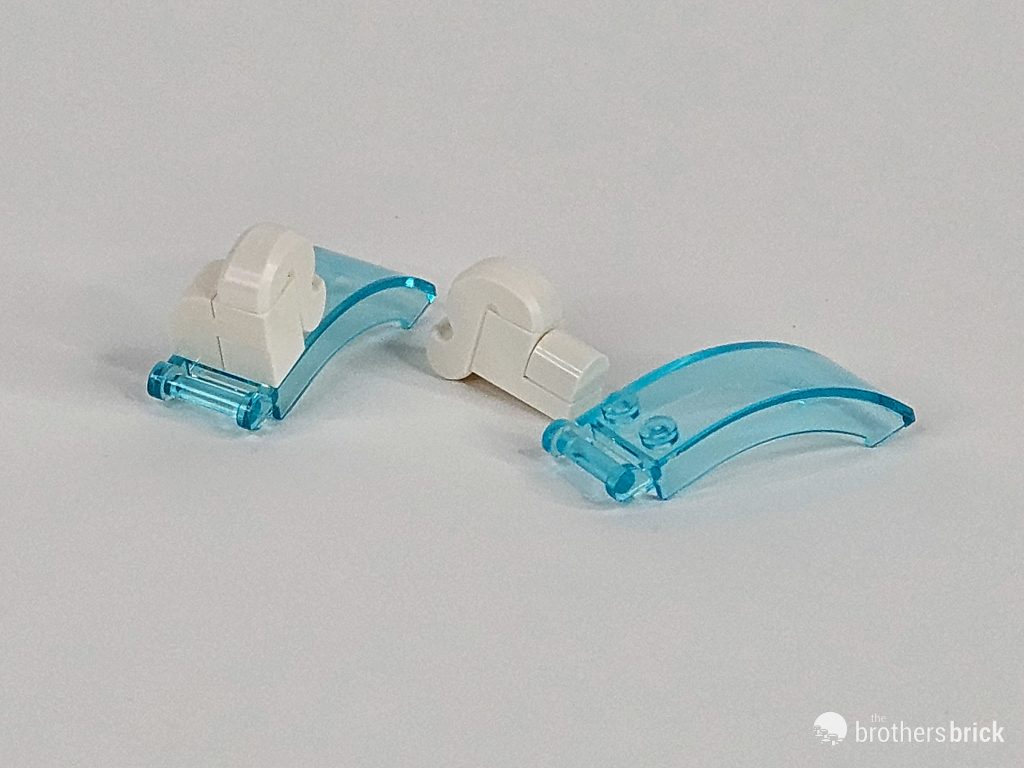
Before moving on, we’ve got to talk about this waterfall, made from a pair of curved LEGO windscreens which clip into place at the base of the falls. This is the first time I’ve seen the studs on these windscreens utilized, and here it’s to attach curvy white parts to appropriately simulate the foamy roil at the bottom of a waterfall. It’s an excellent use of the Unikitty tail part.

The tree stump
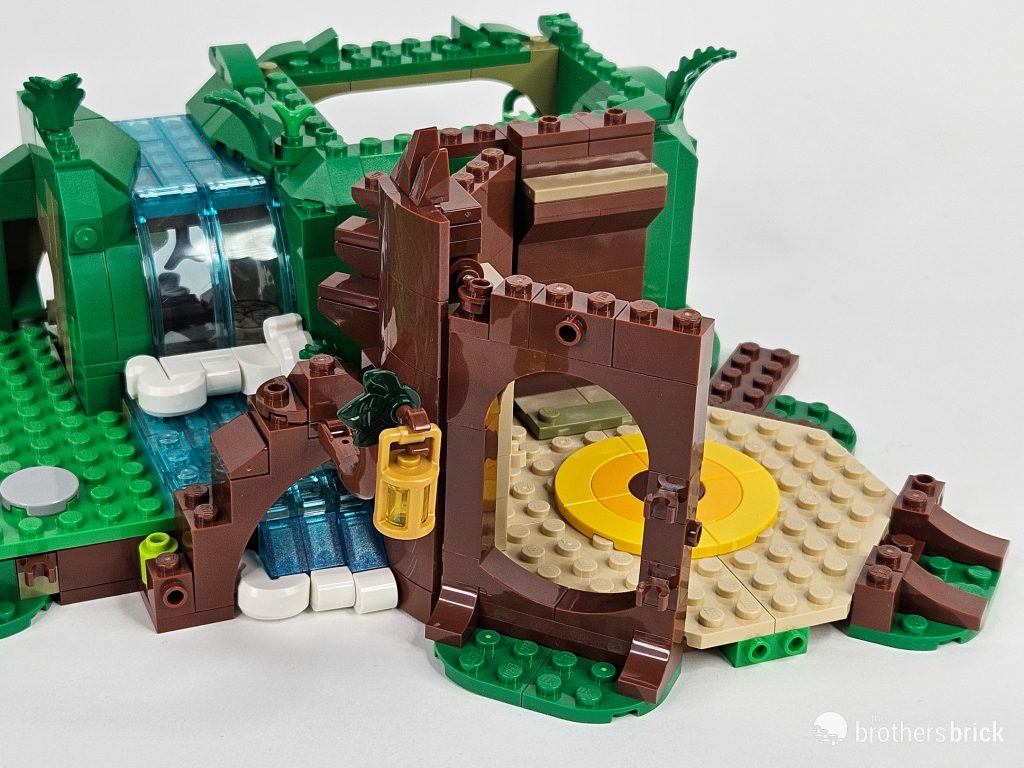
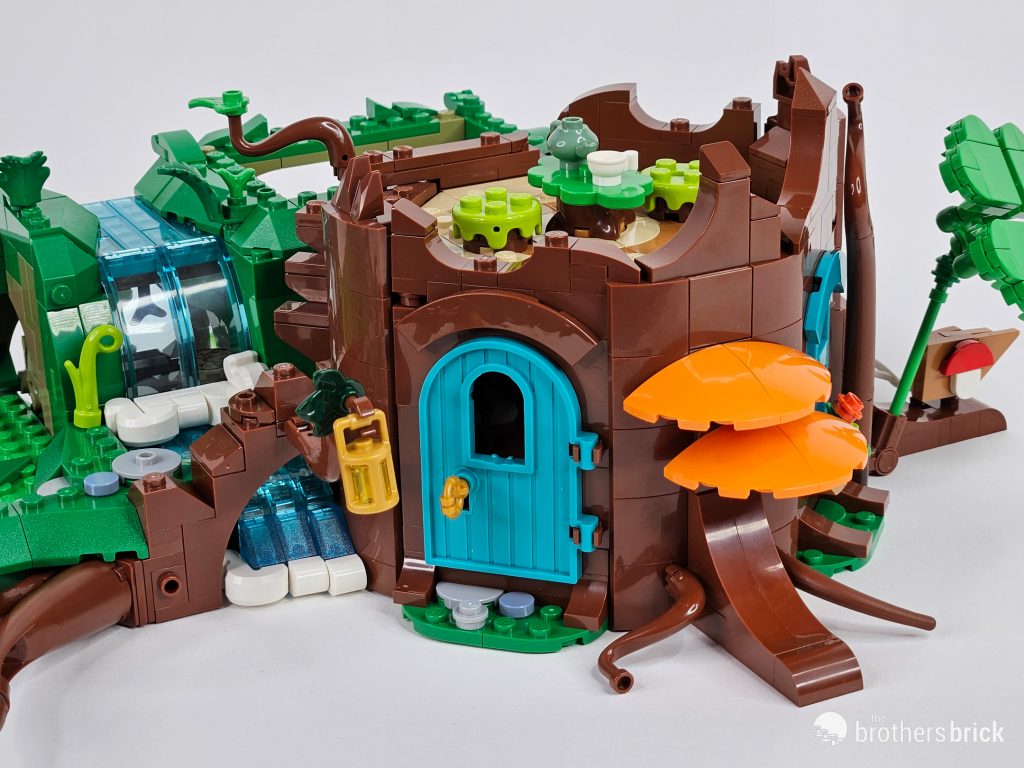
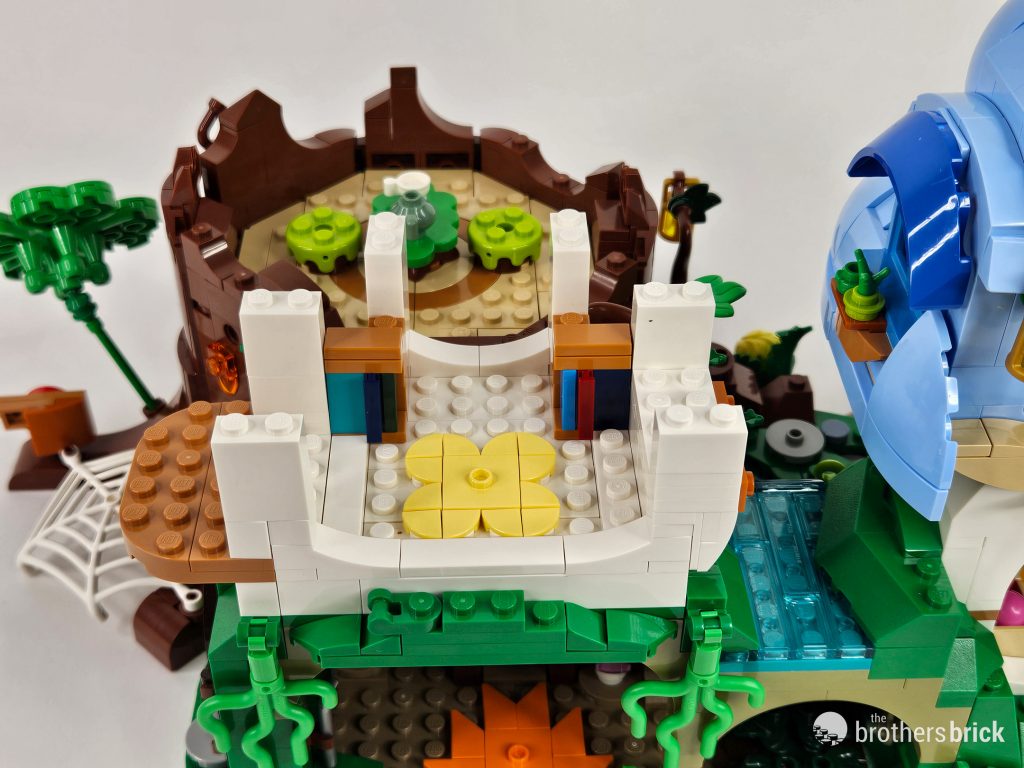
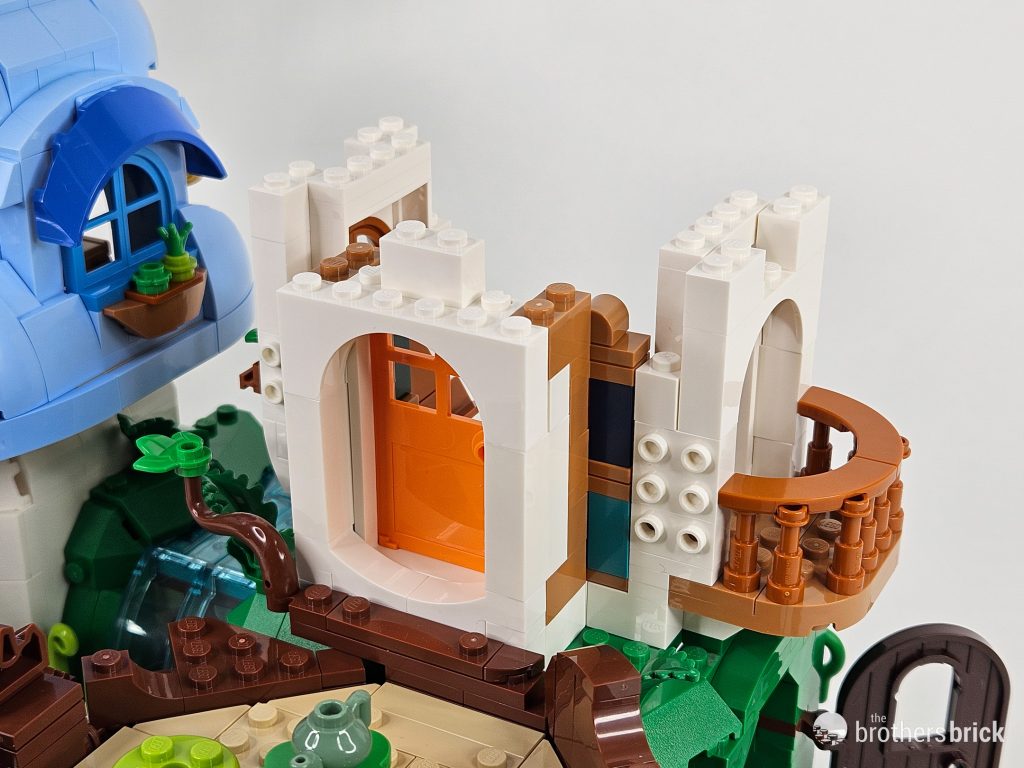
Water feature now in place, it’s time to give some more attention to the room within the tree stump. Several walls come into place, including a front doorway. We also get some stairs arching over the stream which will eventually lead to an open patio atop the stump.


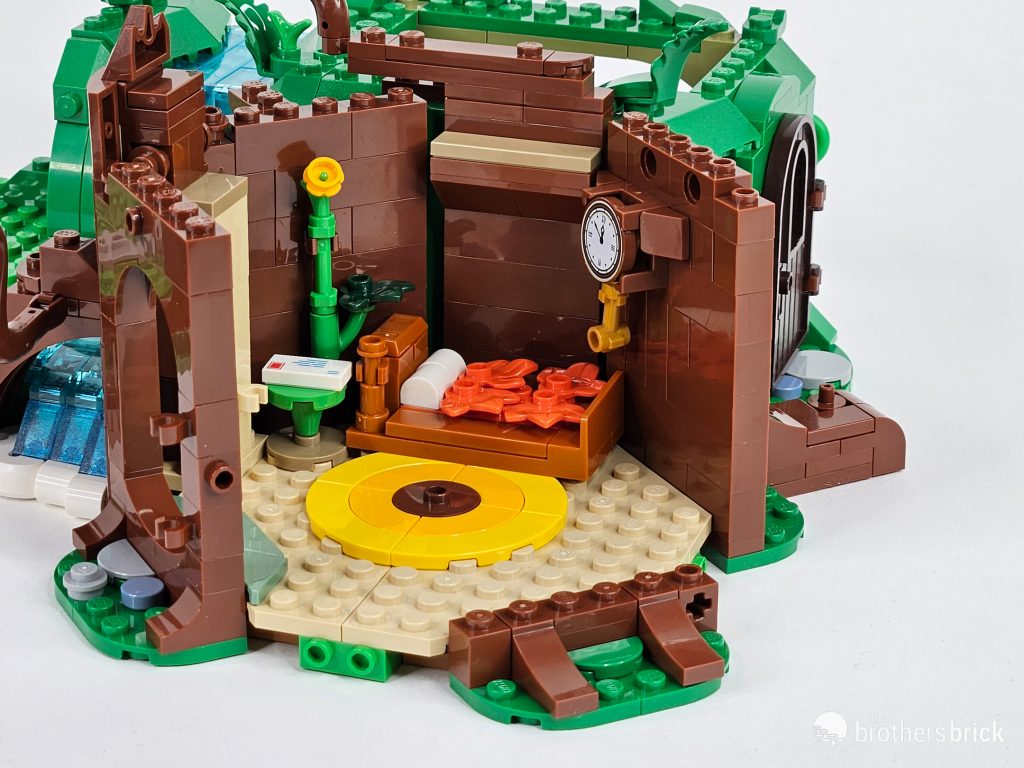
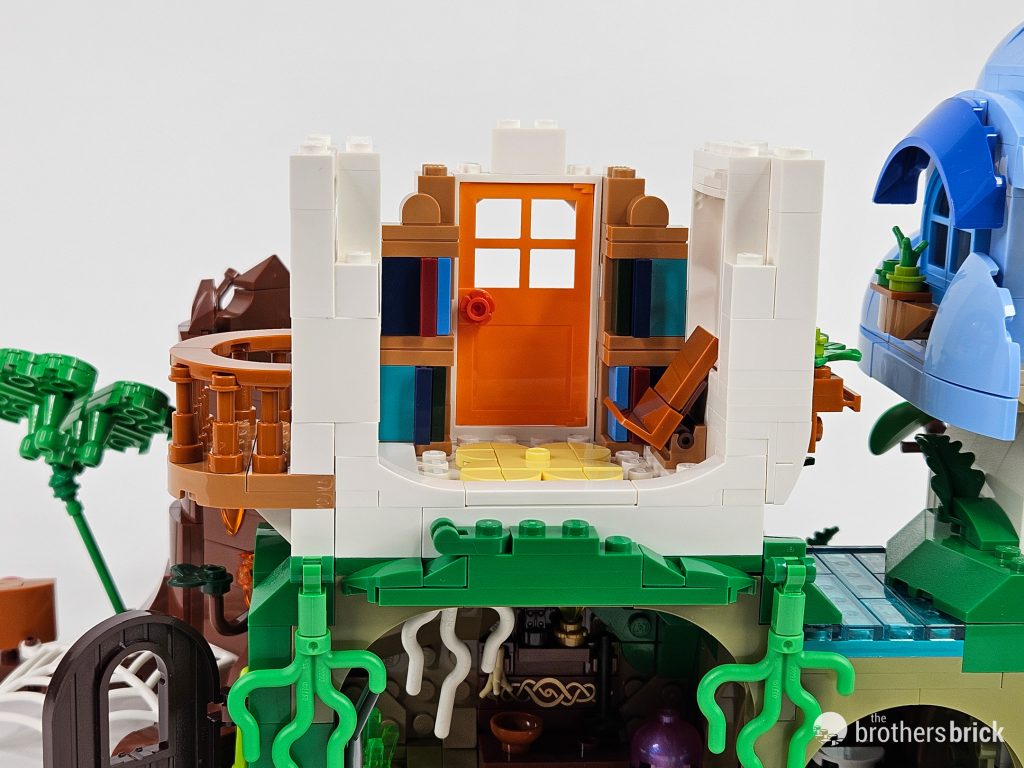
For the next step in the Mushroom Village, we fill that stump room with all kinds of minifig-sized knick-knacks. There’s a clock on the wall, table holding a letter, a vine installation along the wall, and another great bed covered in leaves.

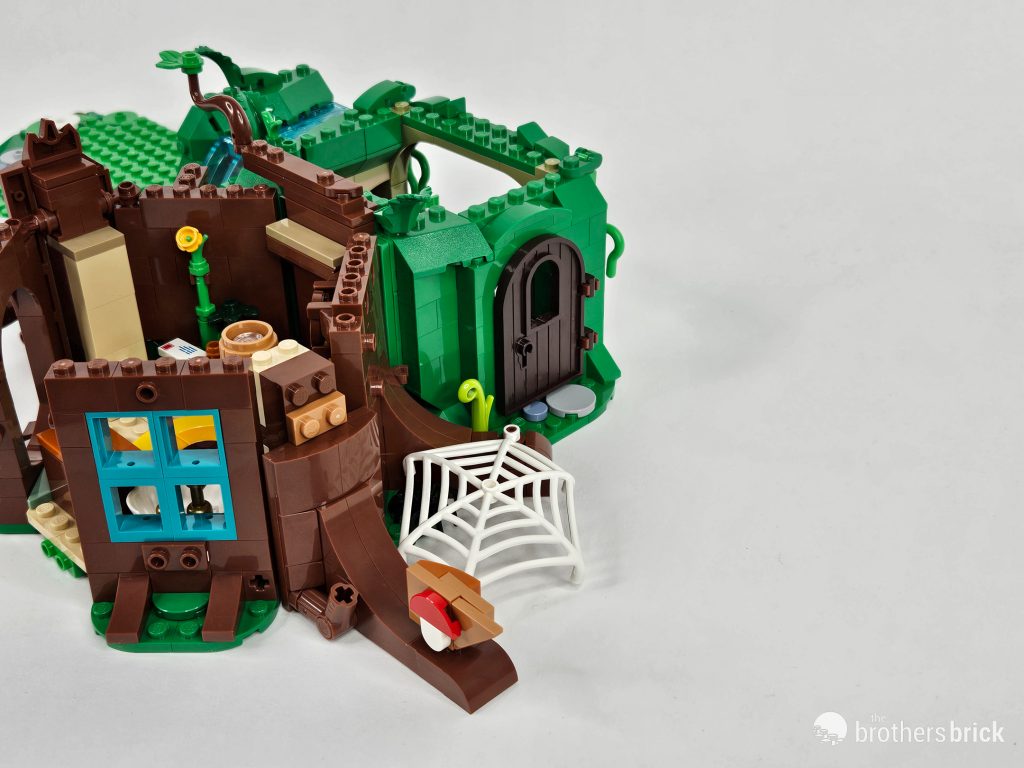
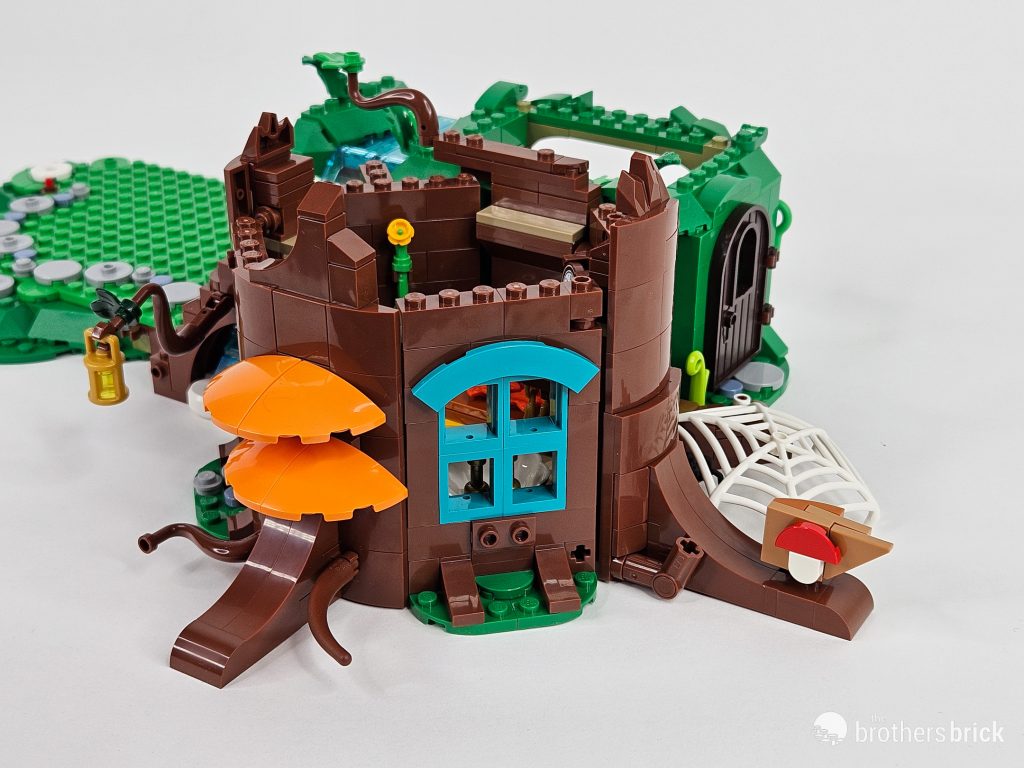
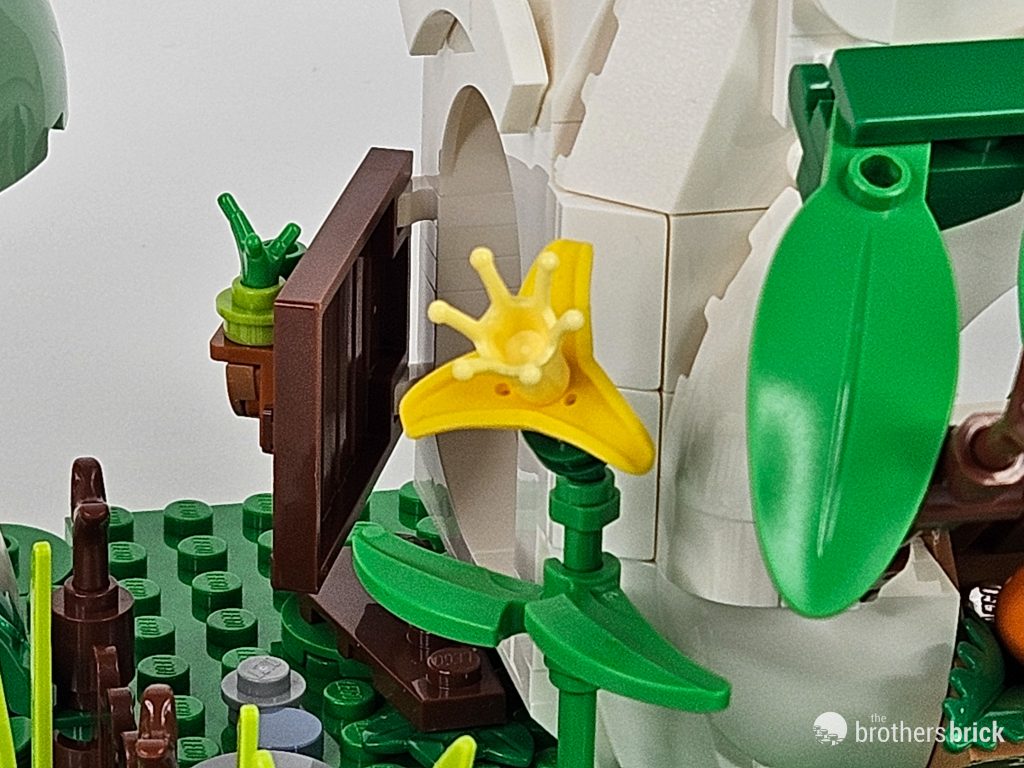
It’s also at this stage of the build that we add on a side door to the green portal we constructed way back. Of note for this set, none of the windows have any inserts (glass or otherwise), keeping the construction materials to those found natively in the forest.

The next step fleshes out even more of this octagonal room, adding in most of the remaining walls and some turquoise windows. There’s also an adorable bit of signage added to the right side of the build pointing the way to the Mushroom House from BDP Series 2. Around back, don’t miss the inclusion of the newer spiderweb part from recent Spider-Man sets.


If we take a peek at the model mid-step, we can check out some of the interior that was just added. This includes a gravity-fed clamshell sink that feels right at home in this aesthetic.

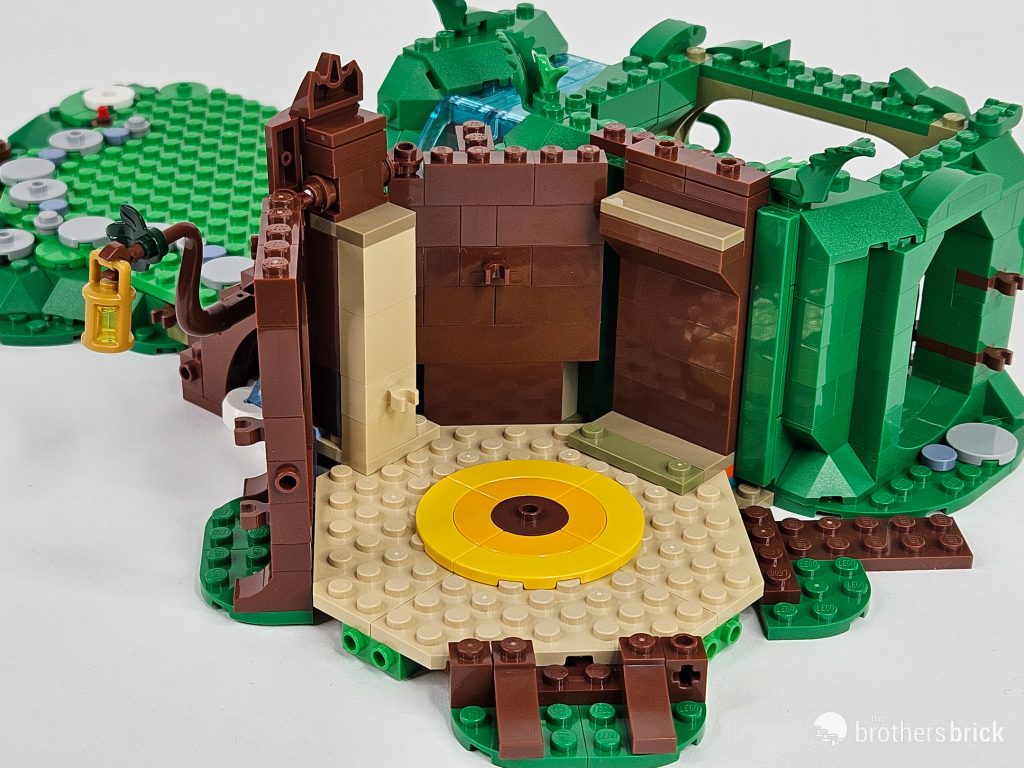
The walls of the stump are finally completed in the next stage, with some additional detail added around the window and to the top of the stump.


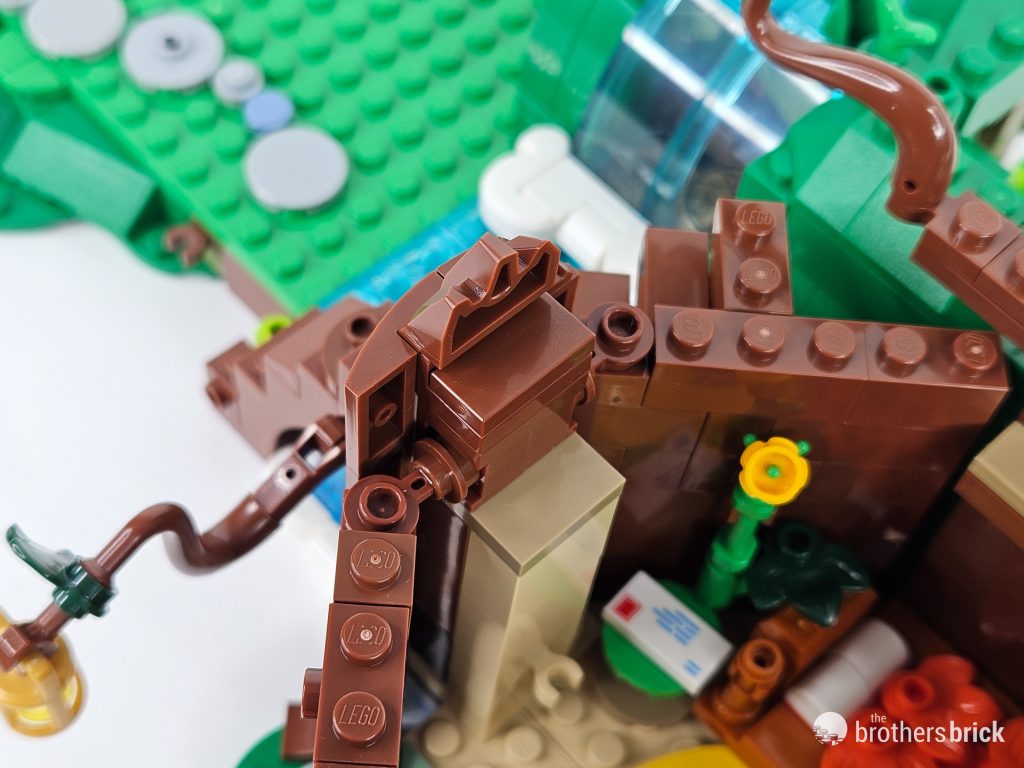
The octagon that forms the stump room is braced at the top of the structure using an excellent technique. Leveraging the flexible connection of a bar seated within the hole of a headlight brick, Kramm is able to grant stability without requiring additional depth to the stump’s walls.

Taking a break from stump construction, we move on to the generation of a LEGO four-leaf clover, perfectly utilizing the form of the heart-shaped plate and the spacing of the knob cog wheel. It sits to the right of the room we’ve been working on. We also manage to sneak on some more stump decor, including a front door to the place.


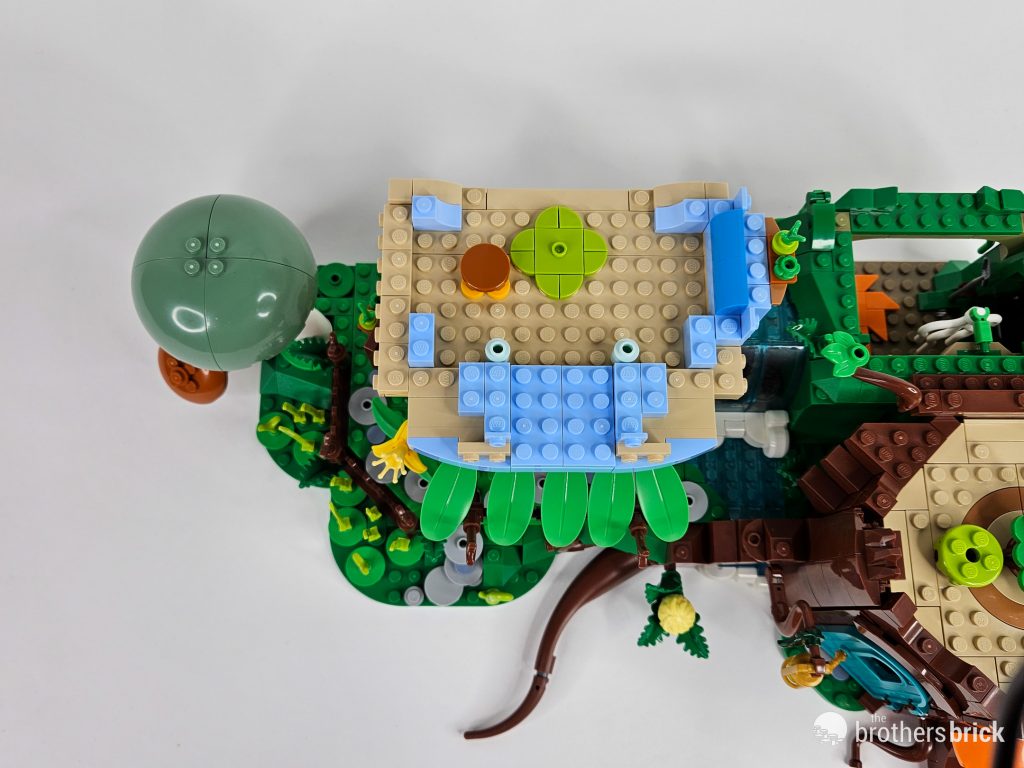
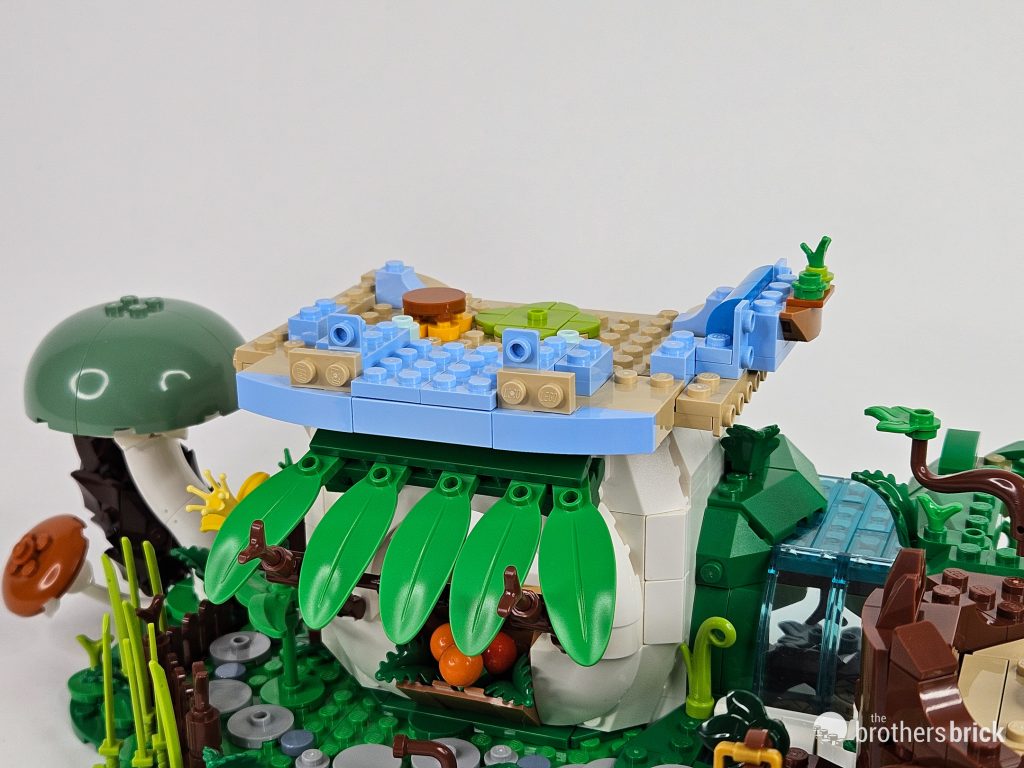
The room we just built still needs a roof, so an outdoor patio goes in to seal off the top of the stump. A table is set for tea up there, with a mossy stool placed on either side of it. This completes our work on the stump.


The blue-capped mushroom
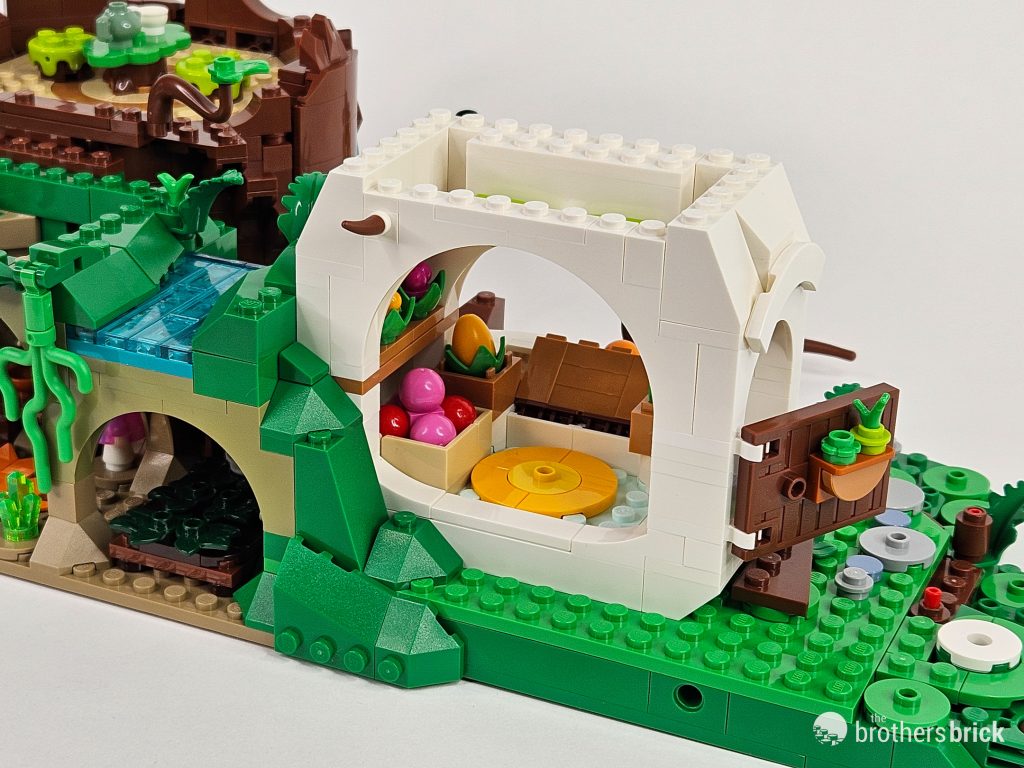
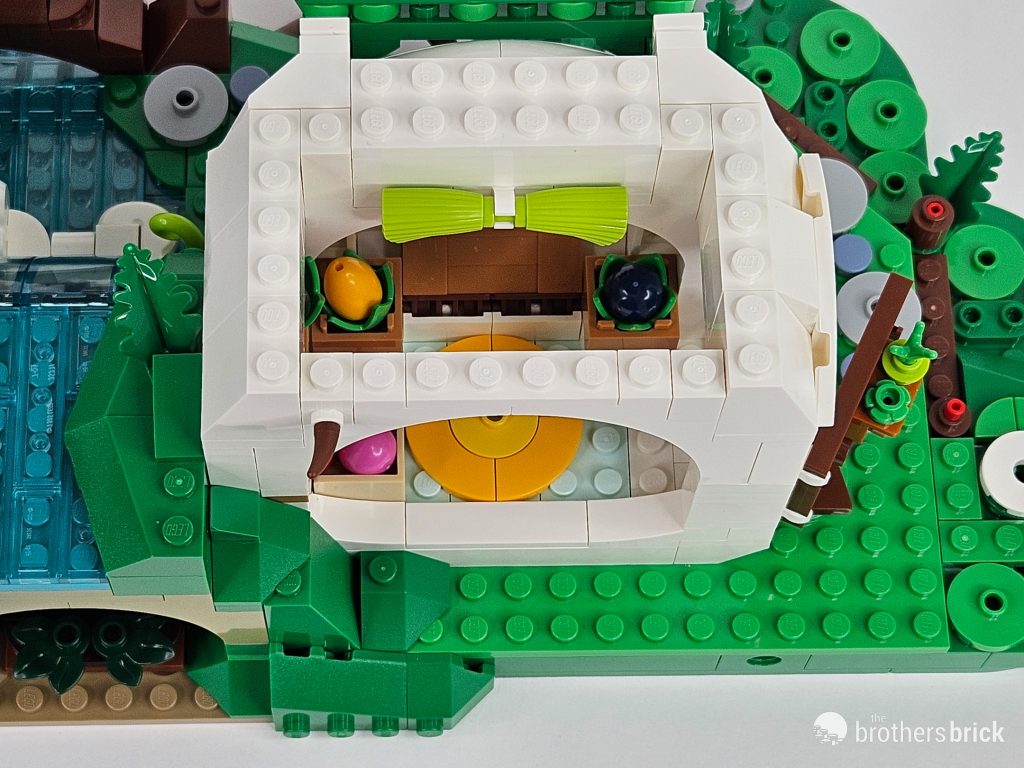
Stump complete, we next begin work on the first of the two large mushrooms. It appears to house some kind of vendor, selling flower buds or blossoms of some kind. And beginning the main floor means building some shelves and stocking them, too.

The rest of the white walls of the mushroom store go up quickly, adding in more goods for sale and a cute side door. The quarter arch tile over doors and windows appears to be a recurring architectural theme in this build.


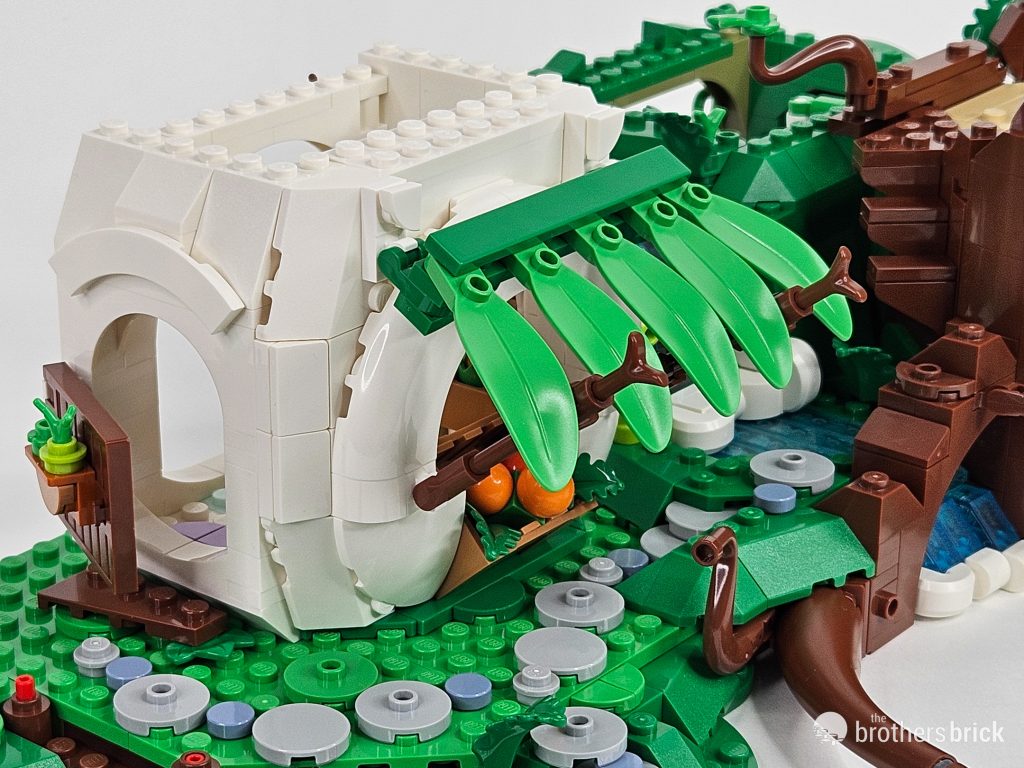
Next up, we add on an awning made of the newer frond element. A rig made of brown bars is used to give the illusion that this verdant canopy is being held up. The interior of the shop is also given some final touches.


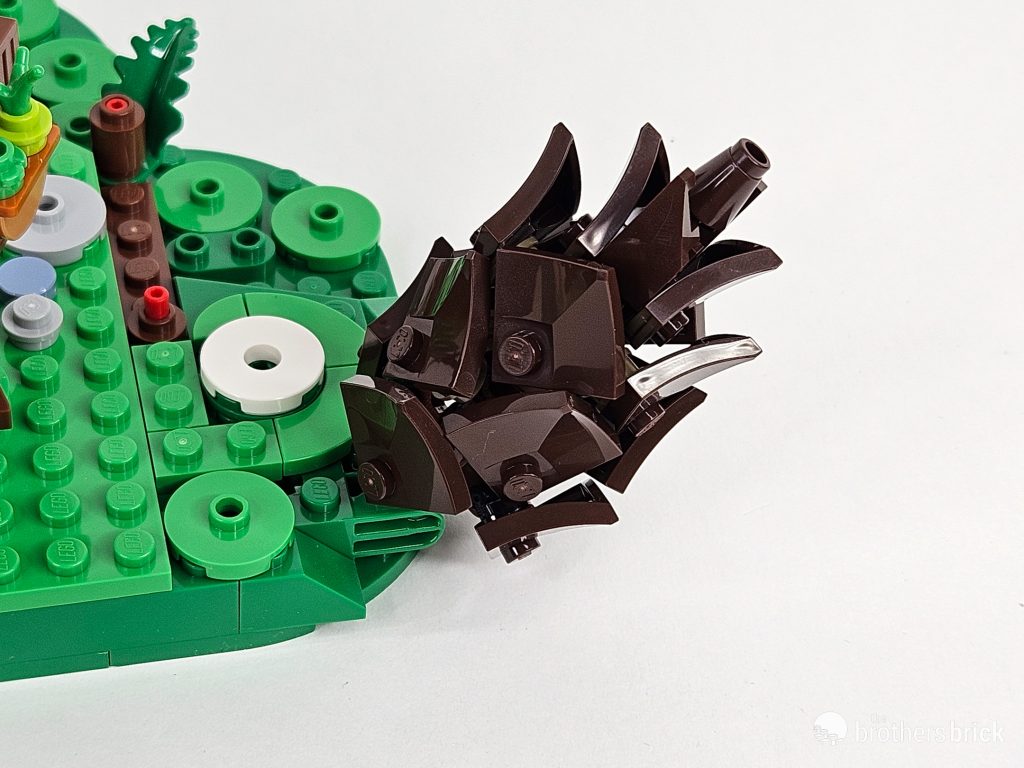
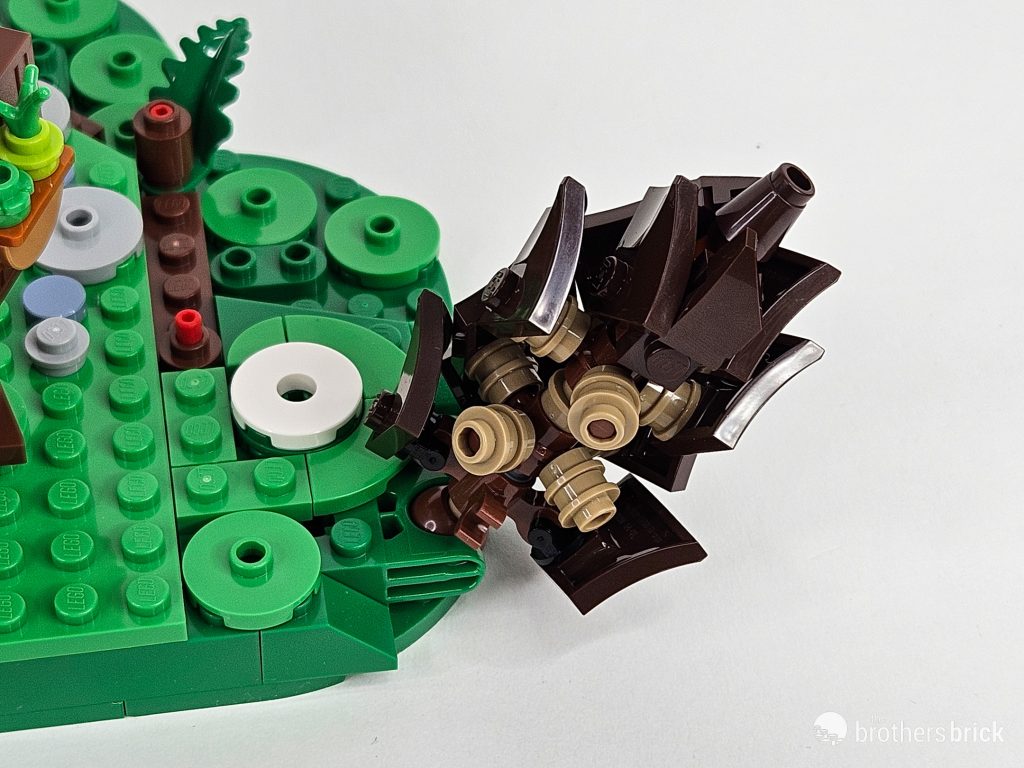
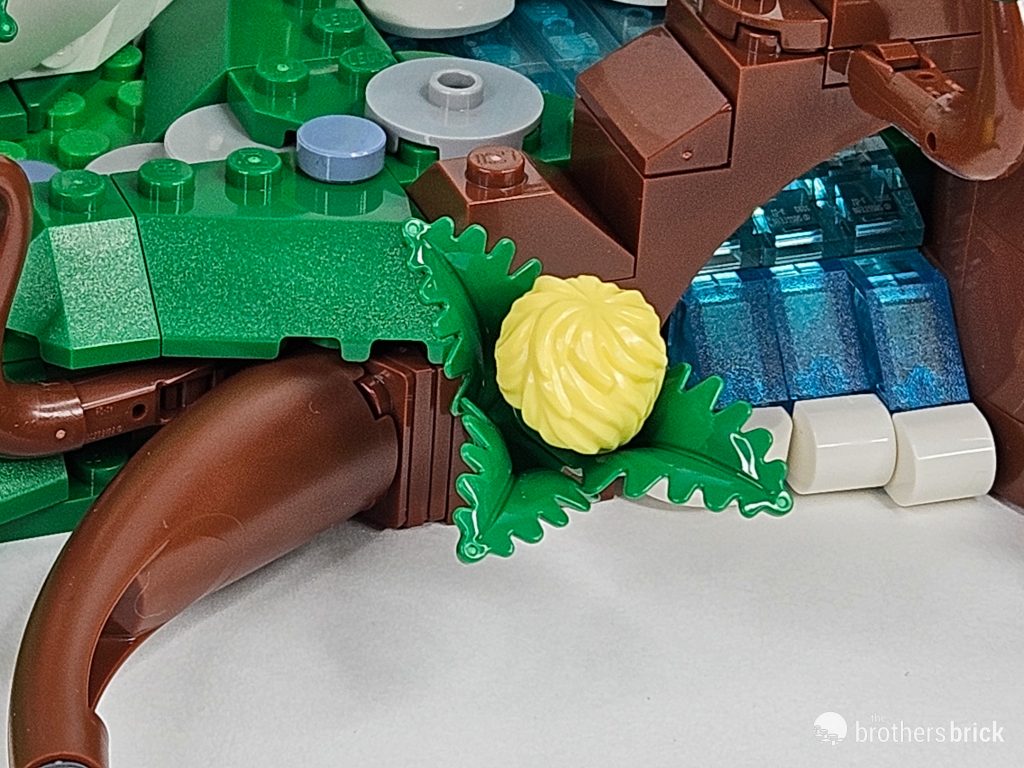
While we’re over on this side of the build, before beginning on the baby blue cap, we can add in some of the landscaping flourishes present in the final model. First up is a wonderful pinecone. This is quite possibly my favorite part of the whole build, utilizing some great technique to achieve an instantly-recognizable shape.


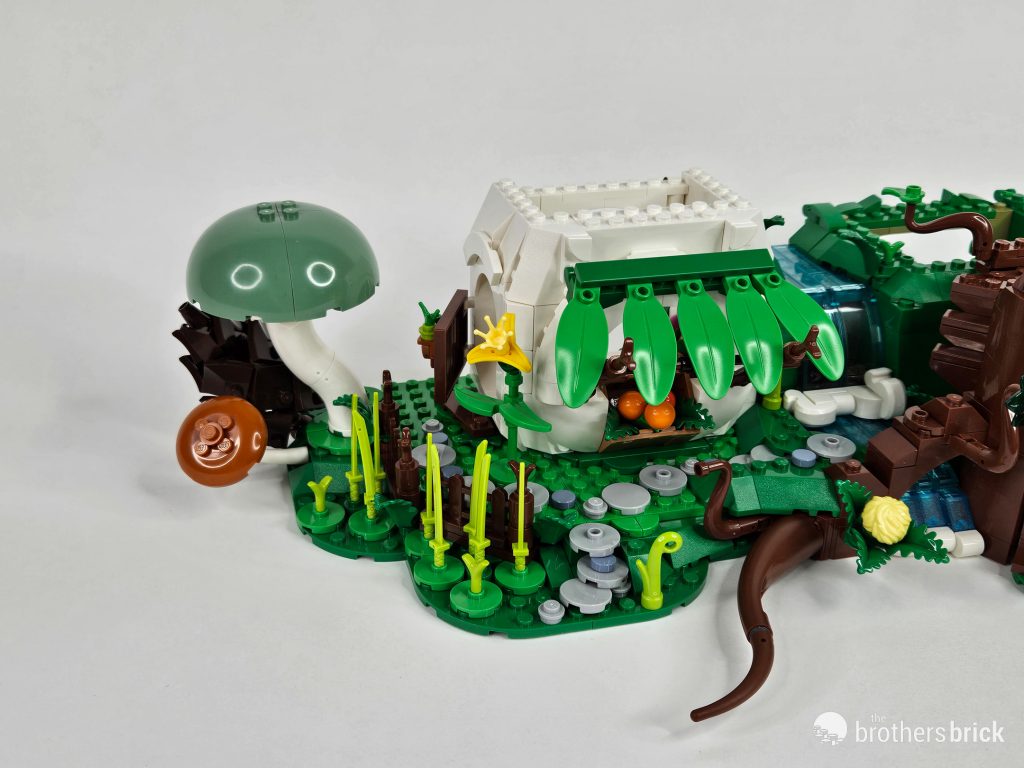
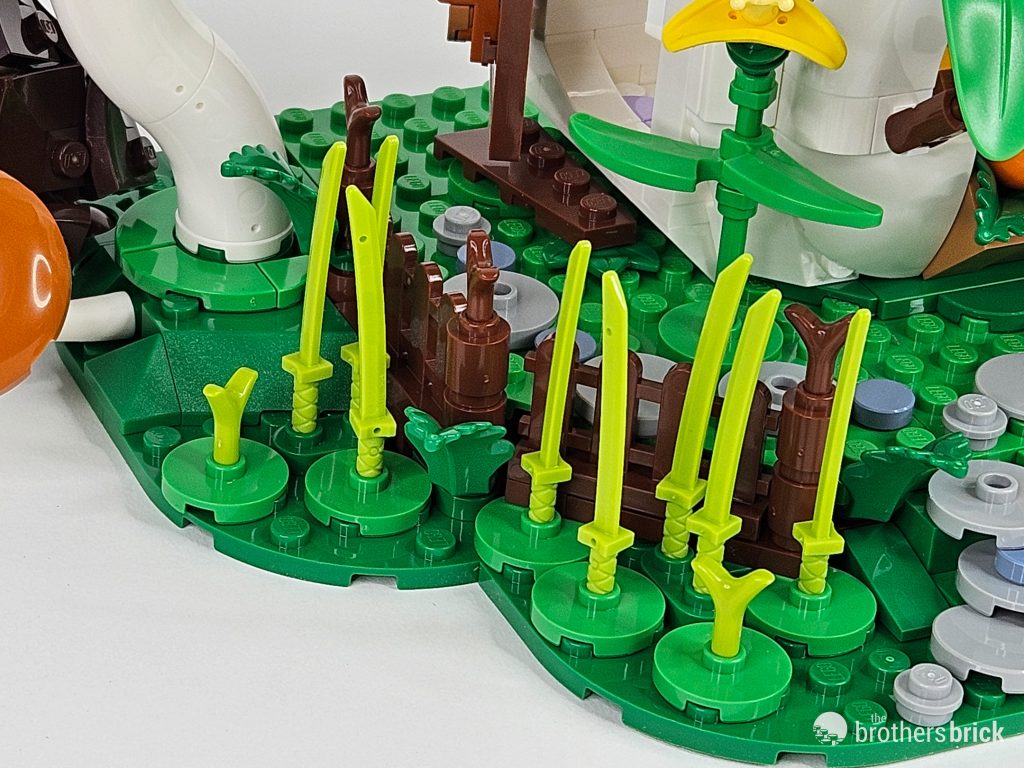
We also flesh out more of the flora on the left side of the set, including a smaller pair of toadstools, some (literal) blades of grass, a bit of fencing, and a few flowers featuring unique and interesting designs. I love how Jonas has created this world and doesn’t build anything the same, but still everything feels at home. There’s great strength of style throughout.


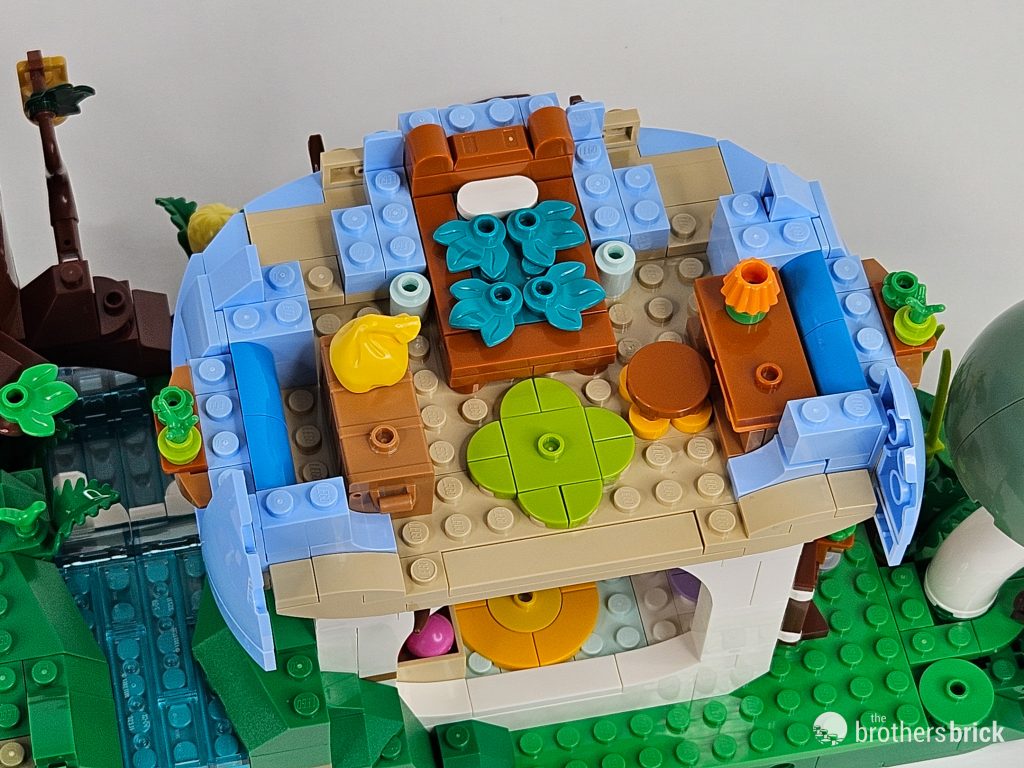
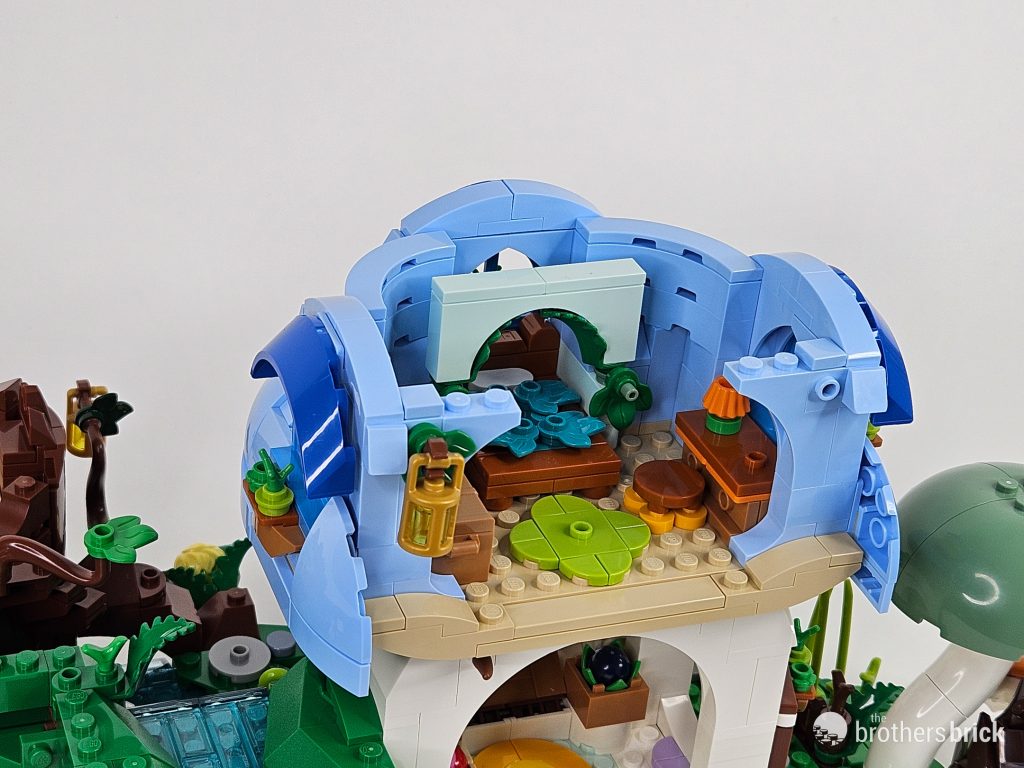
Finally, we begin on the medium blue cap to this ‘shroom. This begins with some curved slopes in the appropriate color, brackets waiting to help build up the walls of this fungal abode, and a floor complete with yet another nature-themed rug.


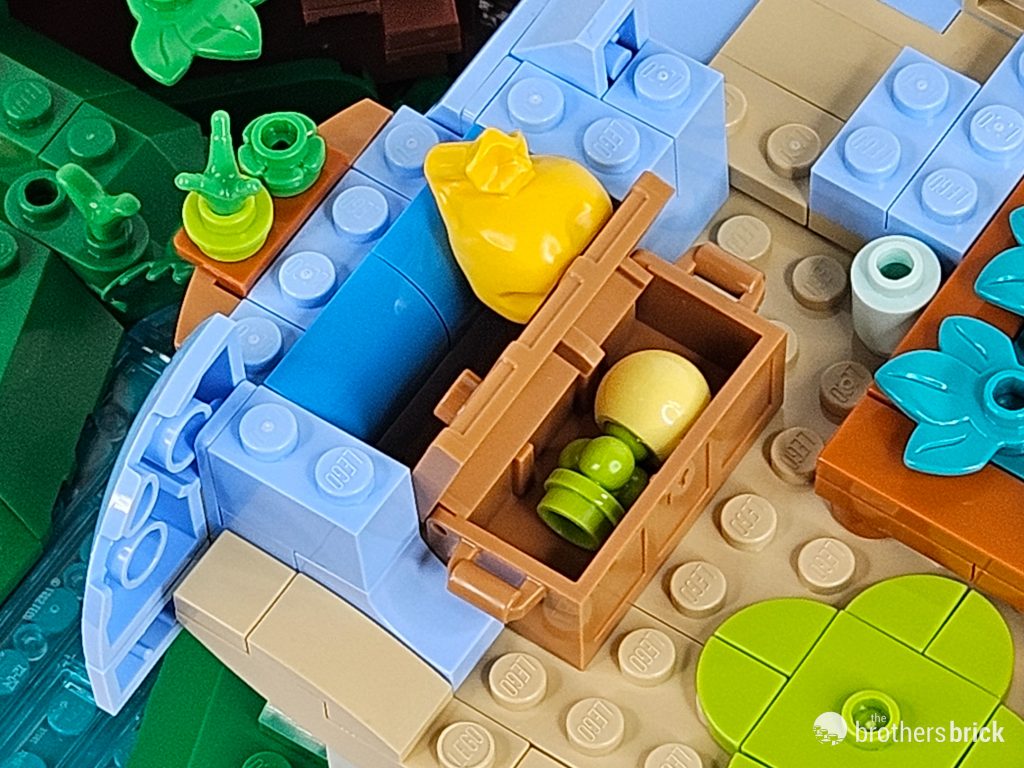
In the next step, we decorate this domicile, and of course we have another leafy bed to add. There’s also a desk on one side and a chest on the other, filled with what I’m guessing is a seed of some kind.


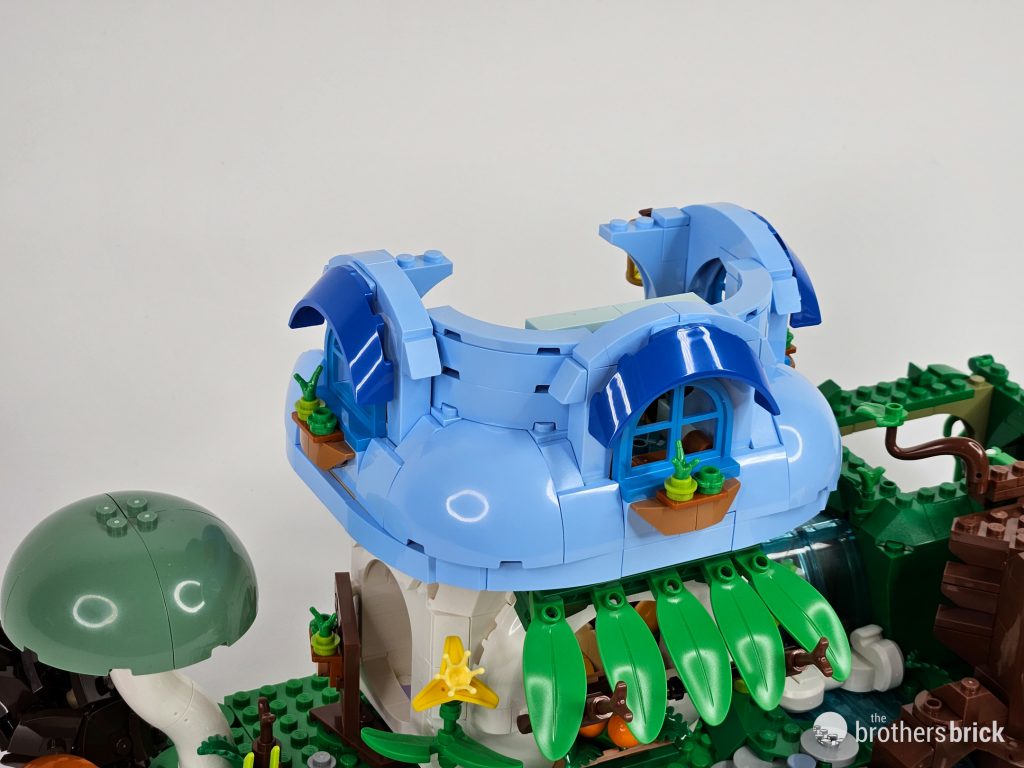
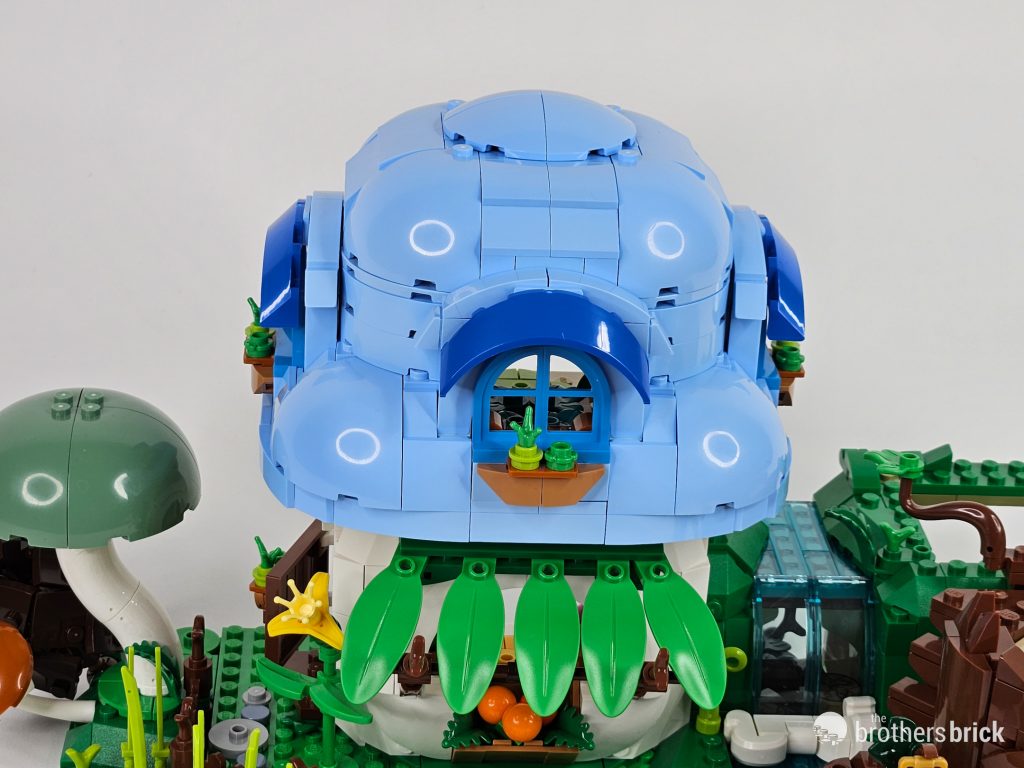
Returning to the exterior, it’s time to add in some windows. This kit utilizes the Animal Crossing versions in dark azure, each capped with an awning in original blue. These awnings are made from one of my favorite parts – the 3×6 curved windscreen. I’m always happy to have more of that part. Meanwhile, on the interior, we get a lovely verdant arch over the bed, and some internal structure as we prepare to add on the roof.


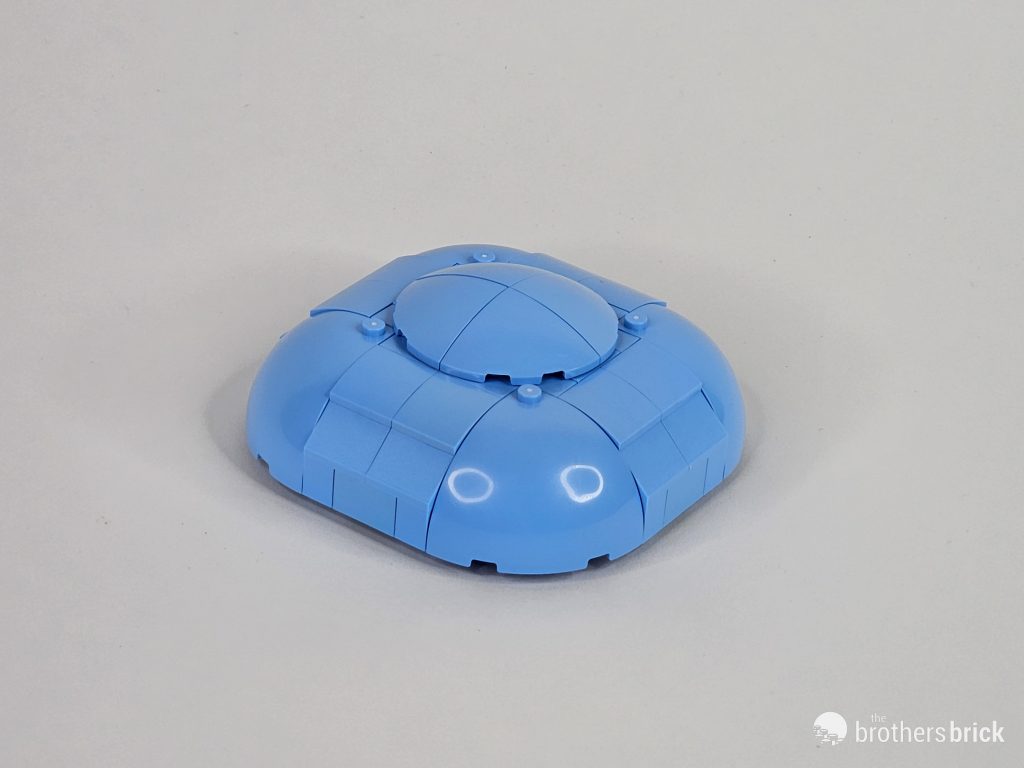
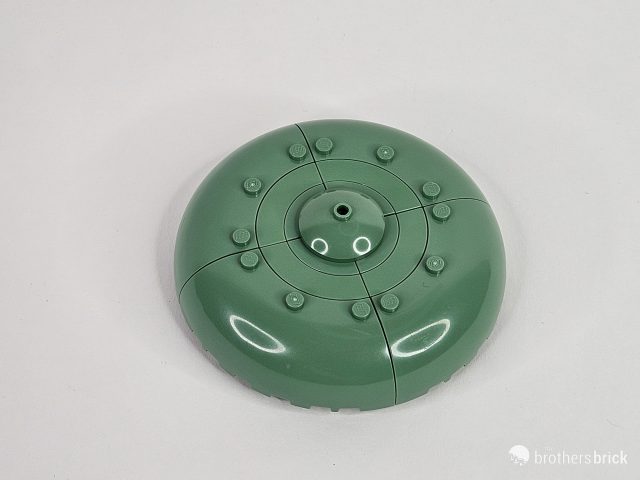
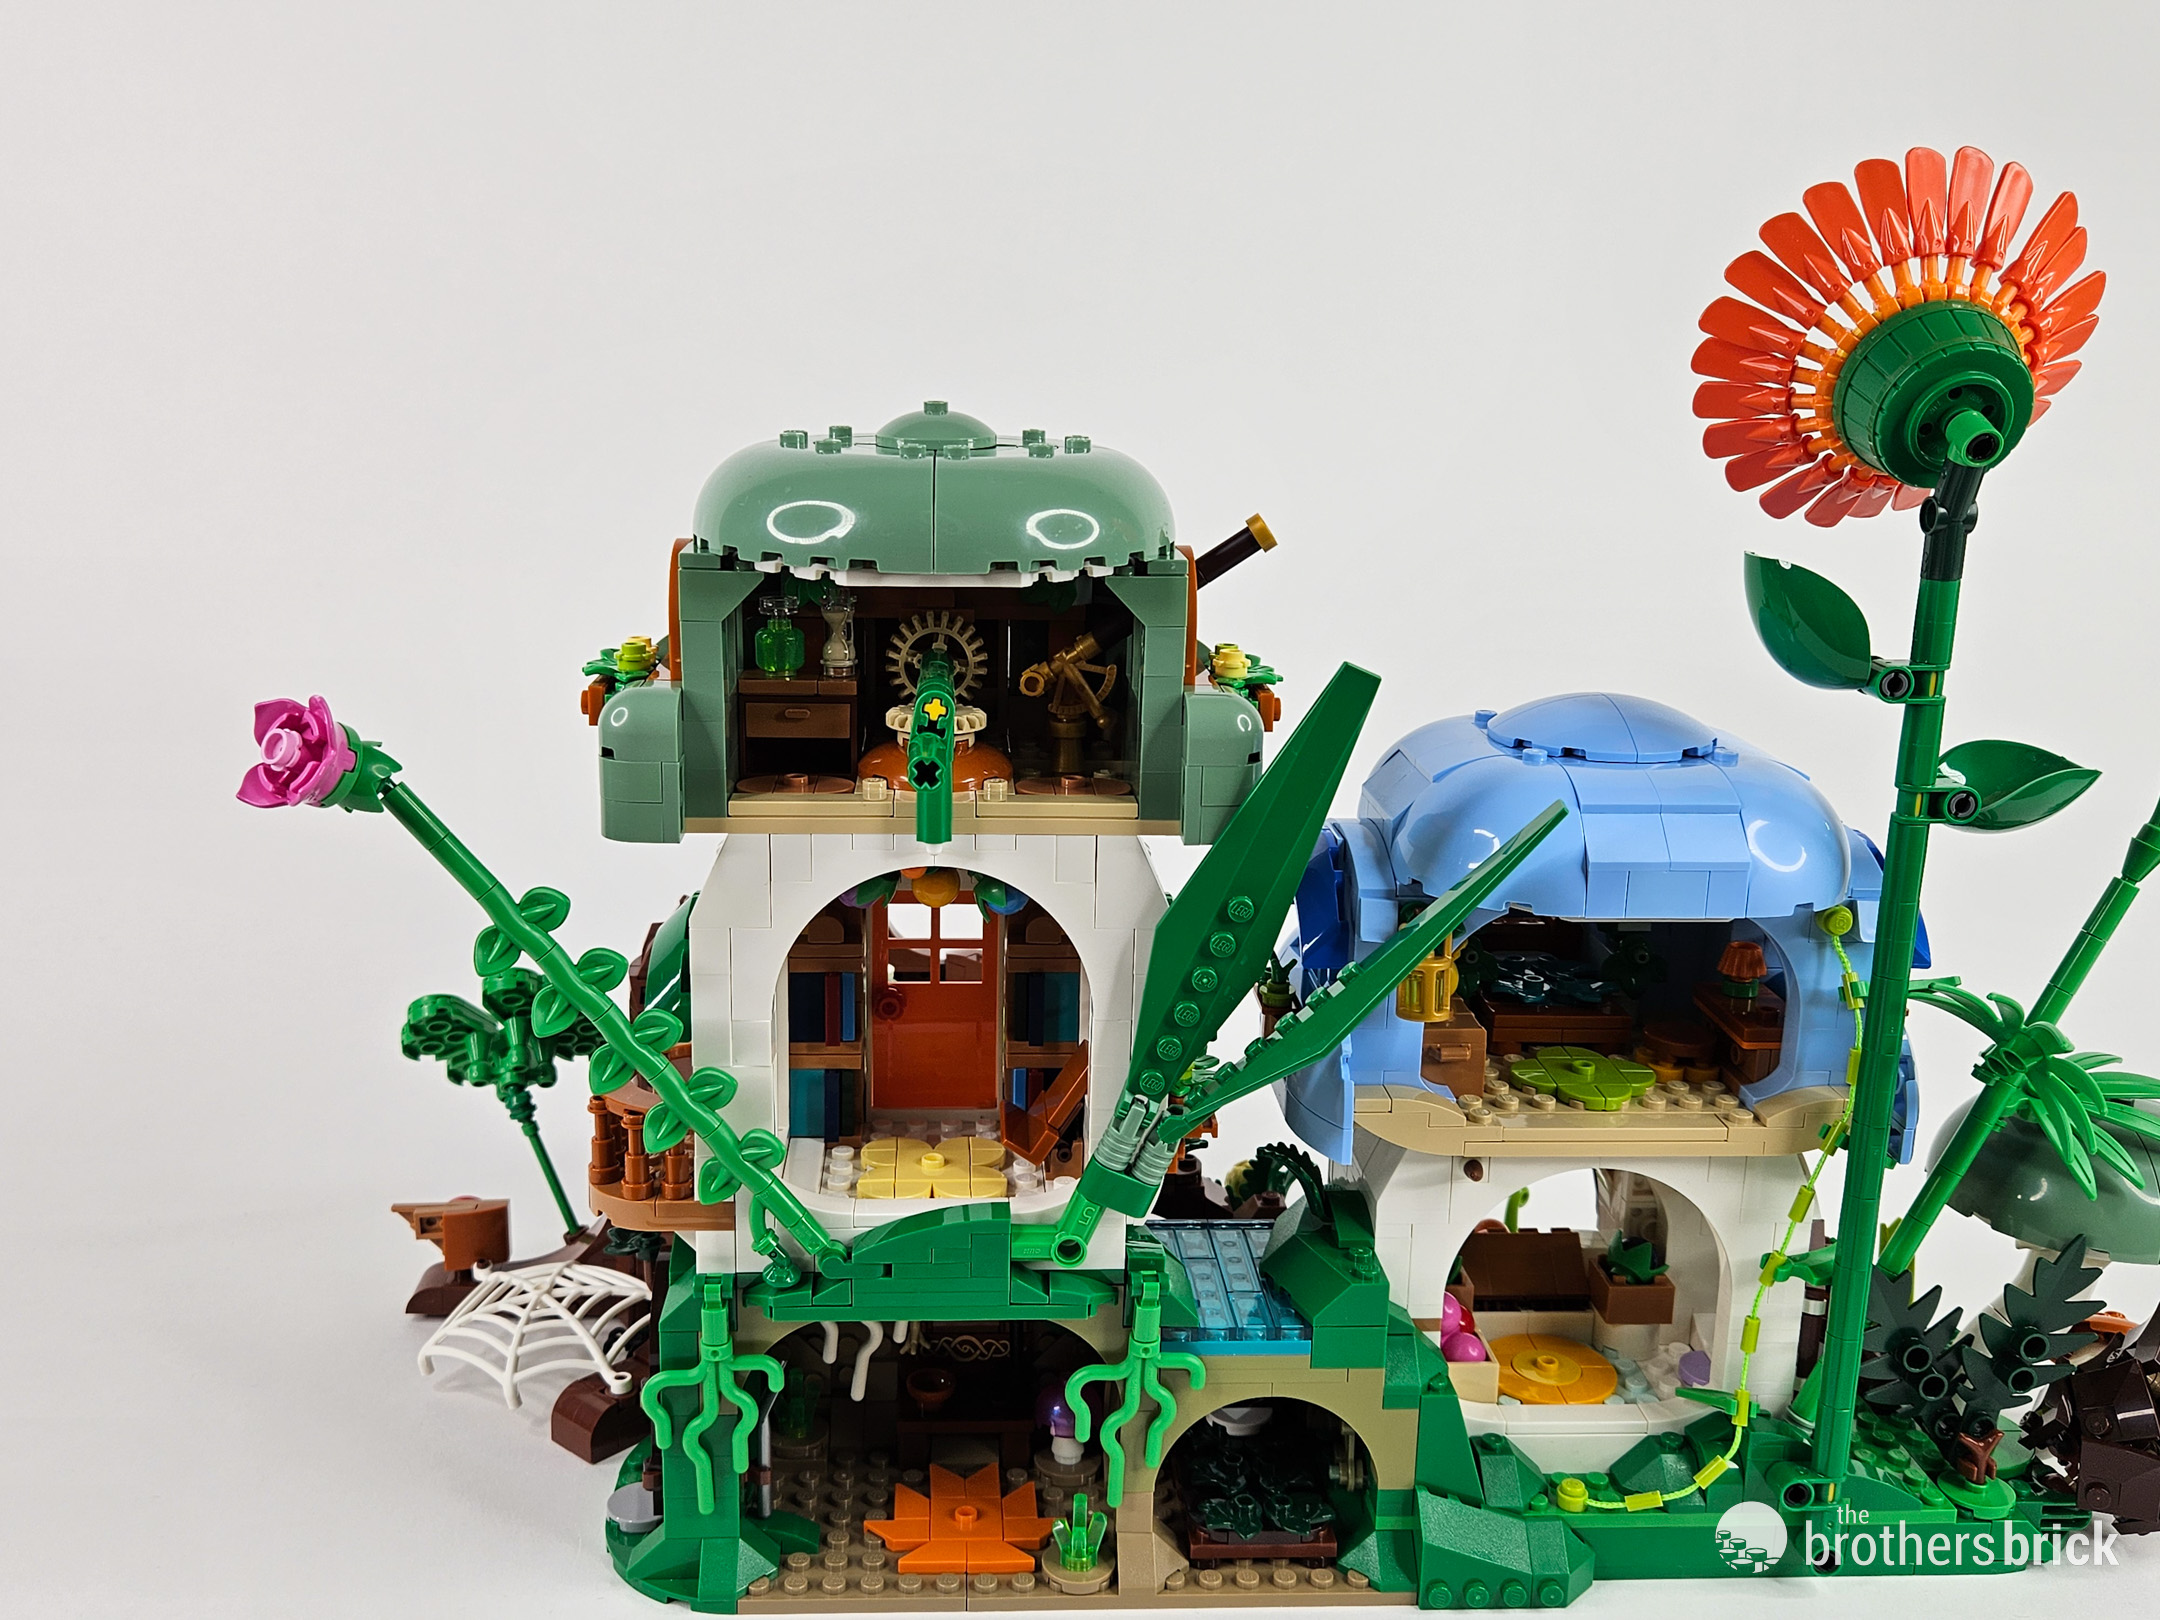
In a final step for the blue mushroom, we throw together an appropriate domed roof. It leads to an appropriately-bulbous fungal building. This roof affixes with minimal stud connections, allowing it to be easily removed for play with the finished model.


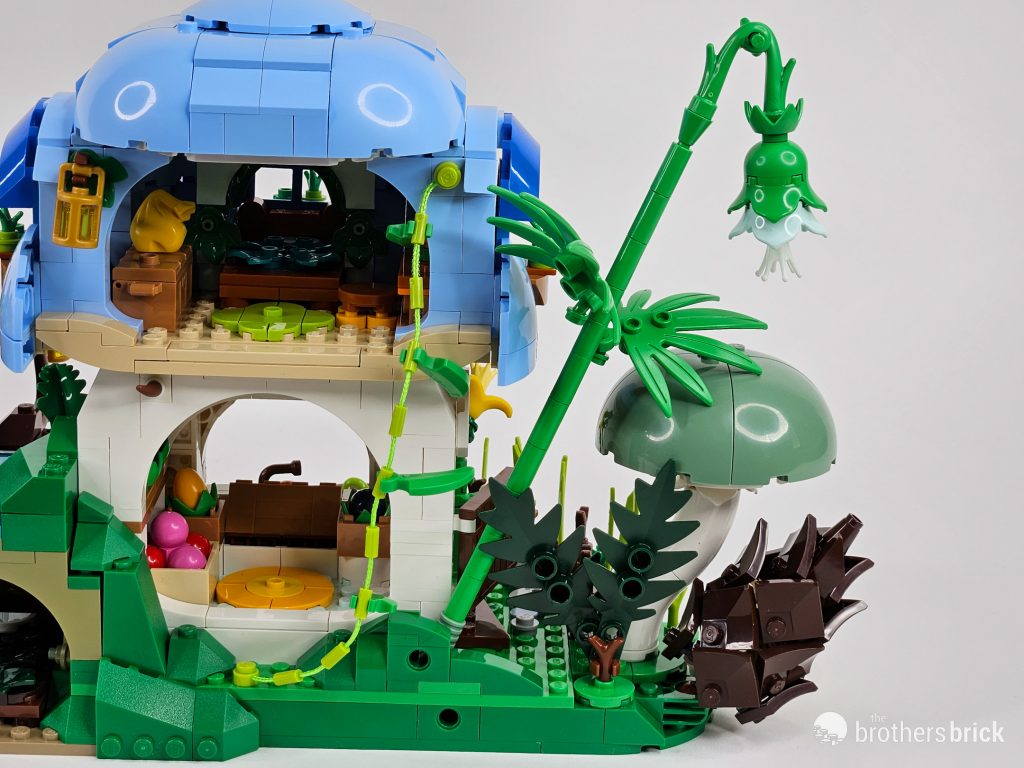
Before we pivot to the final toadstool building, we’ve got some more vegetation to add in around the store we just completed. This begins with a lime green vine, some prickly leaves, and a long bell-type flower. The leaf technique on this stalk is fantastic, and a simple two-part combo. I’m definitely stealing that for my own floral work.

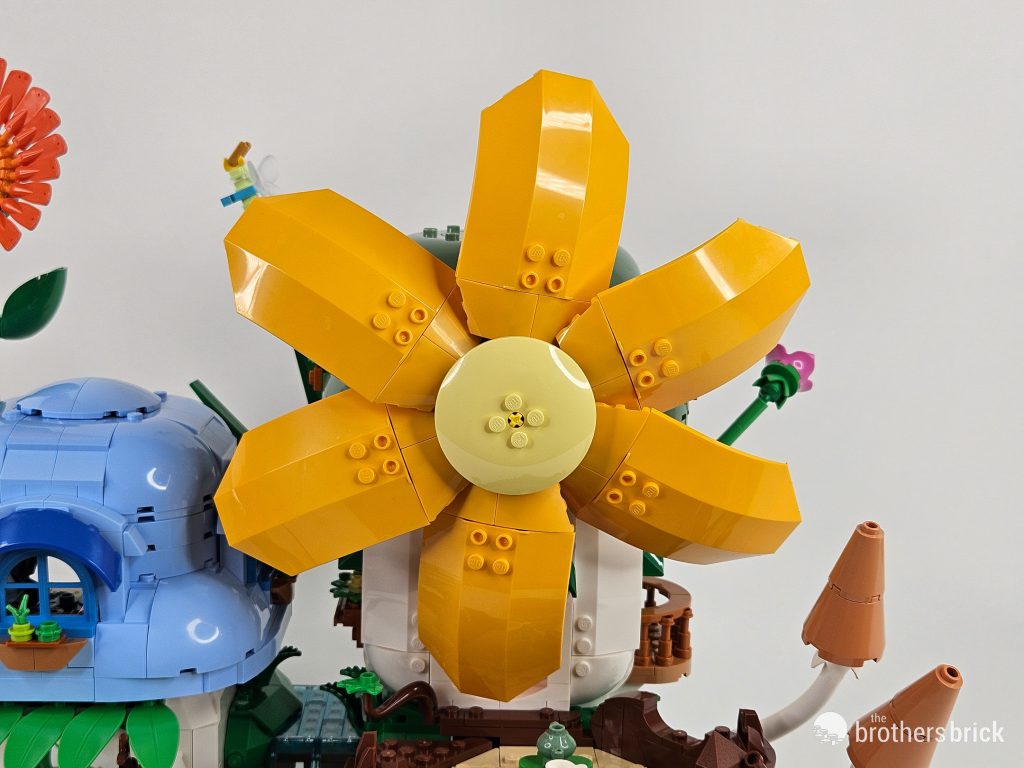
We’ve got one last flower to tack on before beginning the green mushroom house, and it’s a sunflower-type. While it’s a welcome addition, the technique here mirrors other sunflower builds put out by LEGO.


At this stage, here’s what the build looks like before venturing into the home stretch.

The green-capped mushroom
Taking up the right rear of the set, the green-capped mushroom first forms on top of the basement from earlier with some white walls and a few bookcases. As with every other room in this model, we’re blessed with another nature-themed rug. A yellow flower is added to the green clover, maple leaf, and tree ring mats from earlier.

Our next step completes the balcony, adds another layer to the bookshelves, and throws on an orange front door. We also get a spot to hold the mystical book that will come up when we look at the minifigs in this set.


We conclude this story of the green-capped mushroom with the rest of the walls, some green awnings in the same style as on the blue mushroom, and a floor for the second story. There are some bar attachments added at this stage which will come in handy later on when we add the flower windmill.


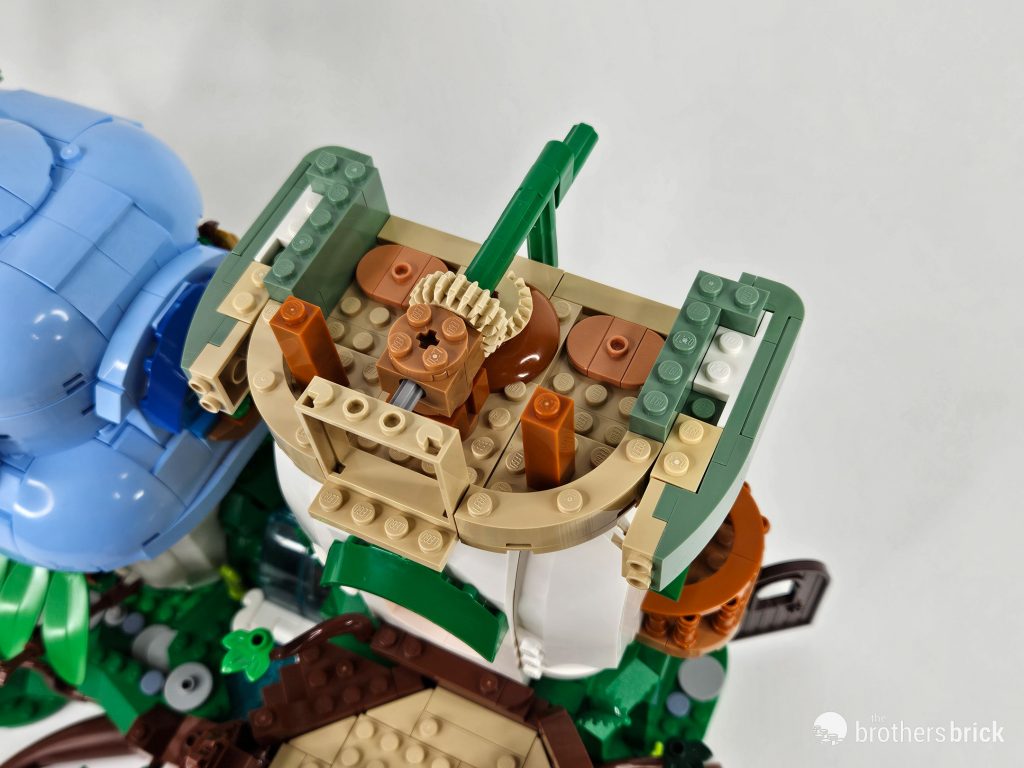
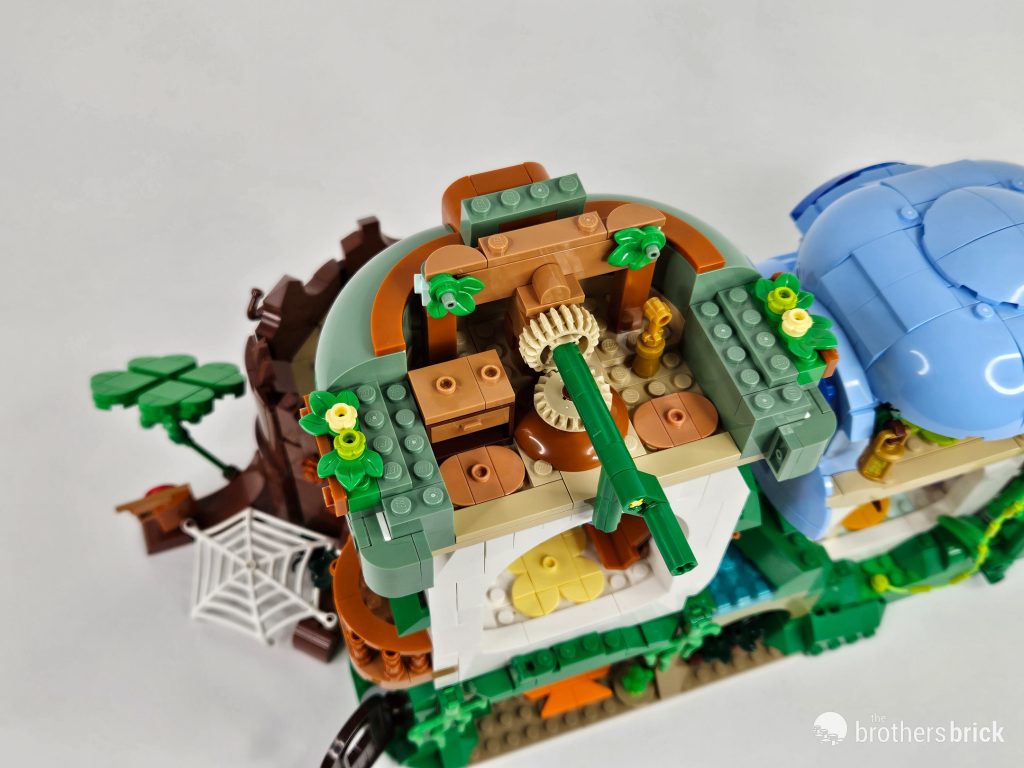
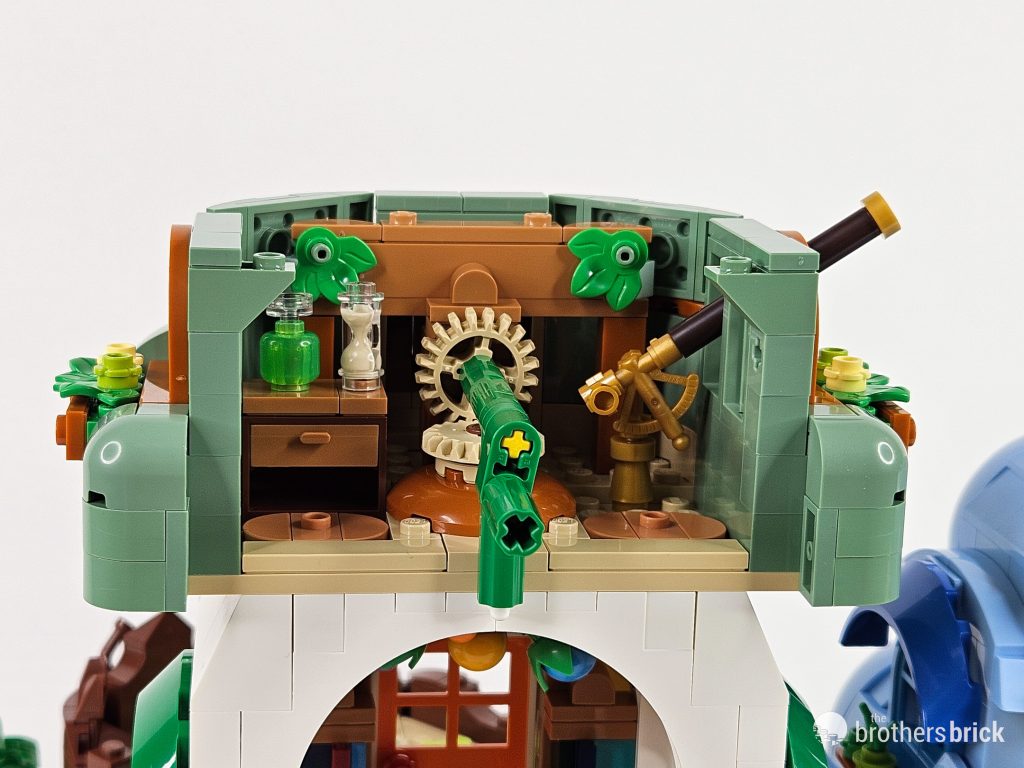
The third floor of this shroom structure houses the mechanisms for the flower windmill on the front. Gears connected at a 90-degree angle connect the crank at the back to an orrery-type ornament on the lower story’s ceiling. This crank is directly attached to the axle feeding through a front-facing window.

There’s no good angle to see the orrery in motion, but here’s a look at it before seating it on the underside of the third story floor.

Amid all the gears in the upper story, we’ve still got plenty of room for décor. The next step brings that in spades! We see the start of a telescope going in on the right side as well.


In the next step, we complete the rest of this sand green room, decorating a set of drawers further with an hourglass and potion bottle. The telescope comes into its full form at this stage, as well.

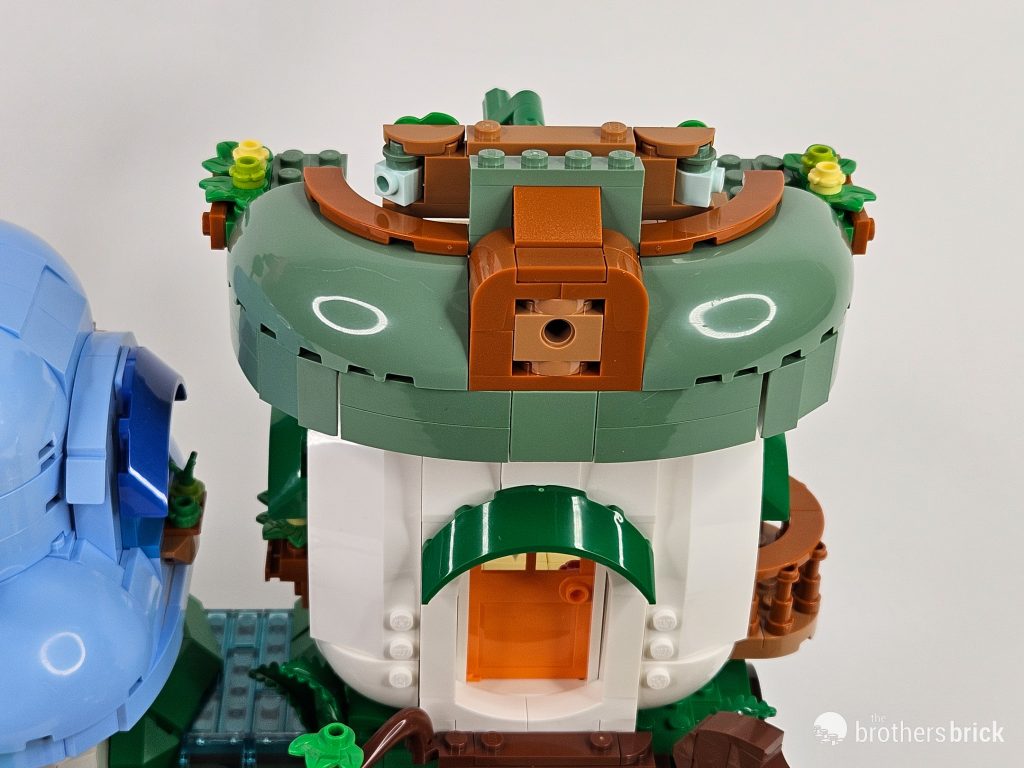
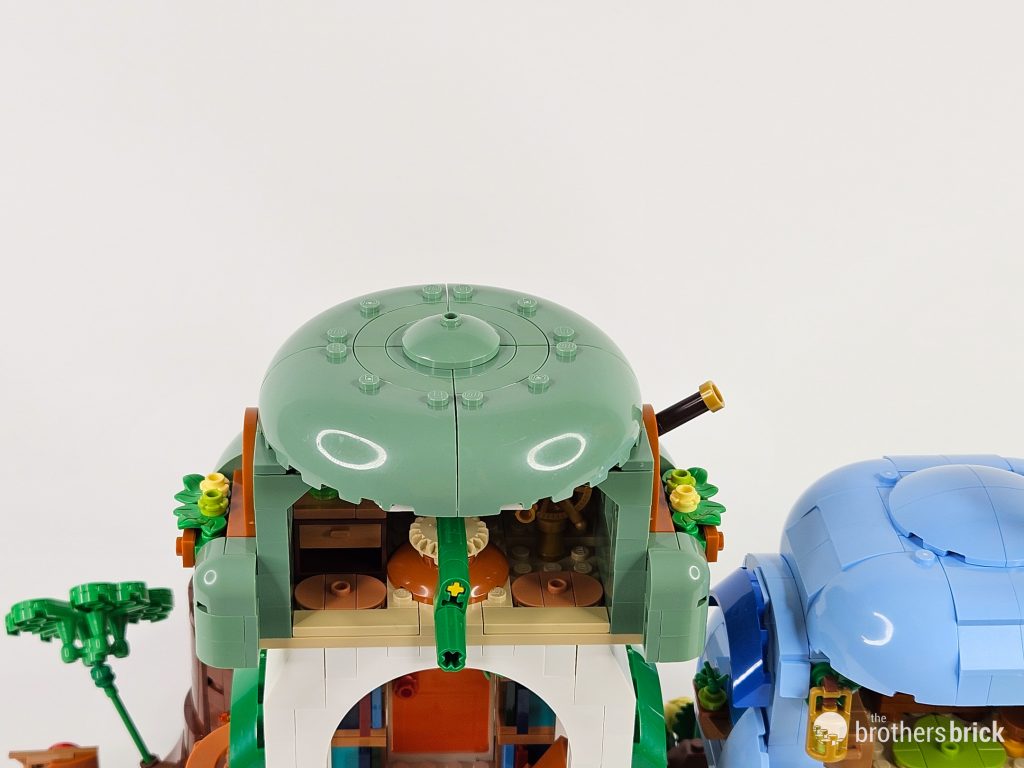
Following up on the completed interior, we next throw together a sand green roof to cap this shroom. Just like the blue one, it sits in place with only a few stud connections to allow for removal during playtime.

The green mushroom is nearly done here, just missing the flower windmill on its front. But we’ve got some more vegetation to add in before we spin the model around. Another long flower does the trick here, along with a pair of leaves.
From here, the rest of the model comes together quickly, bouncing around and adding on a few missing elements. A pair of shrooms sprout out of the side of the stump at this phase, and a small insect flies around the green mushroom cap thanks to a pair of minifigure wings.


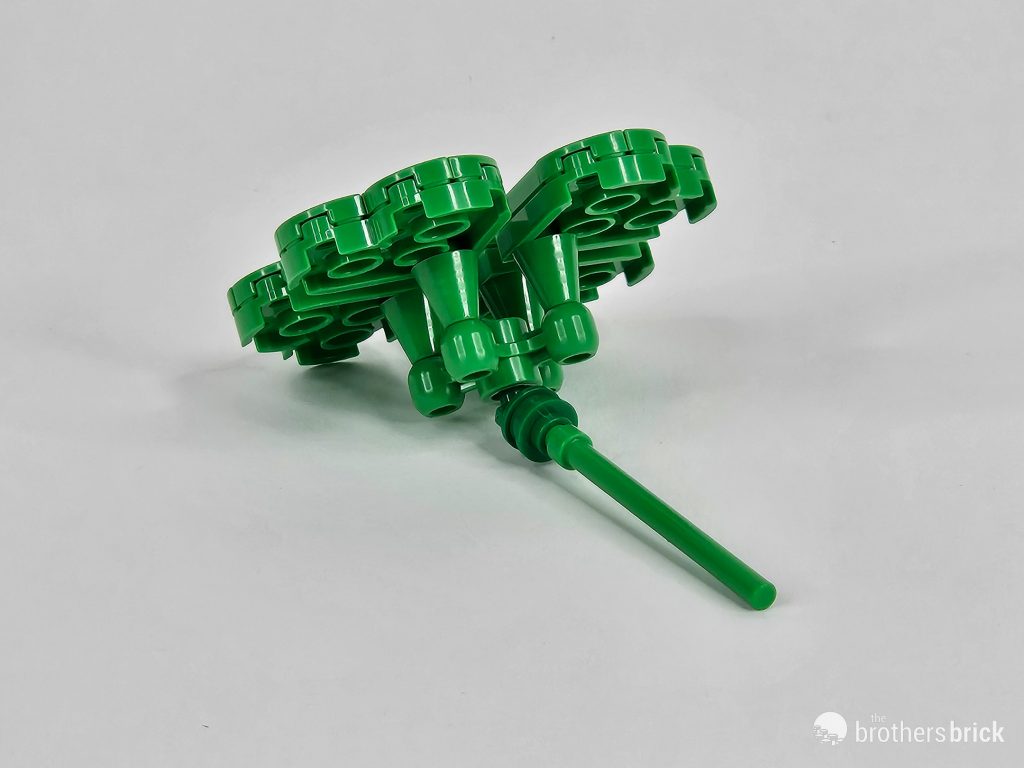
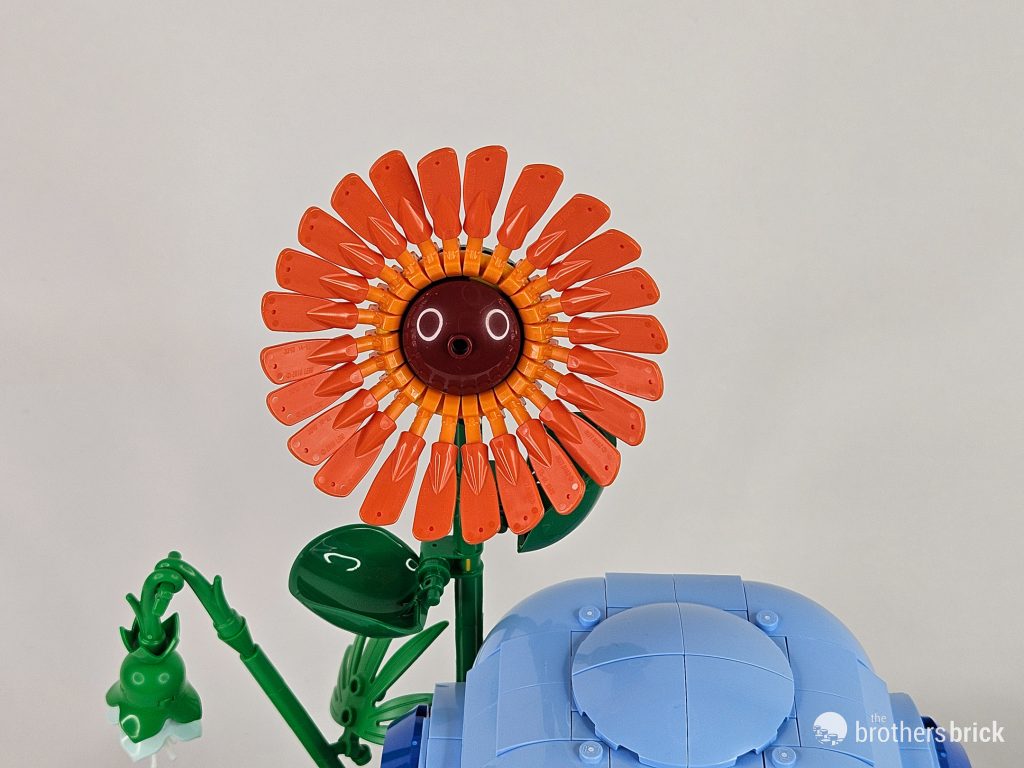
The very last step assembles the spinning flower that lights up the front of the display. The design is quite simple, relying on several three-pronged plates with a Technic axle hole in the middle. The bend in the petals hinges on a lone Technic friction pin for each petal. It’s a very simple design, but quite effective.

And with that, the main model is complete and ready to bring in all the accessories.


The minifigures
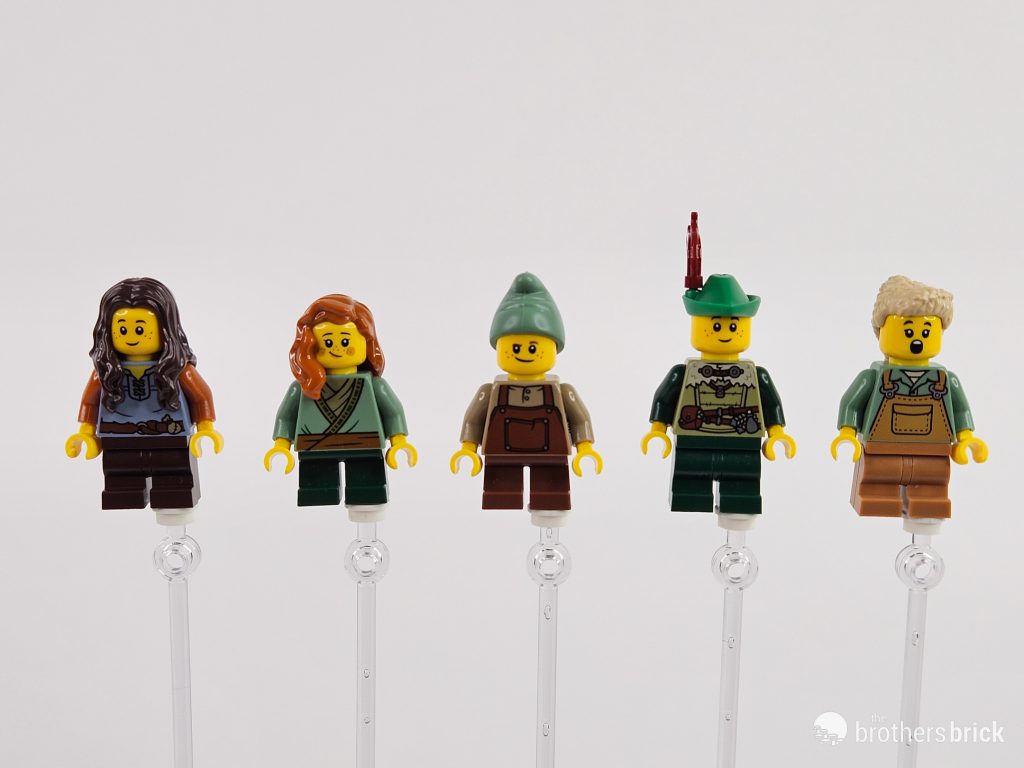
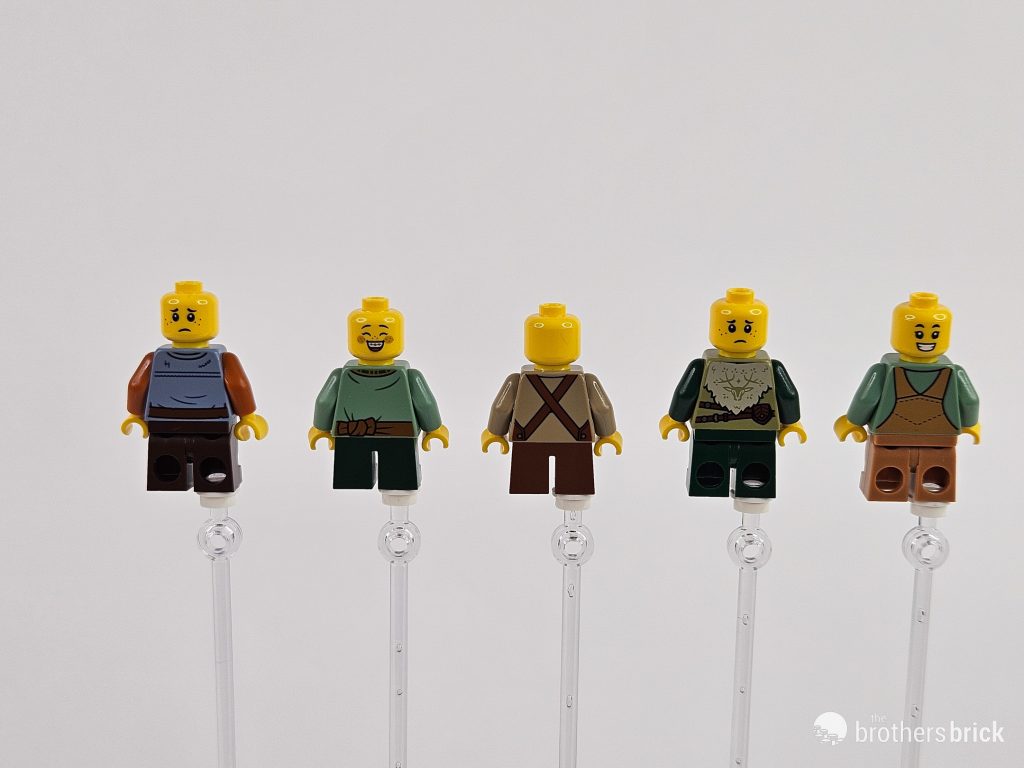
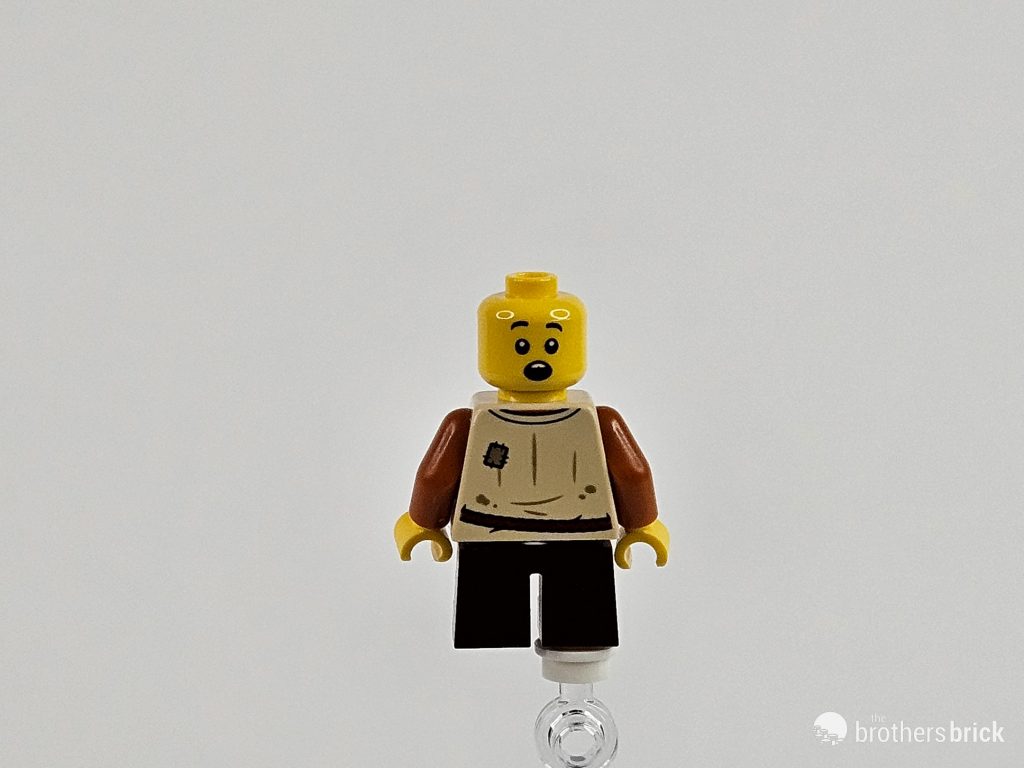
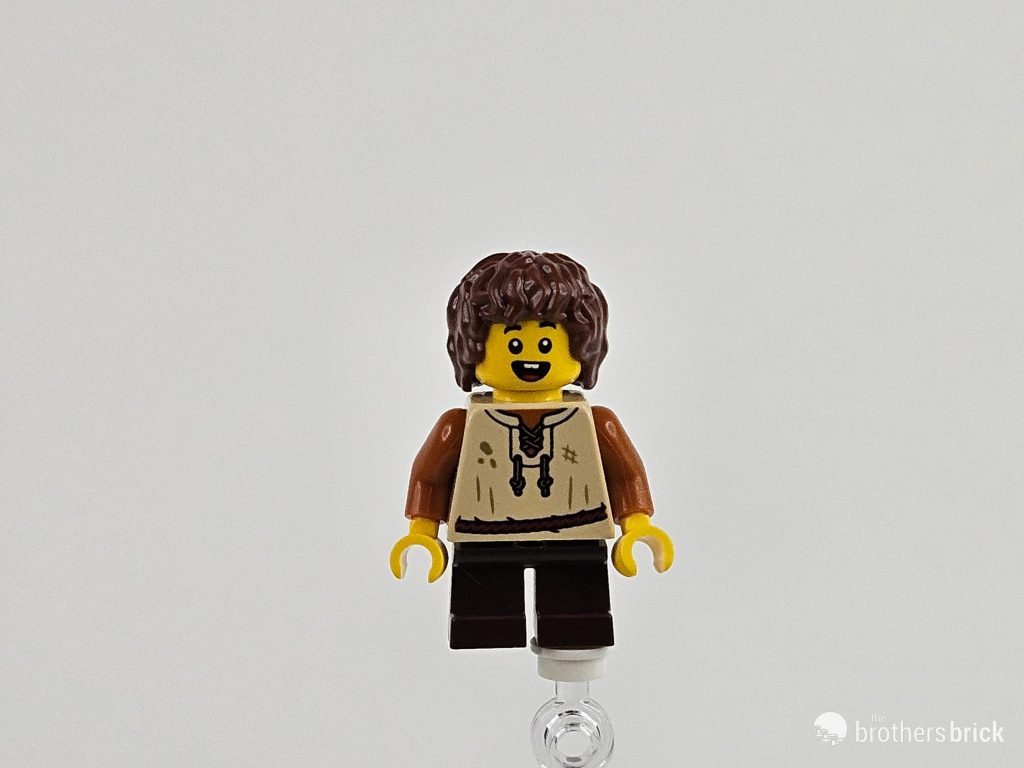
But before we take a look at the finished model in all it’s glory, we’ve got seven minifigures to go over. All seven figures feature legs that are shorter than standard, but vary between the bendable and non-bendable varieties. While the figs aren’t all named by the fan designer, we’ll take a look at these first five which come with more standard accessories before the other two. The torsos are all printed on the front and back with attire appropriate for the denizens of a mushroom village. And four of the five minifig heads have two-sided printing as well. Great accessories like the tan binoculars, lute, and dark blue scarf are fantastic to see here.


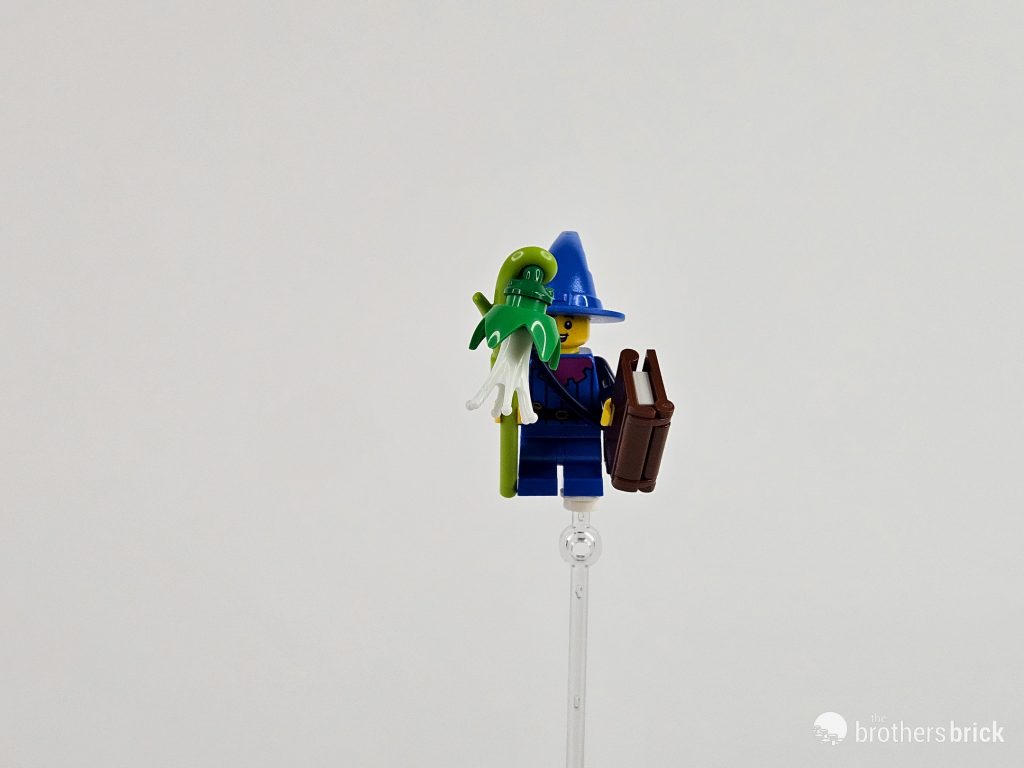
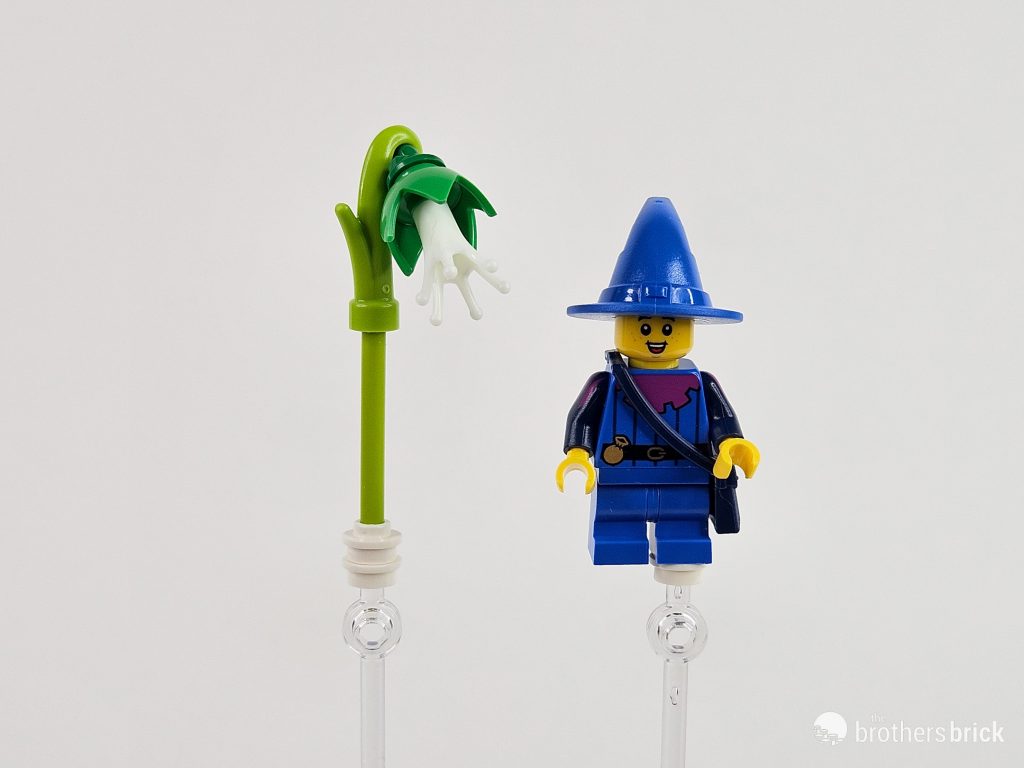
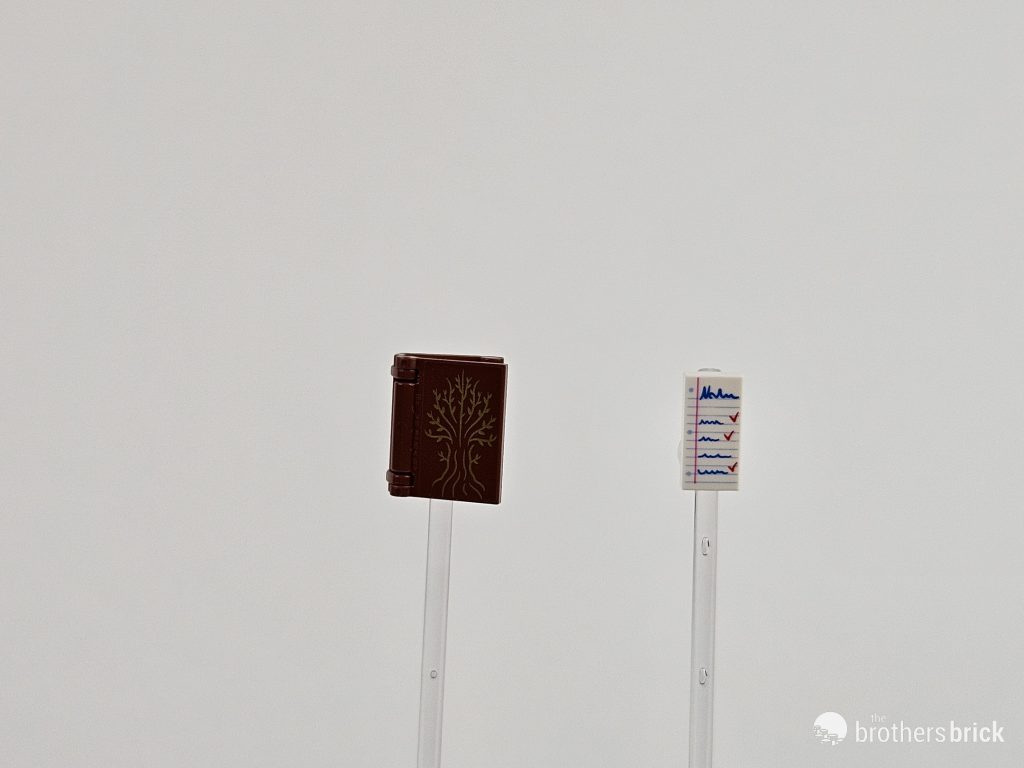
Next up, we’ll give some dedicated time to the wizard of the bunch. Equipped with a very floral staff and spellbook, the World of Wonder’s warlock is clad in blue robes and the standard LEGO wizard hat. Their torso has two-sided printing, while the head here does not. And the spellbook looks to be from the LEGO Ideas 21346 Family Tree set, and contains the 1×2 To-Do List tile.


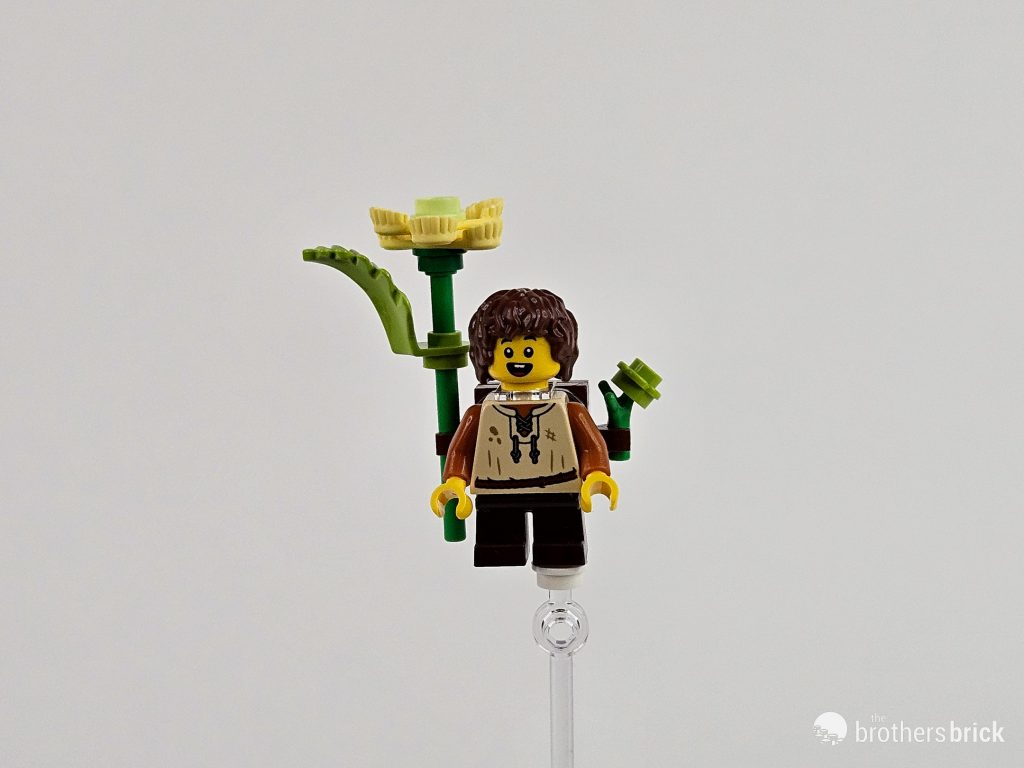
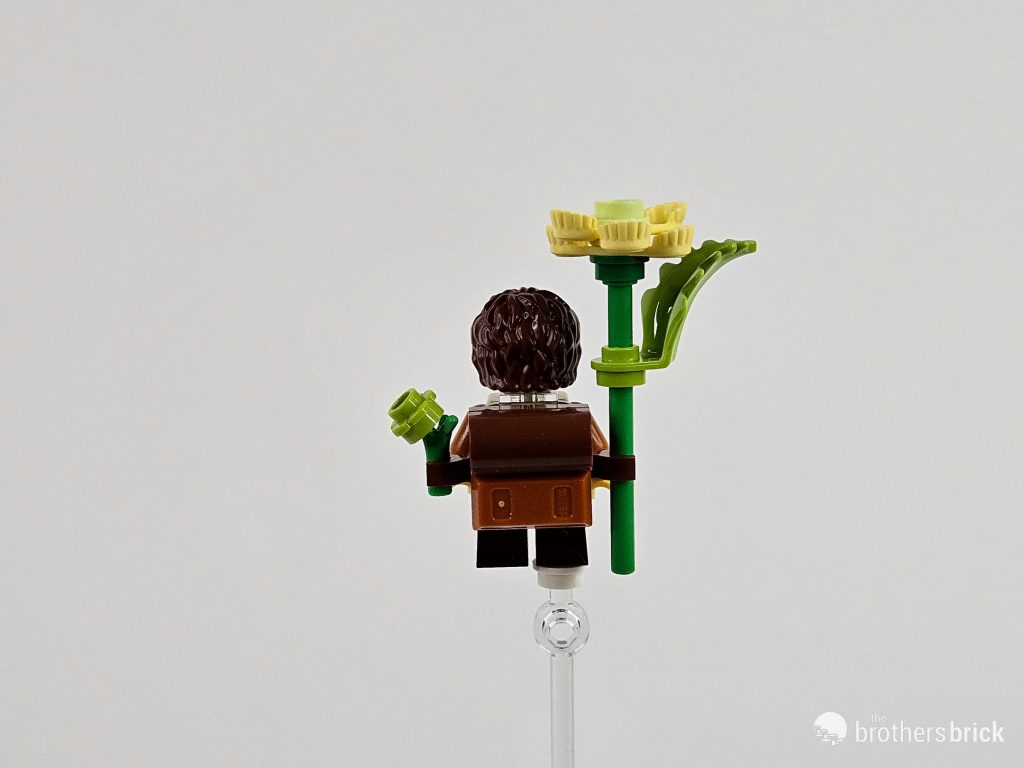
Our last minifigure sports a grin and quite the backpack! One side sports a tiny bloom while the other holds a massive dandelion larger than the fig. Both the torso and the head here have two-sided printing, but the backpack remains the star of the show here.
The finished model
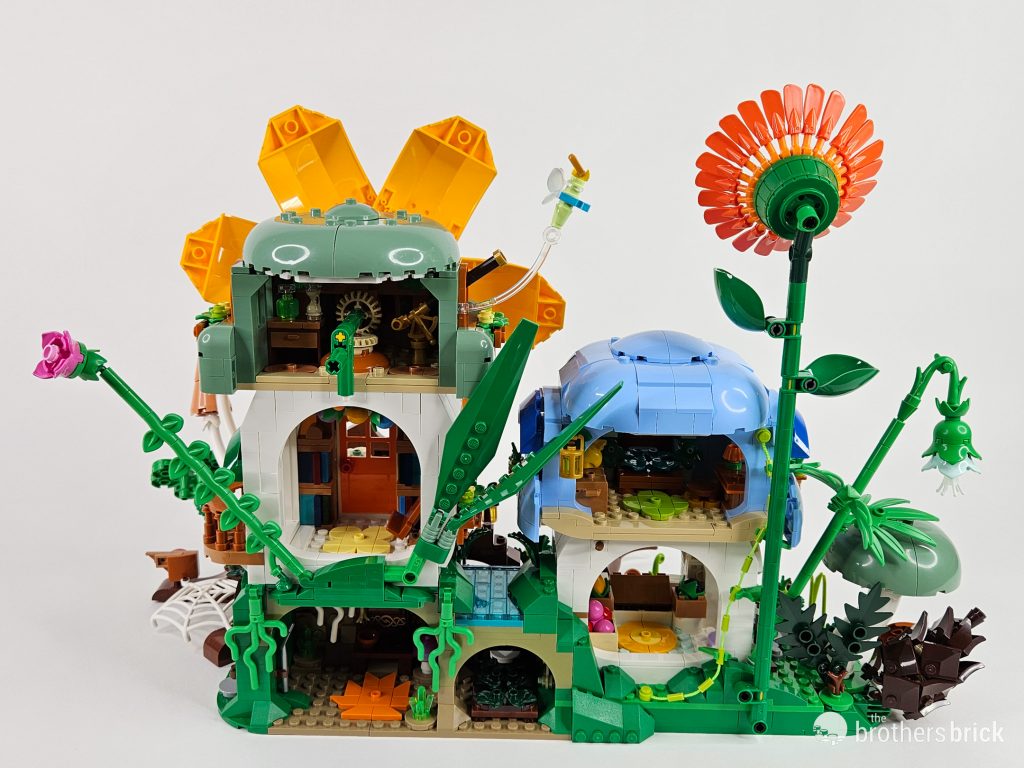
Bringing everything together, the Mushroom Village offers quite the display. Flowers and fungi sprout out of the finished model, providing plenty of color and easily-recognizable forms right at home in this Lilliputian hamlet. There’s a taste of everything, with no duplication of natural wonders. Each fungus and bloom is unique and given it’s own space. And play features abound with an open back, removable roofs, and accessories like the ladybug mount.

Conclusions and recommendations
Full disclosure: I’m a big fan of the principles behind the Bricklink Designer Program and what the team over there are trying to do with these series (though maybe not the popularity contest that occurs on social media to win votes, as I referenced in my last BDP reivew). But I do need to acknowledge that, at the end of the day, preordering a BDP set means taking on some amount of risk. As wonderful as a set may look during voting, it may require techniques that are too challenging for the average builder, as I found with the bridge in BDP Series 2 Logging Railway. It could be made up of so many small parts that an exhausting build process leads to a final work that’s structurally unsound, which is what I found when building BDP Series 3 Lost City. There really isn’t a good way to suss out these issues from an image alone, and for that reason, I think the BDP reviews are essential to informing the community of these potential problems before the pre-order window.
So what did I suss out about the Mushroom Village? It’s a spectacular set! It’s approachable, well-crafted, cohesive, and downright fun. Jonas Kramm is an expert at creating something delightful in LEGO, as we’ve already seen with his Series 2 model. And the village is a fantastic sequel that continues to carry the “Tiny World of Wonders” torch. Time will tell if we get to finish this trilogy (or if any other enterprising fan designer wants to get in on the action, too). As this is the last LEGO set I’m going to review for a while, I can think of no better a high note with which to finish.
LEGO Bricklink Designer Program Series 5 – Mushroom Village consists of 2,436 parts and 7 minifigures. It’ll be available for pre-order on June 10th at 08:00 PT for $209.99 USD, with models shipping roughly 6 months later.
LEGO sent The Brothers Brick an early copy of this set for review. Providing TBB with products for review guarantees neither coverage nor positive reviews.