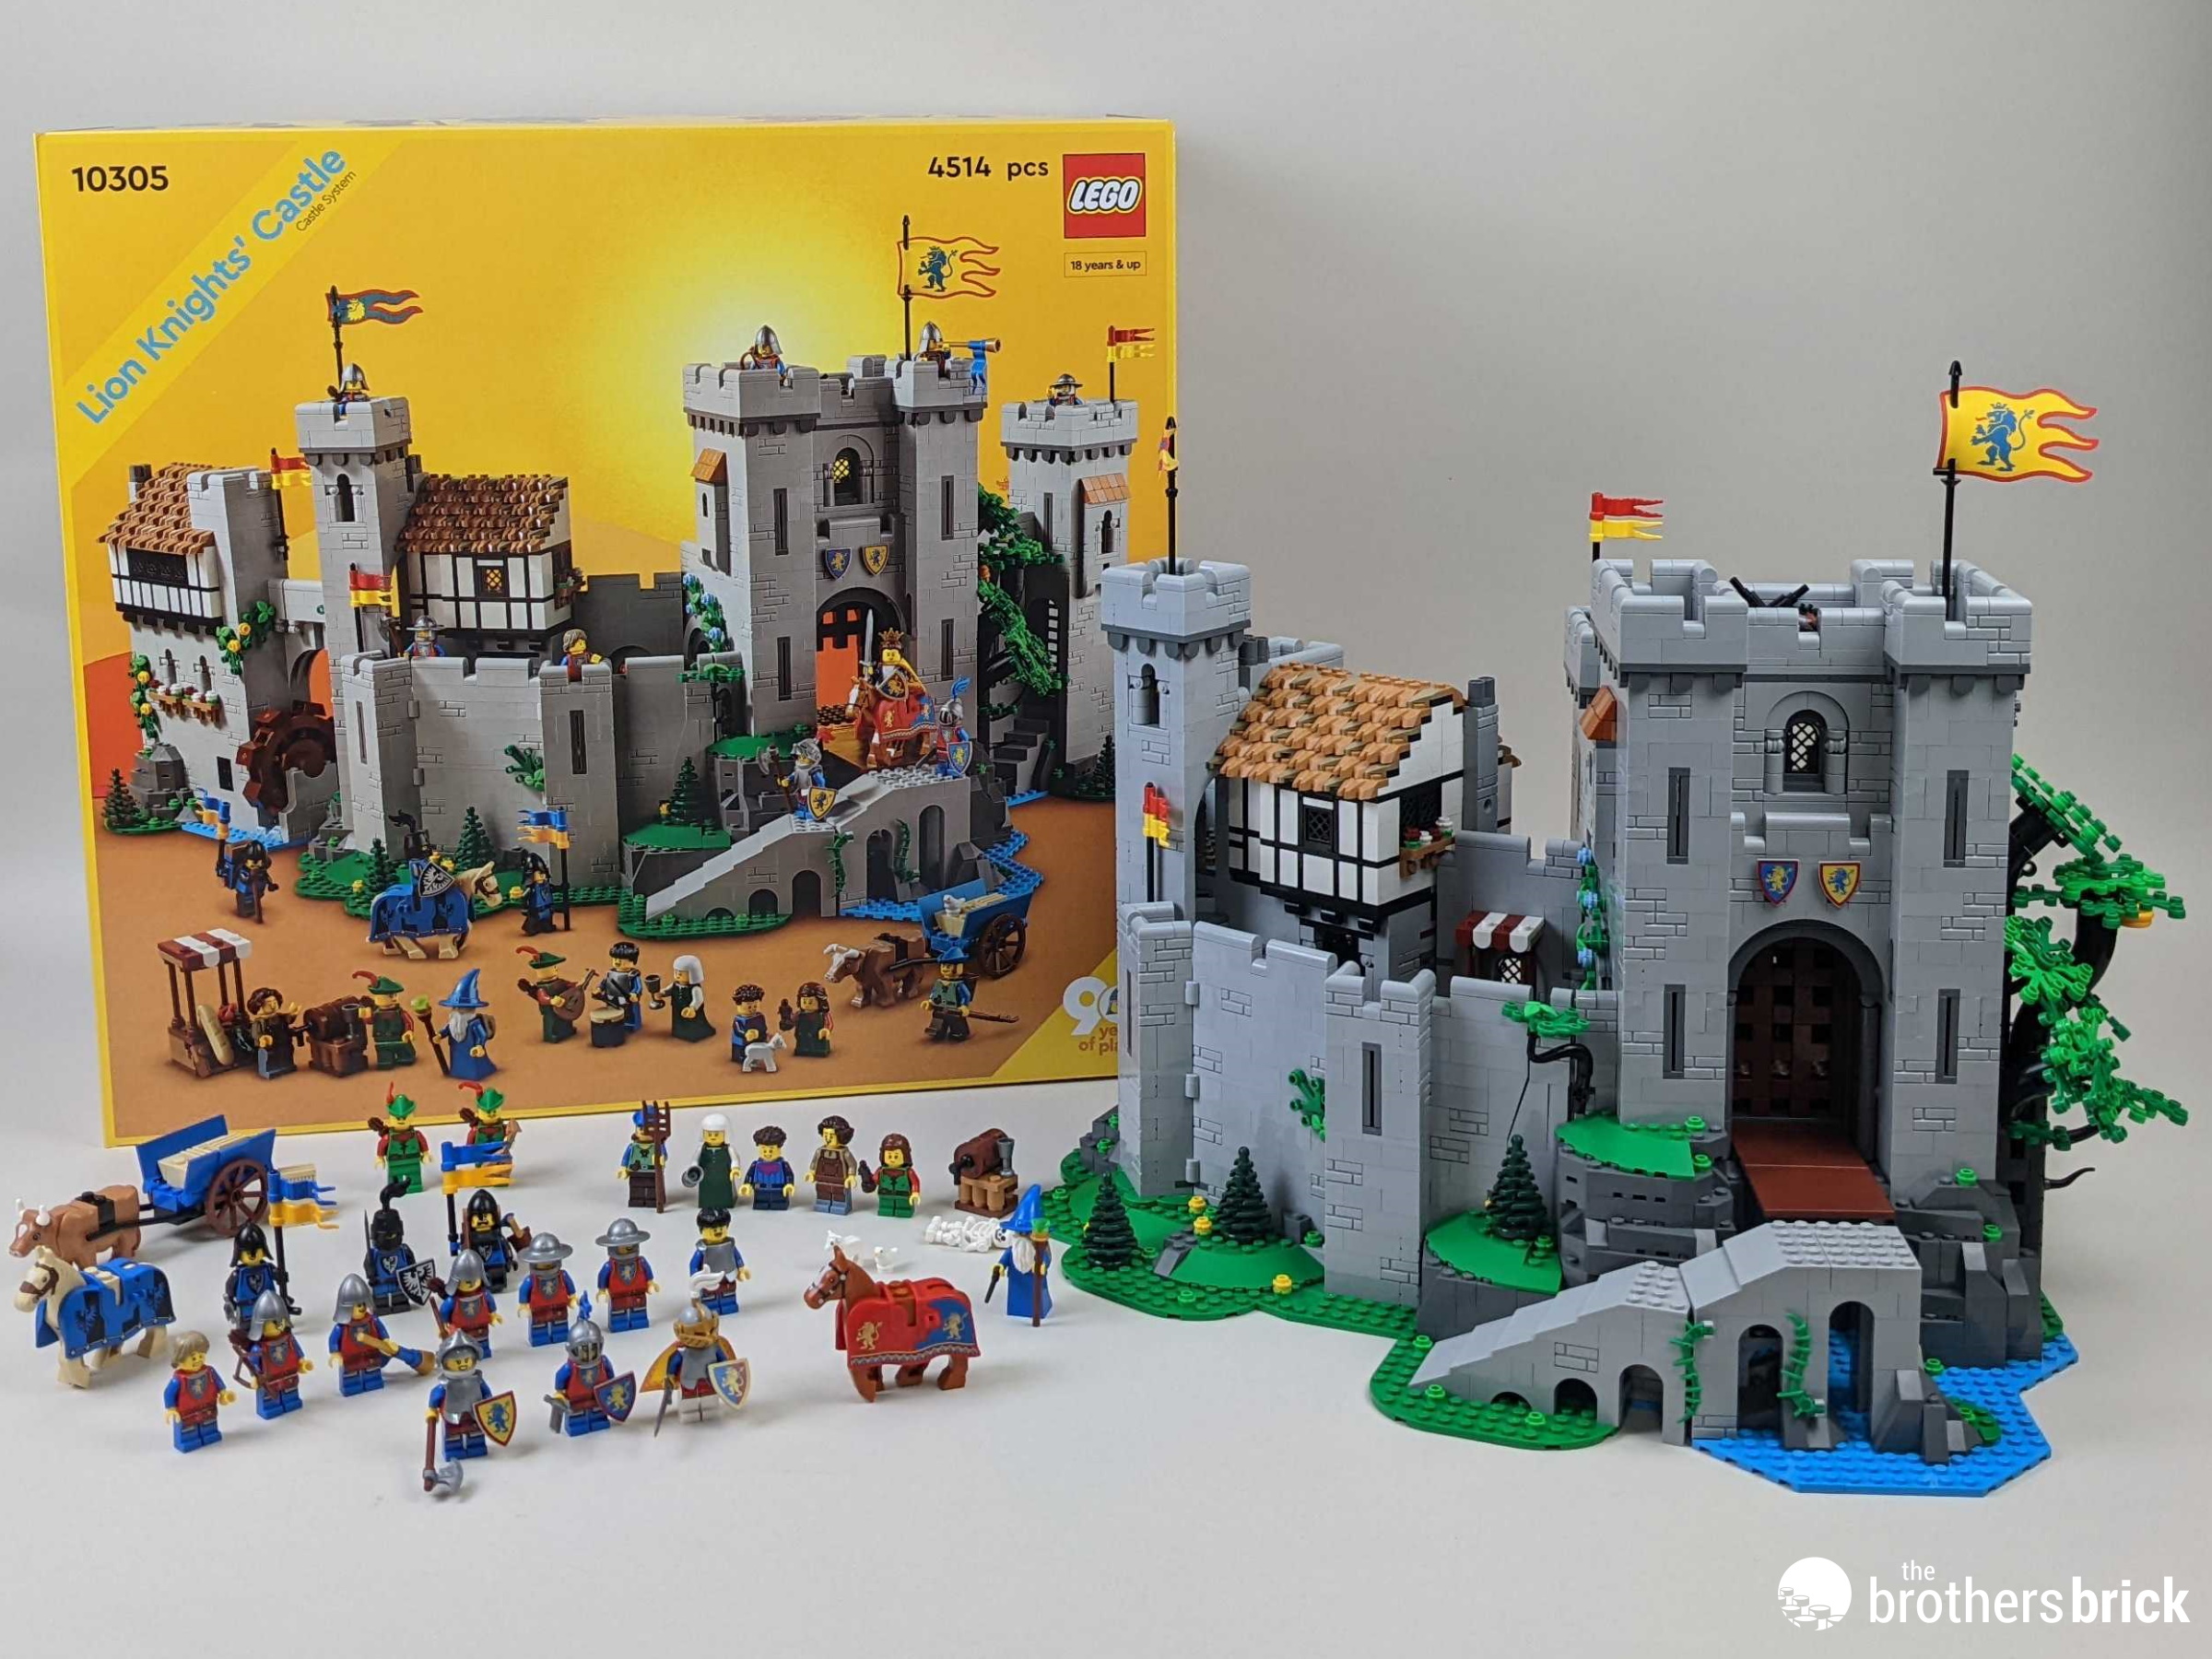
The Castle theme was an early cornerstone of the LEGO line. Starting out in 1978 with the set 375 King’s Castle, we’ve seen dozens of sets over the years. The theme fell mostly dormant in 2014, with only a recent return with 2021’s Creator 3-in-1 31220 Medieval Castle and 910001 Castle in the Forest sets. But just wait until you check out what LEGO has unveiled for their 90 Years of Play celebration. LEGO Icons 10305 Lion Knights’ Castle is a massive, 4514 piece love letter to the theme that will be available to VIPs on August 3rd (and everyone on August 8th) for US $399.99 | CAN $499.99 | UK £344.99. This set is SO massive, in fact, that we had to split our our review of the twenty two included minifigures into “part two”. For starters, though, we take a very close look at the surprises and secrets in the Lion Knights’ Castle itself. Are you ready for a trip down memory lane?

The LEGO Group provided The Brothers Brick with an early copy of this set for review. Providing TBB with products for review guarantees neither coverage nor positive reviews.
Unboxing the parts and instructions
This set comes in a massive, tab-sealed box. Like the 40657 Forest Hideout, the styling leans heavily into retro theming and colors. The 90 years of play logo in the lower right is one of the few immediate indicators that you’re not looking at an actual vintage set. Well, that is if you ignore the glaring upgrades to this castle from the 1978 “All Yellow, All the time” concept.

The back of the box shows the opened castle from the rear, as well as a top view of the set with the wall sections folded in. Two inset shots show off the Forest Guardians’ hangout and the chain that controls the front portcullis. There’s also a side shot showing the set’s dimensions: 38cm/15.” tall by 44.5cm/17.5″ wide. You can see a lot of the set’s details in the “open” shot, but trust me, there’s a whole lot that the box doesn’t have room to tell you.

The shelf-appeal continues with some extra features on the side. There’s a nice blurb calling out some facts about the Castle theme, with a picture of 1978’s 375 Castle, 1987’s 6066 Camouflaged Outpost, and 2009’s 10193 Medieval Market Village.

Under that, there’s another layer of trivia on the inside flap that gives us the backstory for this set:
The great castle on the horizon is home to the Lady of the brave Lion Knights. As a firm but just ruler, the Lady has established her stronghold as the natural gathering place for people from near and far. It serves as a place of trade and treaties, as well as a haven for those in need.

The lower half of that flap has a recap of the different factions that make up the Castle theme. The Lion Knights, as the set’s focus, get a lot of PR hype. The Black Falcons are portrayed as having found a way to live in peace with the Lion Knights, but with an undercurrent of “it can’t last.” And the Forest Guardians are portrayed as the happy-go-lucky scamps of the Castle theme, but also harbor dark secrets. Something here there for everyone!

And THEN you get a final packaging treat with a review of many of the different heraldry designs that have graced the knight’s shields. The top row has three of the four logos from the 375 Castle’s sticker sheet. The bottom row has the three variations of the Lion Knights’ crest.
(And, yes, I opened both sides of the box to check. The inner flaps are the same on both sides.)

When you’re finally ready to start taking parts out of the box, you’re presented with a number of loose part bags, a second white tab-sealed box, and a small paper flier.

That small folded flier promises that eventually all of these plastic bags will be replaced with sustainable packaging. That’s a good thing…as there is a LOT of waste material in this set.


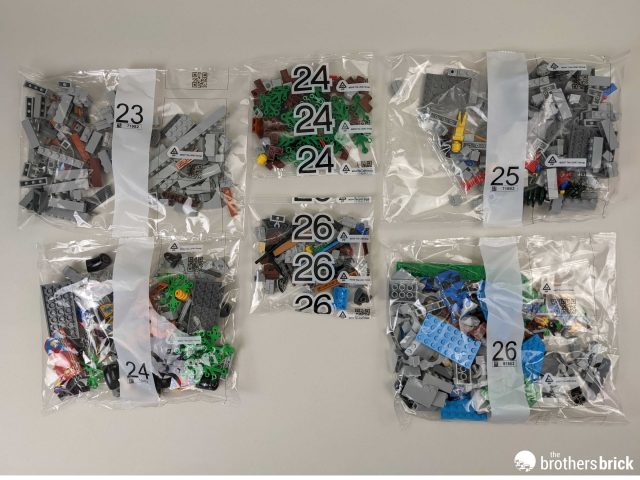
Opening up that second box, we can spread out the part bags. There are thirty-five parts bags, spanning 26 building sections. A thirty-sixth bag is unnumbered and contains some larger plates. And there’s a big white envelope protecting the paper goods.


Inside the envelope are the two perfect-bound instruction manuals. They’re both massive (at 228 and 288 pages) with identical images on the front and slightly different Lion Knight crests on the backs. Amazingly, there are no stickers in this set.

The first book starts off with a few pages about the history of the Castle theme and information about this set’s design. Then we get to the fun part – the actual building instructions. As an added perk, there’s a running commentary by the Wizard character calling out clever bits of build, lore, and sometimes just random stream-of-consciousness chatter.

The parts
One of the exciting things about this set is that the LEGO designers were able to enhance the look by releasing existing elements in new colors. Here are the ones that caught my eye as I worked through the build. We’ll start off with a bit of green – a new color for these elements. The small leaf in dark green is also a new shade for that piece.


More new and interesting parts in shades of brown – including the first appearance of the 1×1 bar with round stud (The “action pose” stand) in nougat.


Not just a recolor, but a brand new piece: these inverted 2×2 curved slopes in reddish-brown. There’s also a huge pile (59 of them!) of modified 2×3 plates w/claws in nougat.


Dark green is a new color for these short pine trees, and the baby lamb makes a second appearance after its debut in 60346 Barn & Farm Animals. And, look! More new recolors with a variety of “loaf” elements in light grey.


While those parts are all interesting, and sure to whet the appetite of custom builders, the castle fans are going to be over the moon for these updated Lion Knight flags and cape. The logo here has had some light updates from the original version, preserving the classic part’s rarity while creating a swanky updated look for the faction.

And if the banners were nice….how about TEN different printed shield designs?? Unfortunately, there are only multiples of the “plain” yellow and blue background Lion Knights shields (3 of each). Everything else is one-per-set. That’s not going to make army building easy…but I know people are going to try.

The Build
Before we get to the castle, we start up with a small aperitif of a farmer bringing hay to market. It’s a simple build, but an effective one. In addition to the cart and hay bale, this section comes with the first of the set’s 22 minifigures, a cow, and a bird.

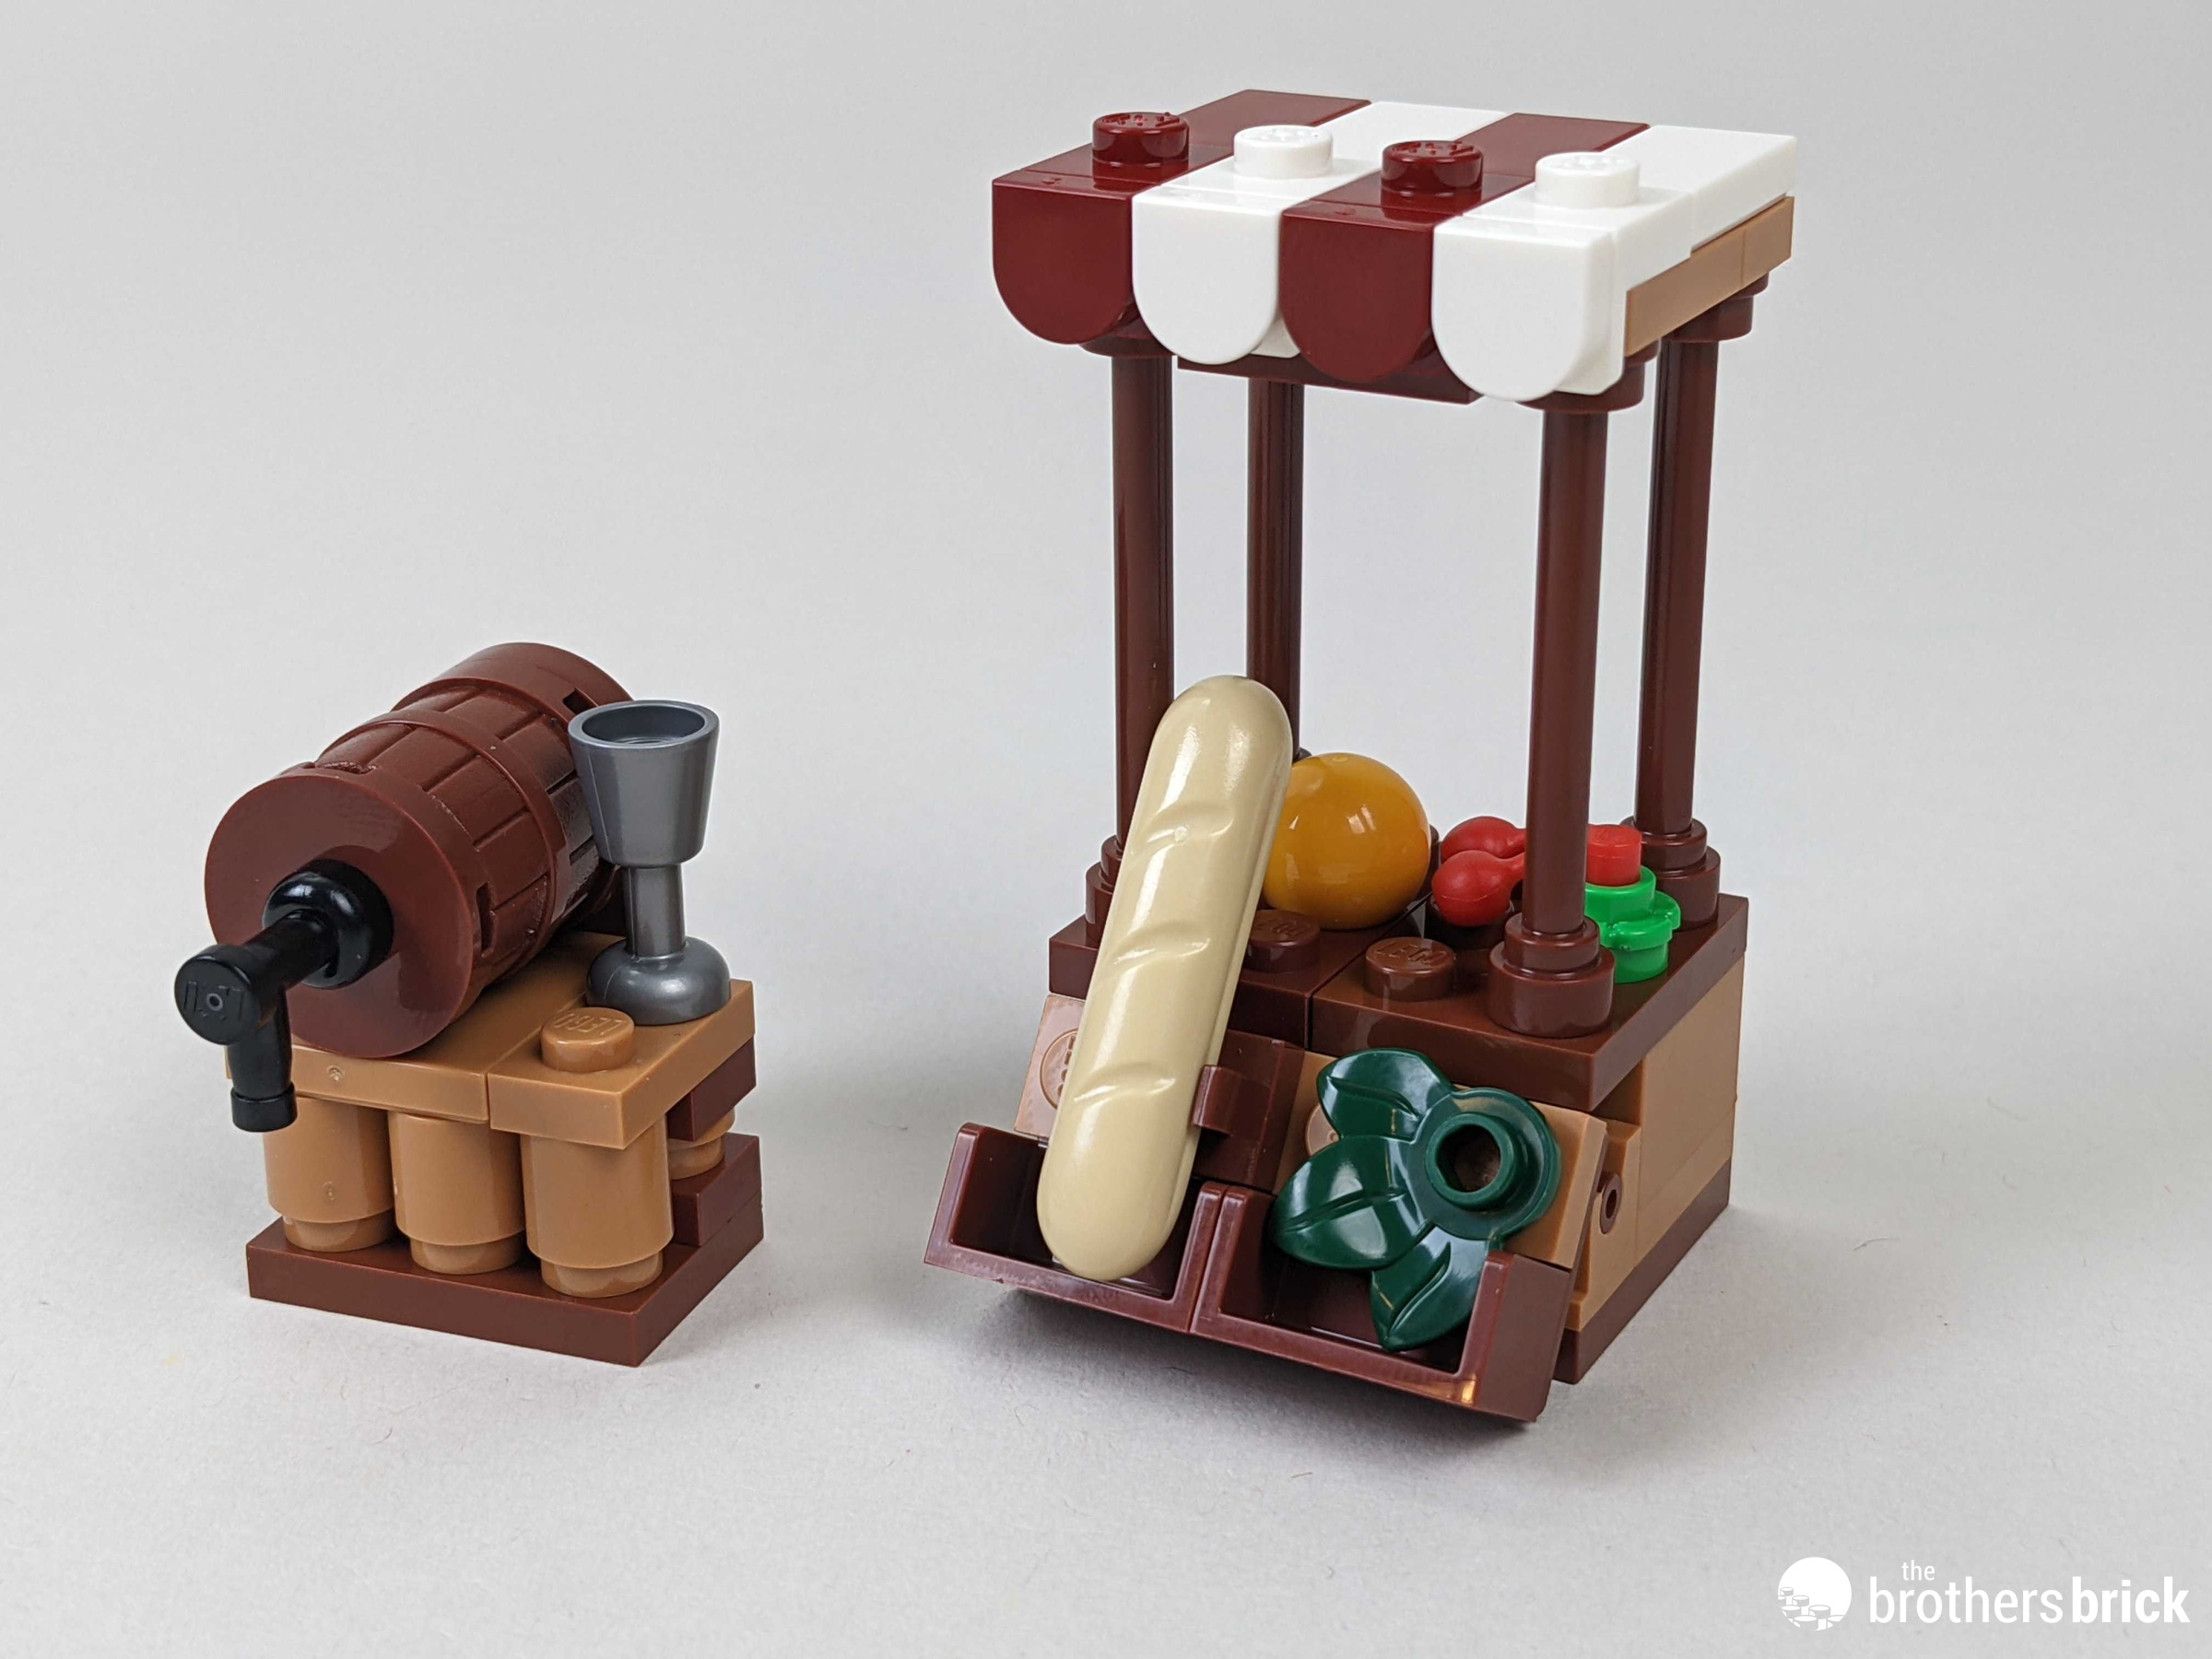
Next up are a keg of ale and a food stand. These won’t be put in place until the very end, but they’ll give your growing army of minifigures a place to get refreshments while you work through the 500 pages of instructions.
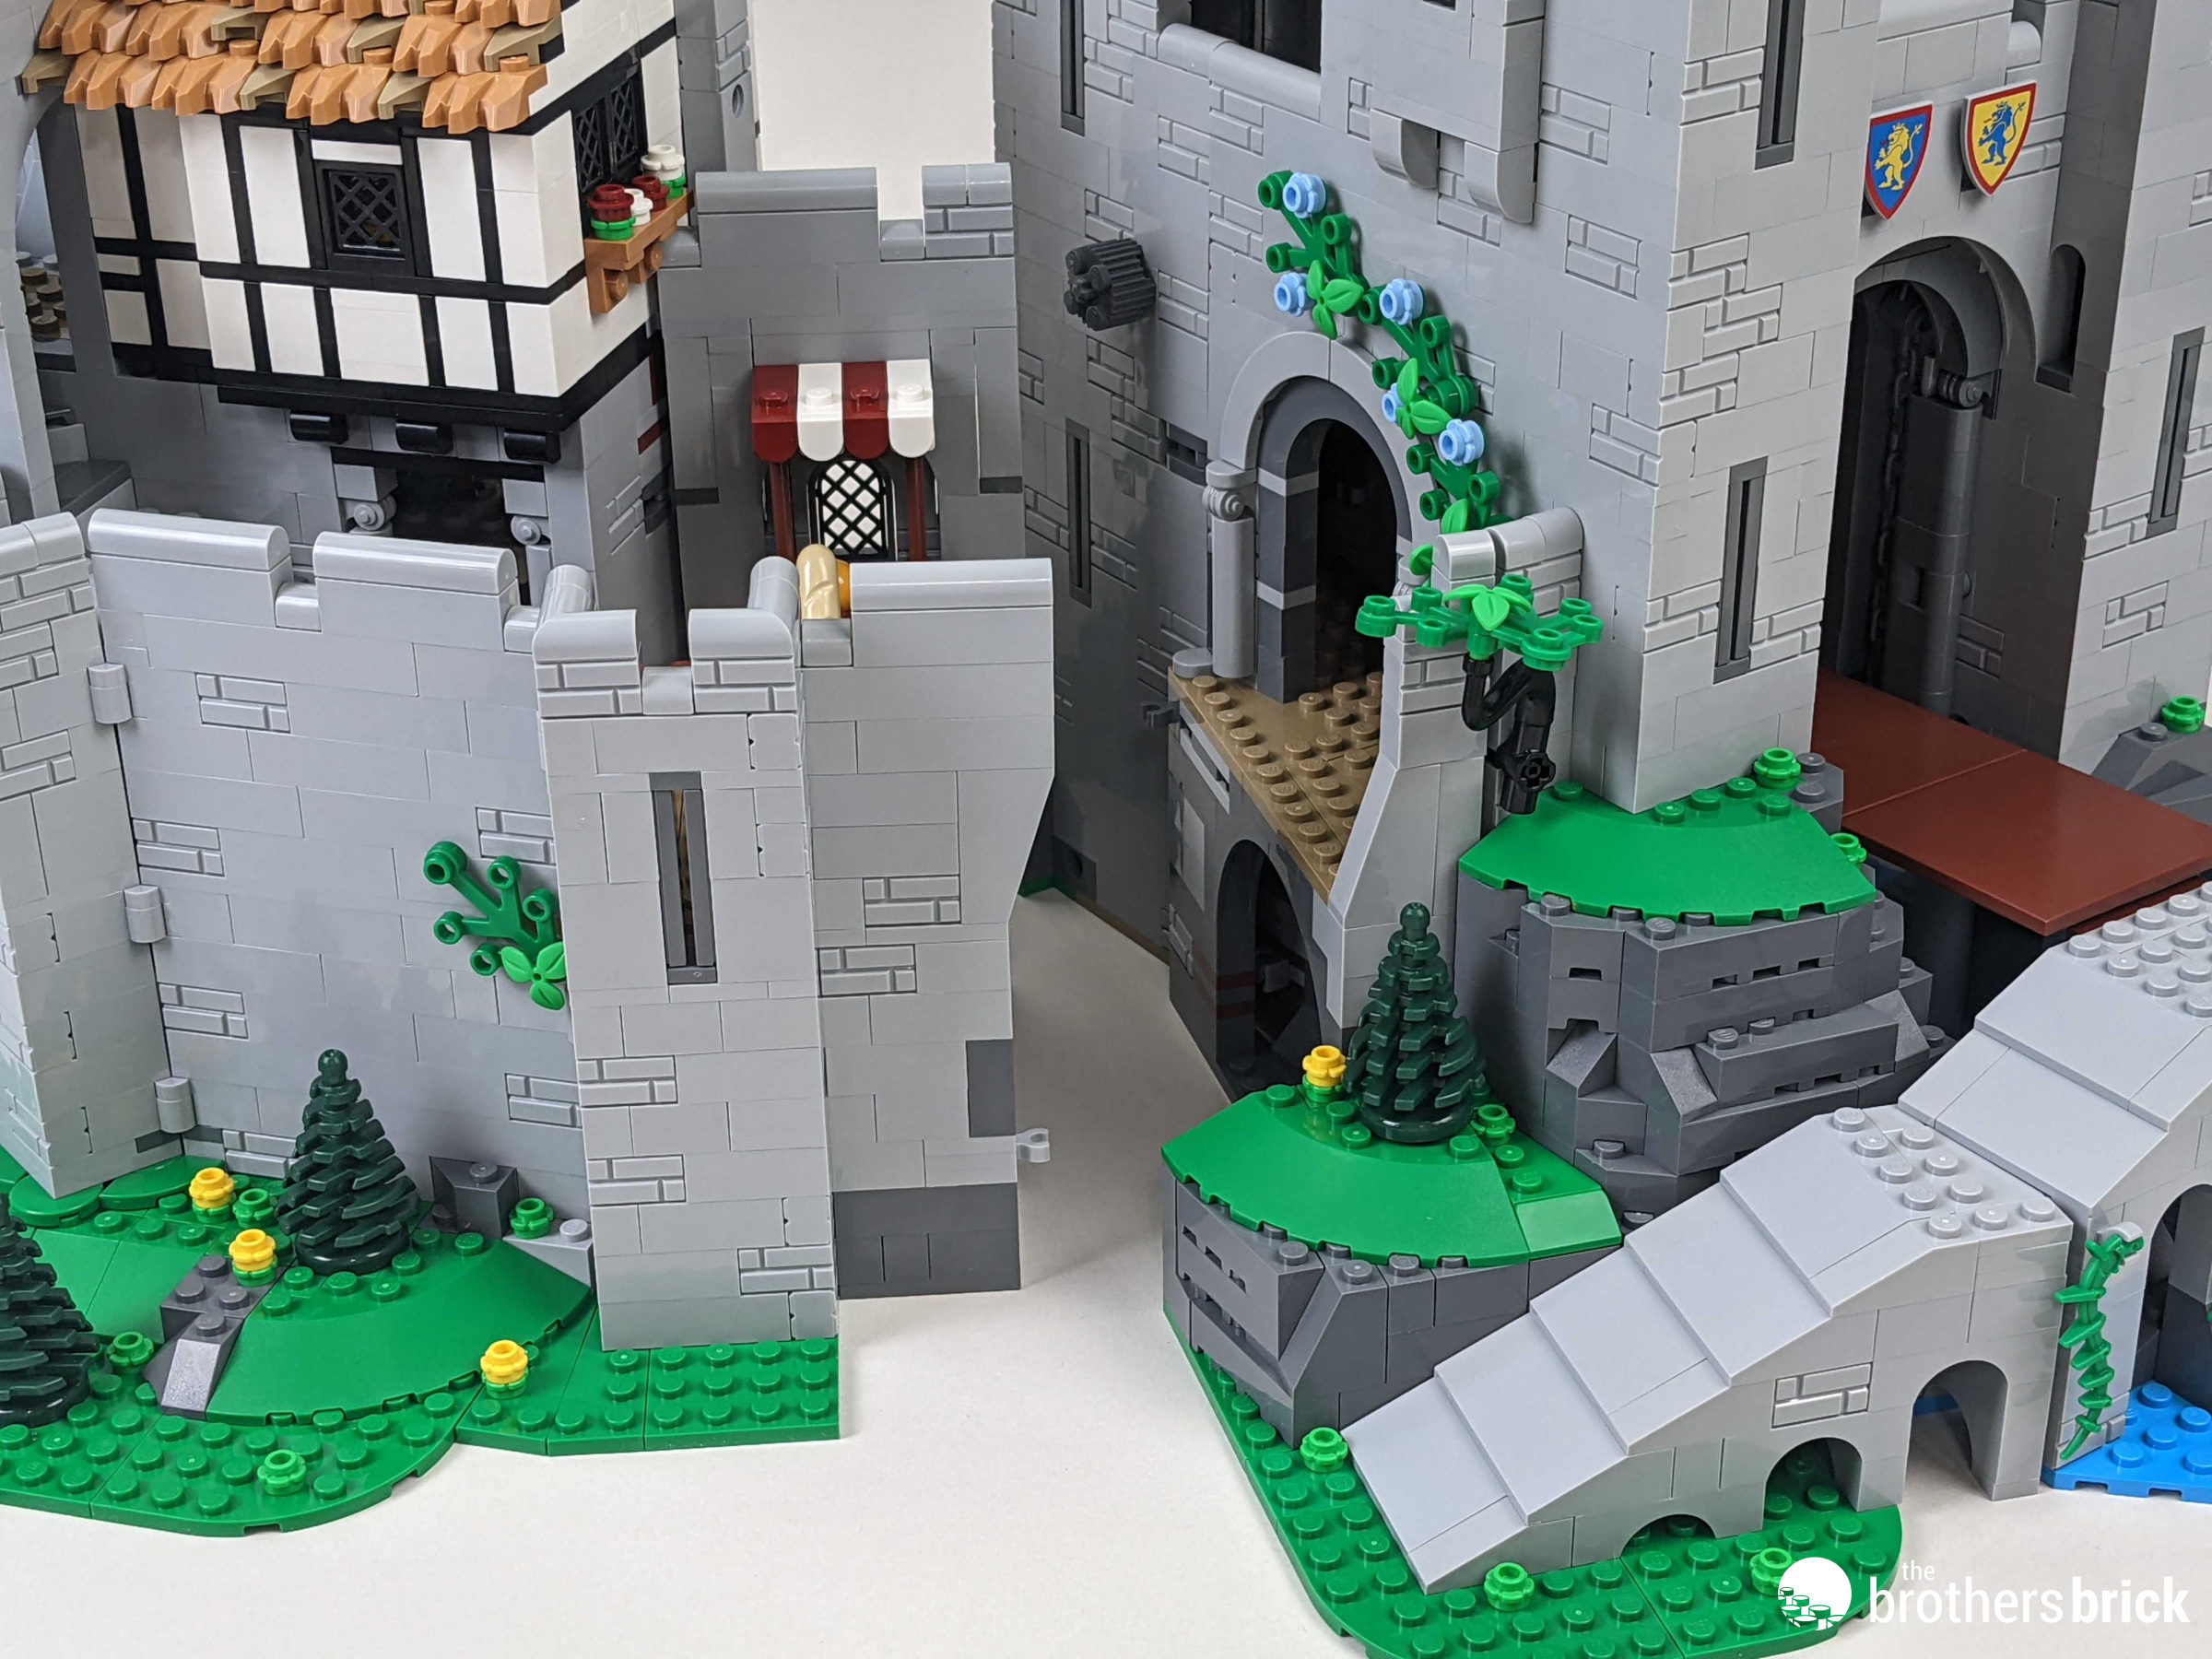
Time to storm the castle! As you’d expect, things start off on the ground level. There’s a bit of landscaping and the foundations of the castle’s outer wall. Right away, you know you’re in for a treat. Rather than just stacked bricks and plates along a grid, there are some seriously well-thought-out angles at play.

Take a look at how the exterior wall is attached with hinges, but the flooring is a solid surface thanks to an expert-level understanding of the LEGO selection and geometry of angled plates.

There are also plenty of instances of Nice Part Usage (NPU) to be found. For example, this small water feature/cistern uses a minifigure energy blast for the falling water.

The Kitchens
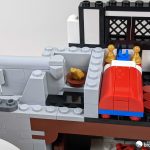
We’ll be taking a look at each of the rooms in the castle as they come together. First up is the kitchen area with a table of food and an oven. Details here include a spice rack, hanging vegetables, and a tasty croissant. Oh, and a couple of pretzels. Truly this is a fortress with an international flavor.


Lair of the Green Arrow
This small room has a bit of mystery to it. There’s a printed 2×2 tile with a map on it, an archery target, and weapons scattered about. The minifigure that accompanies this part of the build is a lute-carrying Forest Guardian, who…suspiciously…has a quiver of arrows on his back. It’s implied that it’s his bow hanging on the wall there. Is this the meeting room for secret plots against the Lion Knights?

Adding to the mystery – access to this room is through a trap door in the roof. Yeah, nothing sus about that.

This section looks into the kitchen area thanks to ball joints embedded in the walls. It’s an interesting connection method and one that snaps together easily.

Again, attention to detail and geometry comes into play, as the roof features a gapless join along that odd angle.

Music Room
As we move to the second story, the first windows appear. The build here is very clever: 1×4 tiles are mounted vertically using 1×1 SNOT bricks, leaving a quarter stud gap between them for light to get in.

The first area upstairs is the music room, featuring a brick-built harpsichord. Here’s an early shot of it, before the walls of the castle obscure the view.

Next to it, another fireplace (complete with logs for fuel) keeps the place feeling cozy. A banner with the Lion Knights’ colors hangs over the scene, although this detail is quickly obscured by the beams that brace the front wall.

The Mill
Moving back downstairs, the next section of the castle has a working water wheel and mill. There’s also a storage room with a bird’s nest and a loaf of bread. Right under a nest is not exactly the best place to keep fresh baked goods, but there’s a lot going on in this castle and they probably just ran out of room.

The hopper for the mill is a cute little build that makes use of a lot of nougat elements. A white sack of grain is also included.

The play feature of the wheel/mill works very well, with rotation on both sides of the wall. The spinning wheel uses some simple Technic gearing to turn the millstone, which sits on a smooth tile base.

Banquet Hall
Above the mill is the castle’s banquet hall. The table and chairs use bracket elements to add some twists and turn to the look. The scalloped edge of the table cloth (achieved by a repeated row of 1×1 half-circle tiles) adds a touch of elegance, as do the holly centerpieces. Behind the table hangs another banner of Lion Knight colors, as well as three wall-mounted shields. These shields all harken back to the 375 Castle, although now the designs are prints, not stickers.

Kid’s Room
Not all of the castle is made from grey stone; the upper story features a bit of woodworking. SNOT connections create a narrow patterns of lines that closely resemble classic LEGO wall elements.

Inside those walls is a children’s bedroom. And, in that bedroom, is a great Easter egg. Yes, if you squint a little, you can recognize that pile of yellow bricks as a tribute to the oft-mentioned 375 Castle that started it all. Sadly no longer mint-in-box, this collectible is at least seeing some playtime. The kids even have a scaled-down minifigure of sorts, a dark brown trophy microfigure.

On the other side of the room is a writing desk writing desk with teal accents, and a fireplace sits to the side. A single twin bed will sit next to the wall, suggesting that one of these kids is just visiting. (Probably the one wearing Forest Guardians clothes.)

Folding Wall
Time to highlight another wonderful bit of construction wizardry! The square balcony area outside of the kid’s room is built on the hinged section of the larger castle, so it has to go through some contortions when changing display modes. The magic happens thanks to this heavily hinged bit of masonry.

Here’s a shot of the folding action in motion from the outside of the castle…

…And here’s the same shot from inside.

If you watched really closely, you might have spotted another one of the castle’s treasures. Hidden behind the sliding wall is a golden frog! This secret is only unveiled when the castle is opened up; it’s completely enclosed otherwise. (And later, it’ll be hidden even further behind a ladder!)

Thatched Roof
Atop the kid’s room is a great thatched roof. The build here is a little tricky, as you need to keep an eye on which type of dark tan wedge slope is called for. It helps if you take the time to sort them into left and right-facing piles before you start assembly.

Bell Tower and Flags
Another hidden detail – the bell tower features this snazzy-looking assembly.

The towers are finished off with light grey loaf bricks, creating a smooth edge to the ramparts. A cloth Lion Knights banner and a couple of smaller flagpoles with red and yellow colors complete the look.

Forest Guardians’ Hideout
In addition to the secret lair of the Green Arrow discussed above, there’s a second ground-level Bat Cave for the Forest Guardians. (You know it’s their safe space as it has their shield hanging on the wall.)

Cavernous Passageways
Under the castle, following the river, there are a series of twisting caves where all sorts of skullduggery can occur. (Provided your hands are small enough to fit into the limited open spaces.) A nice touch is these friendly bats – critters you might have trouble finding again once the build is complete.

There’s also a bit of hidden treasure in there to be discovered. A chest is set pretty far back in an alcove. Light has a hard time reaching that far into the model, a slight problem for all the rooms, actually.

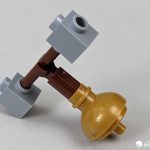
In the chest is a 1×1 cheese slope in transparent orange. Apparently, that’s a deep cut to something that my casual google searching wasn’t able to explain. The Wizard has a bit of commentary in the instructions:
Ahhh yes, the amber. I remember when the Black Knight first cast his eyes upon it. In the end, it drove him mad!
I know where those coins are from, at least. They showed up in the Collectible Minifigures line with the Troubadour character. (As well as in two 2022 Disney sets, but let’s stay focused on Castle-themed things!)

The Dungeons
What would a castle be without some dungeons? Honestly? Still a castle. Luckily the ones in the Lion Knights’ Castle are pretty minimal and haven’t seen much recent use. Sadly, the lone occupant has seen better days.

This is the one spot where the humor of this set falls flat for me. I get that a skeleton in the dungeon is a classic trope, but these days this joke hits differently. And they even doubled down on it with a quip from the wizard in the instructions. I dunno. For a castle described as “a place of trades and treaties, as well as a haven for those in need” having a prisoner die of neglect sure calls the rest of the spin into question.

Secret Doors
The good news is that there’s a way out of the dungeons. A section of the outer wall can be shifted aside, leading to sweet, sweet freedom.

The Forest Guardians’ hideout also gets a secret door – a large rock that pivots open.

Every now and again, the main build pauses and you get get to construct one of these weapon racks. It’s a great way to add some options to your minifigure load-out, and hey, more printed shields!

The Drawbridge
The front of the castle is equipped with a working drawbridge. The bridge itself is fairly sturdy, with long lengths of LEGO chain attached to work the play feature.

The chains run up through the roof, where they’ll wait for the rest of the castle’s structure to catch up.


But eventually, there’ll be a knob you can turn to raise and lower the drawbridge. This play feature works well, but I do kind of dislike the smooth tile used for the surface. This is a spot where some wood grain would have helped the look a lot.

The Side Entrance
In addition to the drawbridge, there’s some additional security provided with a moveable portcullis on the side entrance. There are also open holes in the roof where castle defenders can drop rocks and things on invaders. You can see the gaps in the grey area to the right of the portcullis – as well as another hole in the “U” shaped nougat area to the left.

The Icky Part
Bathrooms in LEGO buildings are more common these days, and the Lion Knights castle is no exception. That little nougat U mentioned above is the seat for the latrine. This room has a white 1×1 round brick for some toilet paper, and a bit of hanging greenery as an air freshener.

And, yes, that’s the bathroom. The Wizard pretty much confirms it, even including a meta-joke about how his minifigure doesn’t have bendable legs.
I’ve spent more time than I care to admit in this room, now if only I was able to sit down could I really put it to its proper use.

And here we see the last line of defense for the side entrance. The latrine has a straight drop onto invading forces. Ew! (And you have to wonder if anyone would EVER want to use the side door. Or is this an even more elaborate “back door” joke? Wow, LEGO, that’s…pretty funny, actually.)

EDIT TO ADD! Turns out I’m the one who’s full of it. Thanks to Jamin Hoyle for pointing out in the comments that the toilet actually empties outside the castle walls – and there’s a brown “frog” on the ground to prove it.
The Armory
Another quick break to build this archery stand preps us for loading up the battlements.

Here you can see the bar that raises and lowers the drawbridge in place, with two more printed shields and other weaponry at the ready.

The Portcullis
So the drawbridge is neat, and the back door well guarded, but why stop there? The main gate needs a portcullis, too. This time we get a much more elaborate build with a latticed grate connected to a long LEGO chain.

The raised gate obscures the shields in the armory, but you don’t really need weapons when you’re in “everybody’s welcome” mode.

The play feature here is a very different mechanism from the graceful raising and lowering of the drawbridge. The switch a the top has just enough tension to hold the gate open, but a light touch and it comes crashing down in a very fast and satisfying “NONE SHALL PASS” motion.

Flags and Banners
This side of the castle is finished off with another large cloth banner, and a good amount of trees and other greenery. There’s even a beehive to add some natural danger (and sweetness) to the scene.

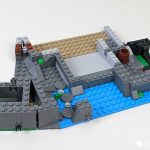
The Stone Bridge
One last chunk of exterior scenery is a stone bridge that lines up with the far side of the drawbridge. Some SNOT connections on the rear side of the stonework allow for a good connection with the front wall of the castle. There’s also a small clip and bar connection along the other edge to keep things tightly aligned.

Fans with a lot of space will find this build useful if they want to incorporate the main castle into a larger layout – the removable ramp means you can customize what’s on the other side of that drawbridge. Interestingly, the ramp also blocks off an entrance to the catacombs under the castle. Feels like a plot point to me.

Return to the Armory
The final bit of build for the castle is another weapon rack. This one holds swords and a mace and hides the raised portcullis from view.

The rack does partially obscure the back wall, but you can at least see those printed shields. And the castle does look well equipped to fight off invaders.

The finished model
Joining up the two halves of the castle completes the build. The connection here is a bar-and-clip type, which is enough to keep things snug without making things too difficult to disassemble.
There are a number of ways to display the castle, with the most impressive being the “fully open” view where all the sections are unfolded to show off the interior and exterior features. The trade-off is that this takes up a LOT of linear space.

You can also go for two smaller displays if you don’t link up the full castle.


From the back, you can see that all the play areas are easily accessible. The rooms are designed so that minifigures are “more likely” to be doing things on the open edge, although there are several places where you’d have to have really small hands to place/pose figures.


A more compact option is to close up the castle. Even then, though, this is a pretty massive set that some might have a hard time finding room for. It’s pretty tall, too, meaning that standard bookcase shelves aren’t going to have enough clearance. But it’s totally worth finding a spot for this.


The two half-castles also look great on their own. Maybe someone could use them as bookends?


Conclusion and recommendation
Well, I think you can probably guess how I feel about this set. I’m not a hard-core Castle fan, but I loved every stage of this build. From the highly-engaging unboxing experience to the final bits of construction, I was overcome with how much care and attention went into this set. There are callbacks and tributes to all the different Castle eras, and every room in the castle feels like it has its own new story to tell. There are play features and great details all over, and the building is interesting and complex without being difficult to assemble. At $400 US for 4514 pieces, this could even work as a parts pack at just under nine cents per element. And there are so many cool and interesting parts, too! Recolors, unique prints…and that’s not even going into the twenty-two minifigures. There was no feeling that corners were cut, or that the designers had to hold back anywhere. It’s all here, and I think, after a long wait, Castle fans have the set they want. And, trust me, they are going to want this set.
But there’s still more to talk about! Check out the upcoming Part Two of this review for a close look at all 22 minifigures!
LEGO Icons 10305 Lion Knights’ Castle will be available August 3rd for VIP members (and August 8th for everyone else) from the LEGO Shop Online for US $399.99 | CAN $499.99 | UK £344.99. It may also be available via third-party sellers on Amazon and eBay.
The LEGO Group sent The Brothers Brick an early copy of this set for review. Providing TBB with products for review guarantees neither coverage nor positive reviews.
Check out our full gallery of images


Wonder why the red shield with the white spiky cross got left out.
“The Forest Guardians’ hideout also gets a secret door – a large rock that pivots open” That reminds me of my favorite castle set from my childhood: Forest Guardian “Camouflaged Outpost” 6066-1. It had the very same secret door.
Did I miss a review of the figures included?
@Anthony – Part II should probably show up tomorrow. Lots of new sets need the spotlight today.
I seem to recall a castle falling during a siege because some soldiers came up through the toilet and let the army in…
Ah, yes. Here it is: https://en.wikipedia.org/wiki/Siege_of_Ch%C3%A2teau_Gaillard#The_inner_bailey_falls
The latrine empties outside the walls. There’s a brown “frog” on the ground underneath to prove it. (This toilet configuration is historically accurate, btw, which I love.)
@Jamin – D’oh! Right you are! Thanks for spotting that. Makes a lot more sense!
I’ve updated the article with the corrected info.
Ah, cool! Thanks for the nod, Chris. Love the site and all the reviews!
I can’t even read this review due to the highly intrusive ads that take over half the screen and auto scroll me to the top of the page every minute.
Relax on the skeleton, don’t read so much into it. It’s not like the skeleton was carrying the shield with a cross on it, that might raise eyebrows!
Id say that this Forest guy in small room is more like ranger or forester in that certain case.
Maybe I’m not looking at it right but isn’t the golden frog only visible when the castle is closed up? Seems like that wall extends to cover the frog when the walls unfold. Great review! Love how in-depth it was.
@Ryan – *Sigh* – you’re right, the golden frog is exposed when the set is closed, not the other way around. I’m going to blame the fact that it’s really hard to spot either way. :)
@jon – Noticed that omission in the shield design from the classic stickers, did you?
Hi,
thanks for the review. I’m trying to build the castle following the official photos and videos only, your pics give me some additional (and much needed as well as appreciated) insight. The buidling technics have me sweating all the time. At least I managed to (almost) finish the main gatehouse and its back, although in a black/ the Upside Down/ conquered by the mean dragon queen sister version (due to a lack of grey pieces for the whole construction). With that many detailed pics it seems almost “to easy” after the last few weeks of constructing, swearing, deconstructing, correcting and construcing again.
Great detailed review. I look forward to part 2.
Regarding the skeleton in the dungeon, it is truly horrifying considering it from an adult’s perspective and not a child’s but in my mind those crafty outlaw forestpeople snuck in to the dungeon and placed a recently exhumed skeleton bone by bone through the locked gate as to occupy the right cell.
Come the time when one of them will inevitably get caught and thrown in the dungeon the lazy guards will predictably imprison them in the left cell, guaranteeing their escape through the movable rock wall. Every time.
That’s just good foresight :)
The exterior is drab….
@rebel pilot – That’s a great take! Accepted as personal headcannon.
Are you really going to write a whole review and not eve ln acknowledge that Lego has changed the name of the Forestmen?
@Jason S – I touched on it in my review of the Forest Hideout. Probably could have included a parenthetical “(An updated name from the classic Forestmen)” here, though. Obviously there’s a lot in this set to cover, so my apologies for not getting to all of it.
Puzzled why the Drawbridge chains are not visible from the front outside?
Hay is not the color of straw (light yellow). It is green. If you want to sicken your horses, feed straw!
@Nick Howes
The drawbridge is a “bascule bridge” type, which pivots midway along the deck. More like a see-saw than what we often think of as a castle drawbridge.
It has a counterweight on the back end such that if there were no chains at all, it would flip up closed. Many modern drawbridges are built this way, but they use gears and motors to make the roadbed tilt. In this Lego set, the chains go straight down and pull the weight upwards, which in turn makes the front edge go down.
What is the amber thing a reference to?
Fully open how wide and deep is the castle? I think it is an amazing set but I’d have no idea where I’d put it.
don’t forget about the green frog showing you the secret path under the drawbridge!