LEGO’s tremendously popular Ultimate Collector Series (UCS) models have been the flagships of the Star Wars theme since they were first introduced back in 2000. Most of the models have been large-scale interpretations of various ships, such as the 75275 UCS A-wing. However, a small handful have been closer to minifigure-scale versions of larger vehicles, notably the 75192 UCS Millennium Falcon and 75060 UCS Slave I. LEGO’s latest UCS model follows in the latter vein, bringing fans a proper minifigure-scale model of the Empire’s fearsome beast, the AT-AT. 75313 AT-AT is the second-largest Star Wars set to date, with 6,785 pieces, falling short by fewer than 800 pieces of the UCS Millennium Falcon. It features nine minifigures, including Luke Skywalker, General Veers, two AT-AT pilots, and five Snowtroopers, and will be available starting Nov. 26 for US $799.99 | CAN $949.99 | UK £749.99.

The LEGO Group provided The Brothers Brick with an early copy of this set for review. Providing TBB with products for review guarantees neither coverage nor positive reviews.
Unboxing the parts, instructions, and sticker sheet
As you’d expect from a set with almost 7,000 pieces, it comes in one of the largest LEGO boxes. The box is similar in size to that of other top-tier sets like 10294 Titanic and 75252 UCS Imperial Star Destroyer, though it’s a bit less wide, which gives it the impression of being a little taller.

The front of the box has all the usual hallmarks of the LEGO for Adults packaging with a black background, greebly stripe, and simple text. LEGO had a bit of fun with the other sides, though, and decided to show the AT-AT from every side. Much to my surprise, that includes the underside of the box, which shows the rarely-seen bottoms of the AT-AT’s feet.


Upon opening the box, you’re greeted with some cool non-LEGO Star Wars art. The outer flap has an Imperial crest and Hoth illustrations, while the inner flaps share an electrobinoculars view of the approaching AT-ATs.


Like other sets of this scale, the parts are not simply loose inside, but are split among smaller boxes. LEGO seems to have finally gotten a handle on splitting these boxes up in a logical way, and so the four inner boxes are numbered 1-4 and contain their own instruction manual and the parts you need for that step. The boxes together form a larger illustration of the AT-ATs on Hoth.

With the recent 10294 Titanic, we found that it was easy to split that set’s three boxes among three builders working simultaneously. That would be more difficult here, though, because the AT-AT isn’t divided into quite so discrete of sections. Box I contains the parts for the chassis and upper legs, Box II has the lower legs, Box III has the body, and Box IIII has the outer shell and head. Some division of labor would be possible, as the body is largely independent from the chassis, so two builders could work in tandem with some coordination.


Flip all the boxes over, and you can lay out a path for the AT-AT to stomp through the snow.

Each box is packaged with its own instructions. LEGO continues to use a cardboard envelope for the instructions, which ensures the manual arrives flat and pristine. While parts are fairly evenly divided among the four sections, the booklets vary considerably in size, with book III topping out at 268 pages, while book II has just 60, since it consists of building four of the same lower leg sections.

The first pages of the manuals contain an introduction to the AT-AT, the LEGO model, and its design features, along with an introduction to the set’s designer Henrik Andersen. These special pages are spread among the four booklets so you’ll have something interesting to read at various stages throughout the build. The final spread features a timeline of the standalone, regular-release LEGO AT-AT models (it doesn’t include AT-AT sets like the exclusive magazine sets and the Advent calendar micro models).


Now let’s take a look at the parts. There aren’t too many elements in the set worth highlighting, but there are a few. As you’d expect, there are a handful of recolors. I’ll touch on a few of the most interesting recolors here.
Let’s start with the large Technic turntable, which has always been color-locked to a light grey base and a black geared top. Here the black top gets swapped for a dark grey one, and you’ll get eight sets. Also of note is the new Technic liftarm with opposing pin holes, which LEGO calls a “flip-flop” beam. The piece was just introduced earlier in 2021 in both 11 and 15-stud lengths, and until now has only shown up in black. This set provides 16 of the 11-stud version in light grey.


A few other notable recolors are the large wheel that debuted in the Technic 42110 Land Rover Defender, and has only been available in black. It gets the light grey treatment here, along with the 4 x 4 Tile with Rounded Corners and 4 Feet, which has only been available in a few colors in the Mario theme. The set includes two each of the wheels and tiles.


Finally, the new elements. First, there’s the Technic 3-long frictionless pin with stop, which actually debuted in 75296 Darth Vader Meditation Chamber earlier this year, but will be unfamiliar to many. A total of six are included. And secondly, there is the sole completely new element: quarter-circle gears similar to the existing large yellow gears. When four of them are put together, they form a circle 11 studs in diameter, and you’ll get eight of them in the AT-AT. No doubt builders will find them useful in conjunction with the other 11 x 11 circular Technic beam LEGO released earlier this year.


There are only a handful of printed elements in the set, and apart from some minifigures, none of them are new. There is a very large sticker sheet as well, but it’s only got a few stickers on it—they’re just very large stickers. The light walls adorn the interior of the AT-AT, while the Rebel Base shield generator goes on a 2×6 tile inside the cockpit. And of course, there’s the UCS info placard.

The build
Box I starts with the chassis and upper legs. There are 10 numbered bags across four steps, plus an extra bag with the large wheel hubs (in case you’re wondering, two of the wheel hubs are the Land Rover ones I mentioned before, while the other two are a more common style with six spokes).
 Unsurprisingly for set of this magnitude, the build kicks off with a sturdy Technic frame made of lots and lots of Technic beams clamped together by a few vertical liftarms.
 Soon we flip the core chassis over and begin adding details; the first of the exterior details in the model. This will make the belly of the beast, and in the back center you can spy the small hatch that Luke cuts open to toss in his thermal detonator. The hatch is just for show; it doesn’t open all the way to the interior, but only to a recess about a stud deep.
 Now that the core chassis is built, it’s time to start on the legs. Only the upper legs are part of box one, but they already give us a good look at how a model this big can stand on four poseable legs. The main joints in the legs (shoulders and knees) are made with the large Technic turntable gears, held in place with worm gears. This is a technique that’s been known to mecha builders for a long time, but hasn’t appeared in any official sets until now, as even LEGO’s largeset mechs (like 21311 Voltron) didn’t need to support enough weight to justify it. Of course, using worm gears means the legs can’t be posed by hand; you need to turn the worm gear to move the joint. LEGO’s solution is to include a brick-built tool, which we’ll get to later.
 The four legs are built in identical pairs (front left with back right, and vice versa), and you’ll get your first real dose of duplicate building here. Once the Technic frames pictured above are complete, they’re clad in grey plates and tiles for the exterior, then attached to the chassis. Each leg has orange Technic pins protruding from the bottom where the rest of the leg will attach.
 With all four legs attached at the end of Box I, you’ll be presented with this odd creature. Let’s hurry up and get the legs finished because this weirds me out.
 Box II has 13 numbered bags spread across just three steps. It also has by far the shortest instruction booklet, since this entire box consists of building the same lower leg segment four times over.
 The legs start with a multi-sided structure that’s very similar in design to the 75306 Imperial Probe Droid central structure; an octogon with studs facing out, to which tiled sections are attached.
 Each foot has four identical sides, then three more of a second style, while the final side is unique (where the footpad yaw strut attaches). If you’re like me, when a set calls for multiples of a section (for instance, four feet) I build them in parallel rather than completing one and then starting over for the next. This became quite tedious on this set, though, as the cladding for the feet required building some sections 16 times. This sort of duplication is inevitable on a model like this, but it’s not what I’d call a fun and engaging building experience.
 One thing that is interesting about the feet, though, is that hidden on the bottom is a rubber tire. The sidewall of the tire protrudes just a millimeter or so below the bottom of the foot. The model is heavy enough that it still stands flat, but the rubber tire provides significant grip on whatever surface you have the AT-AT posed on. It’s a technique LEGO has exploited before, such as in 71720 Fire Stone Mech, and it’s frankly genius.
 Now, it’s been quite a few years since I last built one of LEGO’s regular “minifigure-scale” AT-AT sets. I remember that they’ve always been out of scale to minifigures, but they were still pretty large, often filling the top slot as the largest set in a given wave. So in building the UCS AT-AT so far, I could tell it was a bit bigger, but just how much bigger than those other sets didn’t really hit home until I got the feet finished and could compare them to a minifigure. Yes, this is certainly much bigger than previous AT-ATs.
 Now let’s get the lower legs attached to the feet. They’re very similar to the upper legs, with a Technic frame clad in a plate and tile shell, with a large turntable gear at the top for the knee joint. The cladding at this stage is only partial, as the rest will get added once the legs are attached. Frustratingly, the instructions omit the important 4x callout at the beginning of this build (step 266), so you may not realize that you could be building all four legs in parallel until you reach the end of the booklet roughly 70 steps later and see the 4x at the end there.
 Here we can see how the new quarter-circle gears are used, though. Unlike the shoulders and knee joints, the ankles move freely, with geared runners on the quarter-circle gears. This makes for a very strong but flexible connection, though it has a fairly limited range of motion.
 Once we attach the legs and the last bit of armor cladding, Box II is complete, and the chassis now stands at its full height, looking like an odd robot dog. The top surface of the chassis has a mix of plates and tiles, but the body that we’ll build in Box III is largely independent. In the automotive world, this would be a body-on-frame design, as the body bolts to the chassis with just a few key connections and is easily removable later.
 So let’s move on to that body. Box III has 12 numbered bags across six steps, plus an additional bag for some large Technic motorcycle wheels and a few other bits.
 The body starts in much the same way as the chassis, with a solid layer of Technic beams, though this time it’s not quite as thick since it won’t be supporting nearly as much weight.

Because the body of the AT-AT has angled sides, the front and back portions of the frame are angled in with hinge bricks toward the center. The outer edges connect with ball joints, and LEGO has cleverly mounted the female halves of the ball joints on turntables. The tiny bit of play the turntables introduce makes it much easier to connect them. Once the ball joints are in place, the LEGO math aligns even without the turntables. I think most fans would have skipped the turntables if they were designing this, and just used a little more elbow grease to get everything into place. But it’s that tiny space before they clip into place where the wiggle room is helpful.

The AT-AT isn’t just made for an accurate exterior, though. The interior is fully accessible. As we get the second floor on, the seating for troops is added. There’s seating for 40 troopers, an accurate count according to Star Wars reference materials, providing our first solid evidence that this AT-AT is properly minifigure scale.
 And speaking of accurate interiors, let’s jump over to the fuel cells now. There are two fuel cell units, which have a little easter egg nod to Octan’s color scheme with green and red stripes. These are fully enclosed, so once the rest of the frame is in place you won’t be able to see the cells inside the fuel cell enclosures. I mentioned in building the lower legs that the instructions omitted the 4x callout; here we encounter a different issue. Each of the two fuel cell enclosures is completely identical, yet the 14-step subassembly process is duplicated one after another rather than being a 2x callout. It doesn’t feel like the instructions were QA’d to the same degree as the design.
 Moving forward, the neck is built as a separate subassembly. The manual goes into detail about how LEGO designer Henrik Andersen developed this section, because it needs to not only hold the tremendous weight of the head, but also be flexible to allow for the head’s movement.
 The design Henrik settled on uses a series of Technic motorcycle hubs stacked on a piece of dark red flex tubing to create the neck, while the actual weight of the head is supported with four 1 x 16 Technic links that thread through the spokes. The GIF below is a top view, so once the neck is in place, it can swing side to side, but not up and down.
 With the neck attached, we now have the full body framed out. Attach the cockpit and stick 10 wheels on it instead of the legs, and you could pretend you’ve got an A6 Juggernaut (AKA Clone Turbo Tank) model.
 Up to this point, all the work on Box III has been completely separate from the chassis build of the previous two boxes. The body sits right on top of the chassis, with a handful of studs connecting. Four Technic pieces protrude from the bottom of the body and slot into the chassis, where they’re locked in place with brown Technic axles with stops. These four axles—two on each side—slot into regular pin holes (not axle holes) and are held in place later by some armor cladding, so they’re removable fairly easily if you need to partially disassemble the model for transport. When I first attached the body to the chassis, I put it on backward, so I had to remove them to reposition it. I found using a tiny bit of removable wall adhesive like Sticky Tack worked perfectly for pulling the flush ends of the axles.

Now that the body is attached, we can finally get a sense of the final scale of this model. It stands 24.5 in tall (62 cm) and feels absolutely massive. At this point, it actually became a bit awkward to work on at my build desk, due to its height.
 Box IIII rounds out the build with the cockpit and armor cladding for the body, along with adding most of the minifigures and the speeder bikes. It’s got 15 numbered bags across 5 steps, plus the loose 8×16 tile for the UCS placard.
 Like the body, the cockpit features a full interior with room for at least three minifigures. The top of the roof and front are hinged to give access to the interior, while the sides will be affixed in the next steps.
 Once the cockpit is attached, you get a really cool cross-sectional view of the entire AT-AT. All of the side panels are designed to be easily removable, so it should be easy enough to display the AT-AT like this if you wanted (or better yet, with just one side removed).

The armor plating for the cockpit features some fun geometry to get the curved patterns around the FF-4 medium repeating blasters mounted on the sides. The side blasters rotate up and down manually with enough friction to stay in place.
 With the cockpit fully armored, it looks properly imposing.

Now it’s time for the body’s armor shell, which is largely made of stacked plates. If you’ve built any of the big Star Wars models like the 75252 UCS Imperial Star Destroyer before, you’ll be well acquainted with this process. The shell is composed of five individual panels: large multi-faceted panels for each side, and then three separate flat panels for the top.
 The central piece of the side panels features a large cargo door that’s made with bricks rather than plates. The door hinge is an interesting mechanism, as the hinge itself uses 1×5 Technic plates rather than any dedicated hinge element. The while mechanism is then mounted free-floating on a Technic axle, to allow the door to pop in after closing for a flush finish. The axle mechanism uses a minifigure neck bracket for a small spacer next to the yellow bushings, a technique I’d never encountered in a set before.
 The body panels simple slot into place on the frame, so once you’ve got them built the AT-AT is essentially finished. There are also a pair of speeder bikes, a small turret, and the minifigures, but we’ll look at those below. The last thing to finish up is the UCS info placard, which is a very simple design to hold the card at an angle. Behind it there’s a small rest for the leg adjustment tool.


So let’s take a look now at the full model.
The completed model
The AT-AT is a huge model, in case you hadn’t picked up on that already. I know opinions will vary on this, but as much as I love Star Wars and the design of Imperial starships, the big grey wedge of a Star Destroyer is just not all that compelling of a design to display. The AT-AT though, standing over two feet tall on long gangly legs, is extremely impressive. As much as it is an awesome display, it’s a feat of engineering. Minifigure scale is a little hard to calculate since minifigures aren’t proportional to humans, but the AT-AT is 24.5 inches tall, or around 78 studs. A common minifigure-scale calculation is that 1 foot equals 1 stud, and the canonical height for an Imperial AT-AT is 74 feet. At 78 studs tall or almost exactly 1:36 scale, I think we can all agree that’s within an acceptable margin of error on a model this size.

Many fans will have one of the previous “minifigure-scale” versions of the AT-AT, and all of them have been roughly the same size. So let’s see how the 2020 set, 75288 AT-AT, stacks up. It’s no slouch of a set in its own right, clocking in at 1,267 pieces. But stand it next to the new big boy, and it looks positively pallid. The UCS AT-AT’s cockpit is nearly the size of the old version’s body.

Now that we’ve got the size out of the way, let’s take a closer look, starting with the AT-AT’s cockpit. The big Taim & Bak MS-1 fire-linked heavy laser cannons below the chin are connected so that when one recoils, the other springs forward. It would have been cool if there was a mechanism to make them move, but as it is you’ll just have to grab one and make “pew pew” noises.
 The front and top of the cockpit lift up to provide full access to the interior. Previous AT-AT models have just barely squeezed three minifigures inside, but this one actually has enough room for General Veers to strut and call out commands from behind the upper console. If I had one nit to pick with the cockpit, it’s that the raised roof doesn’t have enough friction to stay up on its own.

There’s a knob inside the body where it joins the neck, accessible by removing the top front armor panel. Twisting it side to side allows control of the AT-AT’s cockpit. There’s not a huge range of motion, but it feels fairly accurate to what the lumbering AT-AT would have.

Now let’s take a closer look at the legs, which hold the whole business up. The attachment points of the legs to the body is surprisingly strong, and doesn’t feel even remotely unstable.

The legs have a fair bit of play in them, especially side to side, and can move about two inches left or right when positioning them. Thanks to the rubber grips on the bottom, though, they stay where you place them and unless you have all the feet really far in, the model doesn’t feel prone to tipping on its own.

The shoulders and knees are locked into place with the worm gear we looked at earlier, and the axle to adjust them is well hidden, but easily accessible. The simple brick-built tool includes a universal joint on the end, so it’s quite easy to reach in and adjust the joints.
 The legs can be adjusted to a handful of angles, but you don’t want to press it too far, or else the model can’t withstand its own weight. The manual includes a small guide on how to lift and position the AT-AT.

Despite the handy guide, however, I found lifting the AT-AT to be a precarious thing. Moreso than any other LEGO set I can remember, the AT-AT is prone to having bits and pieces fall off even during very cautious moves. The small fenders around the shoulders are attached with a single stud, so naturally they come off easily, but they’re just as easy to stick back on. More of a problem, though, was the entire underside detail, which I found frequently detached when carrying the model as recommended. And because of its size and position, it was much more difficult to replace it without breaking things further. Several times while photographing the model I had to lay the AT-AT on its side (which is not recommended) so I could see what I doing to replace the belly section, then repair all the damage that having the AT-AT on its side caused.
 Ultimately, I found that the surest and safest way to move the model is to remove at least one side panel, and then lift the model by the second floor’s frame. It’s some comfort, however, that all of the damage the model incurred during moving and positioning was cosmetic. I never felt like the AT-AT was going to tip, or have the cockpit fall off, etc.
 So clearly, sturdiness was not the prime directive on this model. But that’s actually forgivable, considering the tradeoff is that it has a full interior (instead of small sections of an interior). As I mentioned earlier, it has seating for a full 40 troops, the canonically accurate loadout. Sadly, only five troops are included, so you’ll have to bulk up your Snowtrooper army with other sets.
 Behind the troop bays, there’s a bay for Speeder bikes. Two are included in the set, though there’s room for four total in the AT-AT. It’s rumored that more Hoth-focused sets are on their way, so perhaps you’ll be able to give the AT-AT a full loadout soon.
 Speaking of the speeder bikes, let’s take a quick look at them. Due to their small size and the chunky proportions of the minifigure they must carry, LEGO speeder bikes have always lacked a bit in accuracy. These speeder bikes aren’t perfectly accurate even at this scale, but they’re pretty good. My main gripe is the design of the front steering vanes, which feels far too clunky.

Another thing I don’t like is the fact that a minifigure can’t actually grip the controls.

However, while this speeder bike design is new, the steering vane design is shared with older versions, such as the bike that was included in last year’s smaller 75288 AT-AT. Below, the new design is on the left, while the old is on the right. The taps that form the upper portion of the controls were facing in on the old design, allowing a minifigure to grip them. It’s a simple change and easy enough to swap, but puzzling since LEGO is moving from a minifigure-friendly design to one that’s not; perhaps another instructions error?

While we’re on this diversion, the set also includes an E-Web heavy repeating blaster, which is identical to the design seen in 75288 AT-AT.

But now back to the main feature. The speeder bike bays can only be accessed by lifting off the side panels, which gives you access to the full interior from top to bottom.

But if you want a more canonical way to access the interior, you can try the large cargo doors on each side, which swing out and up, and stay positioned nicely when open.

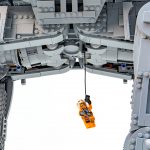
The belly of the beast of course has the hatch that Luke blows open, as well as an attachment point for his grappling hook. The rope is included so you can recreate the scene, and Luke’s even got a thermal detonator this time around.

The minifigures
The AT-AT includes nine minifigures: Luke Skywalker, General Veers, two AT-AT pilots, one Snowtrooper Commander, and four Snowtroopers. It’s a good complement of characters, but you won’t find much new here. Most of the minifigure designs are shared with the 2020 version of the AT-AT.
 General Veers and the AT-AT pilots are identical to their counterparts from 75288 AT-AT, except for a few minor details. General Veers gets boots this time around thanks to dual-molded legs, and the AT-AT drivers get updated heads that add a touch more diversity.


The Snowtoopers are likewise identical to their counterparts from 75288 AT-AT, with the exception of the commander. LEGO has made a Snowtooper Commander before for the 2014 version of the set, 75054 AT-AT, but that employed an older Snowtrooper torso design. The new commander is identical to the rest of the Snowtroopers except for the rank insignia plaque. Like the drivers, the Snowtroopers’ diversity has been amped up considerably, which is a nice nod to the newer canon where the Imperial ranks have been filled with whatever recruits the Empire could find. The Snowtrooper Commander (far left) retains an aged clone head, though, which actually makes a good deal of sense.

Finally, the set includes Luke Skywalker. This version of Luke differs from the one in the previous AT-AT set, but instead is identical to the version from 75301 Luke Skywalker’s X-wing from earlier in 2021.


As you can see below, the primary difference this version has over the last one is the position of the hose from Luke’s chest piece, but ironically, neither is accurate to what’s seen on screen in The Empire Strikes Back, which has the hose looping around the torso down low like the older minifigure, but on Luke’s left like the newer one. The new version included here seems to be screen accurate for Luke’s outfit in A New Hope. It’s a small detail, but this is also an $800 set with effectively no new minifigures, so small details count.

Conclusion and recommendation
It’s hard to justify spending $800 on a LEGO set. But the AT-AT is truly jaw-dropping. Its scale is truly hard to comprehend from pictures. It absolutely towers over minifigures, and will no doubt soon feature as the centerpiece of many fans’ homegrown Hoth dioramas.

It’s true that the AT-AT rings in at the same price point as the 75192 UCS Millennium Falcon while having fewer pieces, but the difference isn’t too stark, and once built and towering over your minifigures, it will feel at least as impressive as the UCS Falcon.
The AT-AT isn’t without its flaws, though. The instructions don’t feel properly vetted, a trend we’ve been noticing across LEGO sets for the last several years, but is especially egregious when you’re spending this much. As I noted earlier, while the ability to stand on four poseable legs is an incredible feat of LEGO engineering and it works remarkably well, the model is still relatively fragile and prone to shedding bits and pieces. Also, for the price of $800, it should have included some more unique minifigures and even more Snowtroopers. With seating inside for 40 troopers, the five included Snowtroopers feel almost like a joke. It needs at least 10, so that you can really feel the Empire’s crushing might bearing down on the Rebels. LEGO no doubt plans to remedy this with future sets you can buy to bolster your Imperial forces, but the Ultimate Collector Series AT-AT surely had room in its $800 budget for a few more.
Gripes aside, The Empire Strikes Back has always been my favorite of the Star Wars films, and the awesome AT-ATs are among the coolest and scariest pieces of machinery in the Empire’s arsenal. I never thought I’d see LEGO produce an AT-AT that’s actually properly scaled to minifigures, and it’s jaw-droppingly cool. You’re going to want this one.
75313 UCS AT-AT contains 6,785 pieces and 9 minifigures, and will be available from LEGO starting Nov. 26 for US $799.99 | CAN $949.99 | UK £749.99. It may also be available from third-party sellers on Amazon and eBay.
The LEGO Group provided The Brothers Brick with an early copy of this set for review. Providing TBB with products for review guarantees neither coverage nor positive reviews.
And no review of a huge LEGO set is complete without a cat for scale. OK, in this case, it’s a kitten for scale, which I’ll admit does throw things off a little. But come on, look at this!


I love the picture of the AT-AT with the CAT-CAT. That certainty does put its size into perspective even though she’s only a kitten!
+1 to what Huw said. Awesome review, pictures and animations. After the Titanic another behemoth of a set but at least this one can stay on the floor and doesn’t need an extra shelf.
Great review and impressive engineering with the posable legs using the worm gears. I am curious on all the leg poses the model can handle with stability. I was hoping for a better stance then all four knees with a slight forward bend, which is quite an inaccurate stance to the original. At least 2 if not 3 of the knees should have locked knees in a straight pose, as well as the angling of the legs should mimic a proper gait.
In terms of the speeders..
“Another thing I don’t like is the fact that a minifigure can’t actually grip the controls.”
There is a very simple solution. Flips the pieces the other was around so the grip portion is on the inside. I think it should line up correctly then. It may not be how the instructions say, but its LEGO, who cares! :)
Thank you for the detailed review!
Nice review, thank you! I particularly like seeing all of those lovely studded Technic beams, it warms my heart that Lego hasn’t gone completely to studless liftarm-type beams.
I’m with you on being annoyed at the lack of a “2x” or “4x” callout at the start of some building steps. I’d go even farther and suggest that (for advanced sets) Lego should also include a “mirrored” or “left/right handed” or some other subtle indication that what your building is about to be followed up by building the exact same thing mirrored.
Very detailed article, just one question – The article mentions the substantial weight of the set a couple of times, but doesn’t actually say how much it weighs. As someone looking at putting it in a cabinet, I’d be interested to know that detail!
The 2020 AT-AT is the size of a house cat.
The 2021 AT-AT feels like much the same model, just bigger. But as LEGO just released two sizes of Bat Tumblers only a month apart, maybe this does not cause LEGO any concern.
Looks sweet but I wish the reviews were delayed a bit. On the other hand maybe I’ll save money by not needing to buy one.
Great review! I wonder if you could pose it fallen down tripped by wire.. The Ninjago Quake Mech uses turntables for shoulder joints.
… now impatiently refreshing NewElementary for more information on that new, smaller, banana gear (quarter circle) …
This review is awesome as always from BB! I have never spent more than a few hundred dollars on a set but the AT-AT has always been my favorite vehicle from my favorite movie so I will spend whatever it takes to have this one. I have never actually bought an AT-AT LEGO model because they have always been dissatisfying to me, it was never “right”. And this model proves why, you need that scale to be honest to the real vehicle. I will be setting a reminder to buy this when it becomes available as I suspect that it will sell out fast.
Sweet – 12 sets of 75320 Snowtrooper Battle Pack + 1 set of this and I can have a fully kitted out ATAT – just over $1k USD each. Plus a couple ATSTs to walk perimeter. No to convince my wife…