The upper boundary for the size of LEGO sets has been steadily rising for the last decade as the company increasingly courts the attention of adult fans with broader interests and deeper pockets than the toy’s traditional audience. When the Star Wars Ultimate Collector Series 75192 Millennium Falcon arrived in 2017, it set a new high watermark with a whopping 7,541 pieces. That record has since been broken several times. LEGO’s latest venture into the open waters of adult collector pieces comes in the form of the world’s most iconic ship, one whose name is synonymous with its monumental place in history. 10294 Titanic doesn’t quite get the top slot on the part-count hall of fame (that record goes to 31203 World Map mosaic from earlier this year) but at more than 4 feet in length and 9,090 pieces, it’s the largest traditional LEGO model of all time. It features a detailed exterior and segments of the lavish interior. The monstrous ship launches next month, and will set you back US $629.99 | CAN $799.99 | UK £569.99 when it’s available Nov. 1.

The LEGO Group provided The Brothers Brick with an early copy of this set for review. Providing TBB with products for review guarantees neither coverage nor positive reviews.
Unboxing the set and contents
The Titanic becomes only the third set to employ LEGO’s ultra-large box size, following the two top-tier Star Wars Ultimate Collector Series sets, 75192 Millennium Falcon and 75252 Imperial Star Destroyer. Notably, while both of those sets cost more at $799.99 and US $699.99 respectively, the Titanic has several thousand more pieces than the Falcon, and almost double the pieces of the Star Destroyer. The box is large enough that LEGO developed a stick-on system of wheels and a handle for the plain cardboard outer box to let you wheel the set home from its stores like a piece of luggage—something you’ll definitely need, since the Titanic in its shipping box weighs in at 31.6 lbs.


Opening the top flap of the box presents you with a lovely line drawing of the model in yellow, a small image that belies the size of the model inside. Once all four top flaps are open, the set doesn’t contain loose elements bags. Instead, like the UCS Falcon and ISD, it’s divvied into a series of boxes.


For those sets, we roundly criticized LEGO for randomly distributing the parts bags throughout the boxes, making the neat packaging rather pointless. Happily, LEGO has improved, and the three boxes here are, in effect, self-contained sets, one each for the bow, midship, and stern segments. Each is packaged not only with just the parts you need for that segment but also with its own instruction manual and even brick separator (making this the first retail LEGO set to ever contain three brick separators).
 Because of this, you can easily divide up the work in building the set, if you want to build with one or two other people. I cashed in on this opportunity and had my wife and former TBB contributor Caylin help; she started immediately on the midship while I began on the bow. For sets of this size, this is a wonderful thing, because it easily allows cooperative building for those who would enjoy that experience, while not diminishing the experience of solo builders in any way. Because I was doing a review, I went ahead and opened all three boxes upfront to aid with the photography, and just getting them laid out in prep for the build impresses on you the magnitude of this set, as they completely overflowed the boxes from three older large sets that I use for organizing.

But before we dive into the build, let’s take a look at some of the parts. With over 9,000 pieces, there’s a lot of brick at play here, and most of it is interesting (unlike the larger 31203 World Map mosaic set, with its hundreds to thousands of identical 1×1 round tiles). There are not, however, any wholly new elements introduced in the set, unless you count these vinyl flags. With three all-new flags for LEGO, these are sure to be some of the most popular bits for fan builds out of the whole set. The blue Union Jack is the Blue Ensign, identifying the ship’s nationality, while the white-rimmed flag is the Pilot Jack, a flag whose meaning is a bit too nautically obscure for me to parse. Finally, there’s a period-accurate 46-star United States flag (something of a rarity in US history, as it was only flown for 4 years before expanding to 48 stars in 1912). Like most modern LEGO vinyl elements, they’re printed on both sides.
 Next up, there is only a small handful of printed elements in the set, and only a few of those are new. The bow lettering for “Titanic” and stern badge “Titanic Liverpool” elements are obviously new, as are the white slopes with the yellow line. The rest are reused from other sets, notably the big round 2×2 tiles from 21327 Typewriter that are used on the display nameplate. I was surprised to see the “TC” shield tile, which is the initials of former LEGO designer Tiago Catarino and was designed as a gravestone easter egg in 10273 Haunted House last year. And of course, I’m always delighted that the classic 2×2 white slopes with black lines are still making appearances, 35 years after its introduction. They also feature in 10283 NASA Space Shuttle Discovery from earlier this year.
 The set includes a fair number of recolors and otherwise rare and interesting elements. I’m not going to list them exhaustively here, but of course you’ll get a great selection of dark red elements since the lower third of the ship is clad in dark red. The picture below is just the dark red from the first few bags, not even close to the full breadth. Notably missing from this image are the dark red 2×6 tiles, which are not new, but you’ll get a hefty 102 of them.

Recolors of note include tan cheese grater slopes, which according to Bricklink have only been in a single, exclusive LEGO Store Opening set from earlier this year (2x in the set), new long white flex tubing (1x), reddish-brown 2×4 bricks with axle holes (14x), and white and brown curved 1×2 slopes (14x of each), a brand new element that made its first appearance in the 21329 Fender Stratocaster guitar set just last month.


You’ll also get tan 1×5 plates (8x), flame-yellowish orange bar 4Ls (8x) and lightsabre hilts (16x), and black round 4×4 bricks with recessed center (4x).
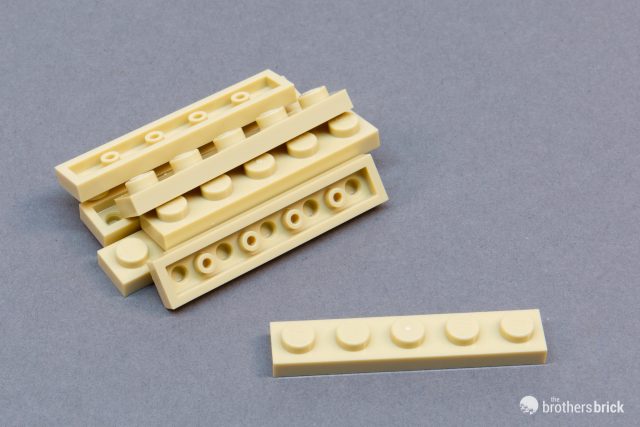


And while not new, in the “lots of this” department, you’ll get loads of black 1×2 rounded plates and black minifigure neck brackets, as that’s what makes up the myriad portholes. The piles below are just from a single bag, as you’ll get 171 of the plates and 284 of the brackets.


The build: the bow and bridge
The inner boxes are nicely detailed with the line drawings covering all the faces of the box showing different angles of the ship, focusing primarily on the section you’re building. I do wish these boxes said the set name and number on them, but I suppose that LEGO wants to make it clear to uninitiated customers down the road that these are not complete sets, even if they are self-contained build experiences. At the very least, I’d love to see a part count for each section on these inner boxes, if only for curiosity’s sake.
 Box 1 contains 22 bags, numbered 1-12, along with the instruction packet and a few loose flex tubes. The instructions packet contains the instruction manual and the vinyl flag sheet.
 The instructions manual is a large perfect-bound book, unlike the ring-bound manuals from the UCS Falcon ISD. Because it’s only one-third of the total instructions, this wasn’t an issue at all and the book had no trouble staying open, provided you’re willing to crease the pages a little. A ring-bound manual would still be preferable since many fans are going to want to keep it in as pristine a condition as possible after dropping more than $600 on this set.

Like most LEGO for Adults/Creator Expert sets (and yes, we find the branding between those two just as confusing as you do) the manual starts with an introduction to the model and its real-world inspiration. The info pages are broken up among the three manuals, and focus mostly on the ship’s construction and technical specs. The final manual contains information on the Titanic’s infamous sinking, but it’s relatively minimal and LEGO clearly doesn’t want to focus on the fact that this ship is most well known for killing over 1,500 people. LEGO points out the model is releasing on the 110th anniversary year of the Titanic’s launch; the ship was launched in 1911, but didn’t finish being fitted out for its maiden voyage until 1912.


The set’s parts are broken into three sets, but the actual build is broken into six discrete segments, with each box building and then joining two segments to make a cohesive third of the ship. Each segment is introduced in the manual with a brief background, and there are bits of trivia strewn throughout the instructions.

At last, we start laying the Titanic’s keel. The inside is brightly colored, and makes ample use of brackets and SNOT bricks to attach the sides, and clips for places where even more unusual alignment is needed, such as the large angled sides of the bow and stern.
 As you build up the bow, the building quickly becomes quite complex. I had worried that building a literal Titanic with 9,000 pieces would be quite a slog, but so far it’s an engaging build with a great deal more complexity under the surface than you might expect.
 This front portion of the bow, for instance, I found particularly clever, since it employs a 1×1 stud with bar (in black, attaching to the brown headlight brick below) in addition to the SNOT bricks to make sure the plates that form the tip of the prow are firmly held in place.

It’s at this point that I encountered the first section of portholes. By and large the build is not tedious, but this probably comes the closest. However, the designers have done a good job of breaking up the porthole sections so that you’re never asked to build a giant swath of them all at once.

The details along the top of the bow are fantastic. For instance, this section with the chains slots deep below the deck to make sure the chains are held at an appropriate length, and to make the holes in the deck as small as possible (just two plates high, and half a plate wide).
 A few more details on top, and the first major section of the ship is complete. Obviously it’s still missing some important bits, which will get added after the next section to join the two together.

Next then is the bridge and funnel section, immediately behind the bow. Like the bow, the hull in this segment still angles in. It also features the boilers, which will be visible in the cross-section on the completed model.

At this stage, I took a picture to see how Caylin and I were progressing with our respective sections. I’ll return to the mid-sections she was working on later in the review, but you can see that working in tandem moves the build along at a much faster pace than building alone. If we’d had a third person building the stern, we’d be on the home stretch already.
 Much like the bow, the bridge section uses clips set at an angle to set the stage for the hull cladding to be attached, while the interior is a reinforced box of mostly basic plates and bricks, with a lot more detailing along the edge where the front third adjoins to the middle third.
 Moving up, we start getting some of the first-class accommodations, with windows made with sideways bricks and plates. The spacing on the windows looks odd now, but once to see them all lined up on the finished ship, the pattern emerges.
 The bridge is a fantastically detailed little section of building. This picture shows the interior structure that’s just setting it up for smooth detailing later on. The sides of the bridge are built at an angle, so getting the studs in the right places to have everything align is very important.

Now, the bridge section is ready to be mated to the bow.

Large panels are then constructed that fit over both sections. Despite attaching with just six clips each, they feel rock solid once in place and haven’t even hinted at popping off.
 One last detail is needed for the front third to be completed, and that’s the stands. The stands are simple and unobtrusive, but very sturdy.


And with that, the Titanic is one-third complete. It’s already more than a foot long and heavier than many entire Creator Expert models—most of the vehicles, for instance.

The build: the funnels and main cabins
Now let’s turn back time a little and look at the midship sections that Caylin was building.


Here we have 18 bags, numbers 13-28, along with another cardboard packet for the instruction manual. These cardboard packets are quite a nice way to ensure the manual stays in good condition without using plastic, which is much more difficult to recycle.

Manual 2 includes a bit of history about the Titanic’s luxurious accommodations, as well as an introduction to the set’s designer, Mike Psiaki. Mike is a long-time AFOL whose creations we featured many times here on TBB, before he was hired by LEGO to work on the Creator Expert team, turning out sets like 10295 Porsche 911 and 10269 Harley-Davidson Fatboy.


Like the bridge, the first of the two middle sections start with a box framework of mostly basic elements.

Once it’s built up a bit more, the sides are simply pressed straight onto the outward-facing studs. Since these middle sections don’t have a tapering hull, they’re extremely rectangular, something that LEGO excels at without getting too crazy. The sides use more of the same porthole techniques; again, they’re a little tedious but nothing like building miles of greebles to attach to a Star Destroyer. Once the sides are on, you’re left with a pretty flat, albeit open, surface on top to start the deck detailing.


Once the tan deck is down, there’s a large hole in the center for the funnel, which is added as a separate sub-assembly.

The funnels are held at their distinctive backward cant thanks to a simple design with Technic pins.
 Finally, a very important detail is left to add: the lifeboats. The “unsinkable” Titanic disastrously didn’t have enough of them, but it did have some. Each lifeboat is made of 11 elements. The LEGO model has 16 lifeboats. The real Titanic had 20 lifeboats, with 16 of them arranged in the four banks of four we see on the LEGO model, while the remaining four were collapsable boats.

Now, the first of the two mid-sections is complete.

The second mid-section is nearly the twin of the first, so I won’t go into much detail there. There are enough differences to keep it interesting during the build however, especially at the back where it will adjoin to the stern.
 With the second mid-section complete, the middle third is ready to go. Except for the large funnels, it looks almost like a microscale apartment building.

The build: engine room and stern
Some 6,000 pieces down, only 3,000 to go. We’re on the home stretch and there are still as many pieces left to add to the build as there in most modulars.


This final box contains 26 more bags, numbered 29-46, along with the final instruction pack, and a loose piece of long flex tube.

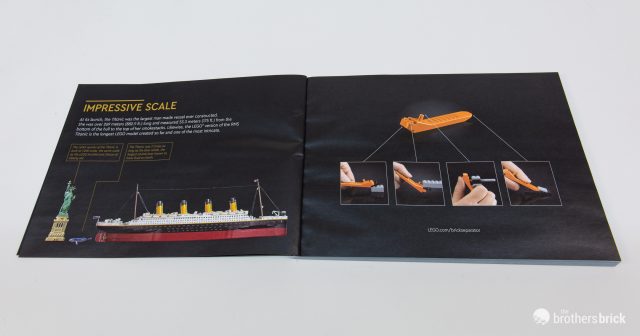
This final booklet has a brief overview of the world’s most famous nautical distaster. It also has a diagram showing the scale of the model, which is 1:200 scale, and notes that it’s the same as the 21042 Statue of Liberty set. They’d make a cool display together for an alternate history scenario: what if the Titanic successfully made its maiden voyage across the Atlantic to dock in New York?

The stern third starts off the foremost of the two sections, the engine room. While the engines will be accessible later on, the Titanic’s electric power plant is buried in the bowels of the ship, and is one of those details that’s only visible when you’re building the model. It’s completely inaccessible once the stern is closed up.

Again, the tapered walls of the hull are attached with clips, held at angles thanks to ball joints and some crazy LEGO math. Here you can also see the beginnings of the driveshafts that will connect the engines to the screws.
 Building up the engine room adds more detailing to the cross-section, and this is a good chance to take a look at a little bit of it. The detailing isn’t quite to scale, of course, but it gets across the impression of tables, chairs, and beds well enough. The interior walls are made with car doors, allowing the walls to be thin while not taking up a stud on the floor the way a panel element would. We can also see here the big column of rounded 2×3 plates with holes in the center, that are used to lock the thirds together later.
 Add some details on top, and you’ve got yourself an engine room. One bit of trivia in the manual is that this fourth and final stack was actually non-functional on the Titanic, and was added purely for aesthetics.

Finally, we get to the stern proper. The stern and bow are by far the most interesting parts of the build, since they’re such interesting shapes. The stern section is the longest of any of the six sections, and starts off with a bit of Technic to hold the driveshafts. This is also where the “TC” shield tile goes. Like the electric powerplant, this tile is completely buried once the model is done. Perhaps it’s a nod in some way to the 21313 Ship in a Bottle set, which Tiago designed. Update: Tiago has said that he worked on an early concept of the set while he was a designer. The easter egg inclusion of the “TC” tile here was a surprise to him.

So far, most of the Titanic has been build as a box, with the vertical hull just connected to the sides. The complex curves of the stern require some more complex structure, however, and the hull sections are much bigger and more oddly shaped. It looks something of a mess right now, but it comes together very nicely.
 Once they’re attached, you can see the smooth curves of the stern taking shape very nicely.
 The upper edge of the stern is a simple chain of hinge plates which abutt smoothly to the deck, before being covered with a long piece of flex tube for railing.
 Now it’s time to mate the engine room to the stern.
 The two sections are connected by a number of Technic pins and axles on the joining faces, but a lot of the strength comes from the deck sections that are placed over top. I haven’t tried disassembling the model, but I get the impression that it wouldn’t be terribly difficult to take it back apart into the six smaller sections for easy transportation.

The two main engines are now added to the engine room. They’re separate subassemblies and can be removed later. When slotted into the engine room, turning the gear on the front of the engine pumps the pistons and turns the screw at the back.

And with that, the stern third is ready. Yet again I’m blown away by how massive this is, especially when realizing that this is still only one-third of the ship. The engines here are not partially pulled out; rather, they span the segments.

Now let’s join the pieces together. This is a remarkably easy process. The bow and stern each mate to the middle section easily, without too much needing to mess around with alignment. There are no Technic pins connecting the sections, something that often causes undue friction when mating large assemblies. Each section connects with two axles, two clips, and the large, central, weight-bearing column of 2×3 plates with holes. There’s a piece of the deck with a large Technic axle that slips down into the column and sturdily locks it together, functioning like a lock pin.

Because the lock pins are easily removable, it’s no trouble at all to split the model back into thirds to see the details in the cross-sections. You need only remove the lock pins and disconnect the top rope.

Only one more bit remains now, and that’s the nameplate. The badge is very simple and consists of only a few pieces. It looks nice enough but it feels like a bit of a letdown after all the detail on the ship. It should have been a or a UCS-style fact sheet, or perhaps more elegantly, a specially printed element with the TITANIC logo from the box front.

The completed model
I love Star Wars. But when Andrew and I finished building the UCS Imperial Star Destoyer, we both had the distinct feeling of “…that’s it?” It’s a big grey wedge, and even though it’s quite accurate and tremendously imposing in scale, it’s just…boring. You see, bigger isn’t always better. It’s possible to have a huge, accurate model that’s boring. And so I went into the Titanic build with a wary eye on it, because a 9,000-piece model of a flat-sided oceanliner has the potential to be a red, black, and white bore. It is not. The Titanic is a beautifully rendered model with an engaging build, and the finished model is a marvel to behold.

The Titanic may not have had the flowing curves of more modern ships, but there are still plenty of interesting shapes to hold your eye.

The deck details rival that of most fan-built creations, and unlike many large LEGO models, it doesn’t feel like many studs were left exposed to give it a “LEGO” feel.
An aside: The stern bridge here contains a tensioner for the main rope that spans the length of the ship, which I forgot to re-tighten as I moved the model around and adjusted pieces of it. The sag in the main rope in some of the images is easily removable by properly tensioning it. Similarly, the sag on the other ropes is also removable by adjusting elements, but I didn’t realize that until after most of the photos.

Looking down the length of the ship, the details blend together in the perfect way a microscale model should; there’s just enough detail there to trick your eye into thinking there’s a lot more.

I’ve hardly any nits to pick with the model, but in the interest of due diligence, one detail I do feel is missing is the Titanic’s operator White Star’s pennant from the rear mast. I’m not quite sure how the trademarks on that shake out 110 years later; I’d imagine there’s no issue 87 years after the brand name was last used. White Star has been absorbed and re-absorbed many times in the intervening century, and the remnants are now part of Carnival. The pennant ought to have been included on the vinyl flag sheet, but failing that even an unprinted red LEGO pennant piece would have been fairly close.
 The bottom isn’t much to look at, but it’s not much to look at on a real ship, either. The holes for the stands are highlighted in dark grey, but otherwise, it’s an unbroken swath of dark red. The ship can be displayed without its stands, if you’d prefer to see it that way.


The bow details are my favorite part of the build, especially the way the chains lie across the deck. That’s not at all an easy thing to accomplish well, and it’s very well done here. And all the miniature cranes just tickle my fancy.
 Still, all the details in the world don’t really get across the scale of this model. I’ve been LEGO building for a long, long time, and this model is truly titanic in scale. It clocks in at 4 feet, 5 inches in length (135cm), a full 14 inches longer than the 21309 NASA Apollo Saturn V, a massive set in its own right.
 Or if you prefer, cat for scale.

So it’s massive. But is it sturdy? After all, how sturdy can it be if it’s four and a half feet long and easily breaks into three sections for display? The answer is very surprising. It’s rock solid. You can lift it with one hand under the middle, provided you don’t mind lifting a 30-pound ship with one hand, and there’s barely any flex.
 Of course, the Titanic isn’t famous for staying in one piece. So while LEGO certainly intends the model to be a static display of a famous oceanliner, I couldn’t help but see if it could be used for other dioramas, too. Watch out for the ice-BURP off the starboard bow!

I also took advantage of the ship’s modularity to recreate its demise. LEGO Certified Professional and LEGO Masters Australia judge Ryan McNaught recreated this Titanic sinking scene in far more detail back in 2016, so at least I’m in good company.

Finally, it seems ironic to think about saving the planet’s ice when building a huge model of the Titanic, but let’s face it, LEGO packaging creates a tremendous amount of waste. LEGO has promised to begin rolling out more sustainable packaging next year, and while I don’t relish the thought of opaque parts bags, that’s a small price to pay for eliminating this monstrous pile of unrecyclable waste.


Conclusion and recommendation
As I mentioned before, bigger isn’t always better. But sometimes, bigger means more room for details, more interesting techniques, and a scale befitting the subject. A LEGO Titanic model that was one or even two feet long would have likely been interesting and a fun build. But a Titanic that’s four and a half feet long is an experience. The details are wonderful, and the way the set is designed to allow tandem building with up to two others is something more large sets should incorporate. The build is interesting and engaging at every point, with the tedious porthole portions nicely broken up and spread out throughout the build. The geometry for the hull shaping is magnificent, and the deck details seem closer to a fan creation than an official model, which is the best praise I can give them. At more than $600, it’s certainly not going to be for everyone. And while the price is steep, you’ll get a lot of bang for your buck, with the price-per-piece coming out at just under $0.07, far cheaper than similarly priced licensed sets, though a bit above 10276 Colosseum. And even if you can afford it, you’ll need to find a place to put it. But if you have any interest in owning a stunning model of the Titanic, or are just interested in very large and complex builds, you can’t do much better than this. The LEGO Titanic is a beautiful model of a beautiful but tragically fated ship.
10294 Titanic contains 9,090 pieces and will be available from LEGO starting Nov. 1 for US $629.99 | CAN $799.99 | UK £569.99. It may also be available from third-party sellers on Amazon and eBay.
The LEGO Group provided The Brothers Brick with an early copy of this set for review. Providing TBB with products for review guarantees neither coverage nor positive reviews.


The cat pictures make me happy. What a set!
While still working for LEGO I pitched a Titanic concept model to the Creator Expert team. So I’m assuming that’s the reasoning behind the tile there which made me extremely happy when I found out!
Bah, when you said Tiago is no longer at LEGO and has a gravestone, I figured he was deceased. Good to see he’s alive and well and still LEGOing.
That’s great to hear the Titanic is an engaging build. It did look like a repetitive slog from the initial box photo.
It truly is a golden era for LEGO fans, even just knowing that such a set is on shelves is enough to see that. And sure, two separate football stadiums might have a limited audience but it’s not like TLG eliminated a different theme to produce them; there is still something for everyone somewhere in the product lineup.
Some insight into the Titanic disaster. The lifeboats were part of the situation, but not all of it. Sure there were not enough of them, but they were the required amount for that period. Second, the telegraph machine was not manned 24/7 which meant that the Californian couldn’t come to Titanic’s rescue. Finally, Titanic had the wrong color flares.
Great review. The iceberg was on the starboard side – you have it right in the photo, but that is the starboard side.
DelawareBridge; haha, this is why you shouldn’t trust me to pilot a ship! Thanks, and corrected.
I thought I’m gonna see the elegant entertainment section, but no details inside… such a disappointment ????????????
Excellent review. And thank you for highlighting the importance of the environment and hope Lego gets to sustainability and oil-free ASAP!!!
No band?
Love the cat picture for scale. To cute!
If the shipping weight is 31.7 lbs, what’s the weight of the finished model? I’m guessing somewhere in the range of 27ish lbs?
Lego…blah. Give a real model to build.
Are there any new black hull parts that arent available in white to make a Britannic?
Bricstol74: I haven’t cross referenced them, but I’m reasonably confident that pretty much all the black parts are available in white. On the off chance any aren’t, I’m sure they’d be easy substitutes, because there weren’t any particularly unusual pieces in that section.
The American flag? It was a British ship, British flag, and that was just a glance.
She would have flown the flag of her final destination on the foremast, even when stopping at other ports along the way. Hence the American flag up front, which is in original pictures from it leaving Southampton
How long does it a moderate Lego’er roughly take to assemble this?