Large-scale display pieces catering to the nostalgic adult fan have long been a mainstay of Disney merchandise. Whilst some LEGO Disney sets have flirted with the memorabilia audience before now (notably 71044 Disney Train and Station and 21317 Steamboat Willie) the latest Disney set — 43179 Mickey Mouse & Minnie Mouse Buildable Characters — has its sights set firmly on the hearts (and wallets) of adult Disney collectors and enthusiasts. The set contains 1,739 pieces and features the iconic couple as large-scale figures, clad in their signature outfits, and with a range of accessories. It will be available from July 1st, retailing for US $179.99 – CAN $229.99 – UK £169.99.

Let’s see how LEGO’s tribute to Hollywood’s most famous power couple stacks up…
The box and its contents
The box is large (23″x15″x5″) and has a satisfying heft, suggestive of the 1,739 bricks awaiting within, and the intricacy of the impending building experience. The black backdrop of the new “adult-focused” packaging feels classy and premium, and provides a smart backdrop for the box-front’s images of Mickey, Minnie, the display stands, and the tripod camera.


The reverse of the box shows the same image of the pair as the front (an early hint as to the lack of poseability and any real “play features” in the set), but makes room for attractive sketch graphics which show the evolution of these iconic characters over time. There are also images from the pair’s first appearance in 1928’s Steamboat Willie alongside some close-up images of the set, and a sketch showing the dimensions of the finished Mickey Mouse figure (14″ tall — 1″ taller than Minnie, despite her high heels).
The 18+ branding, indicating a building experience targeted at adults, is communicated in a strip of brick-patterned red around the bottom of the box. Aside from a colour change, this is the same as the first sets to feature LEGO’s new “adult packaging”, where we saw gold strips around the base of 10273 Haunted House, and black strips around the Star Wars helmet busts. As more adult-oriented sets receive the new livery, it will be interesting to see if retailers place these sets together on-shelf in a section of their own, or if they continue to merchandise them by “parent theme”. If they are merchandised together, the expanse of black, with the strips across the base, will have a strong impact at shelf, very different in feel to the colourful barrage on the eyes which the regular LEGO aisle can represent.
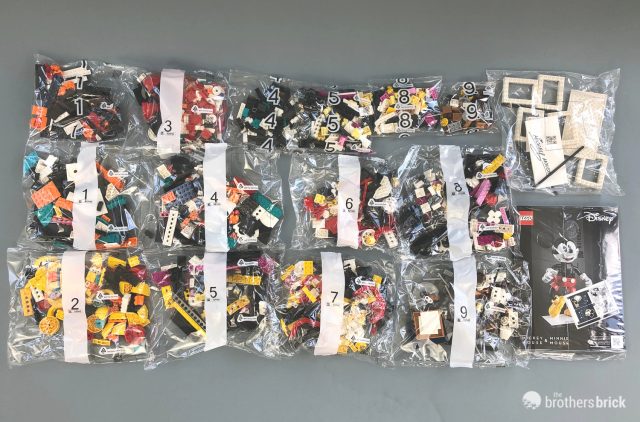
The box contains 15 bags of bricks, and another bag containing the instructions booklets and sticker sheet. The pair of instruction booklets mirror the packaging in their grown-up look and feel. However, I’m not sure they’re quite the “coffee table book” quality which LEGO claims in its product description. The first booklet, which details the 189 steps for constructing Mickey, is spread out over 112 pages, and includes a section with some brief biographical details of the world’s most famous mouse, and some comments from LEGO designer Ollie Gregory on the process of creating the set. The second booklet is 124 pages, and uses 92 for the 147 steps for putting together Minnie. The remainder of the second booklet details the instructions for the various accessories.


The set includes a single small sticker sheet, featuring four stickers. All are used to decorate the photo album accessory. Two dark blue stickers provide Mickey and Minnie faces to decorate the front cover, and two black & white stickers create the interior of Mickey & Minnie’s photographic memories. One shows Mickey serenading his love using his one-string cigarbox guitar, and the other features the pair in front of Sleeping Beauty’s Castle at Disneyland, Anaheim.

New and interesting parts
The set features several new and recoloured parts. These include new semicircular 10×5 “half dish” parts printed with the figures’ eyes, a new black 2×2 round 45° macaroni-like brick (hereafter referred to as a “Big Mac”), red barrels for Mickey’s shorts, and printed red wedge slopes and windscreens for Minnie’s dress. The characters’ bases include large printed autograph tiles, white 6×6 tiles, and a new transparent blue opalescent window piece used to simulate strips of movie film.


We get no less than 8 of the 4×4 quarter dome parts — 4 in red and 4 in black. These parts have only been seen once before, in light grey, in 2019’s 75253 Droid Commander. As well as some of the smaller 3×3 quarter domes in black, we also get 4 of them in a much rarer colour — yellow. Again, these have only been seen in this colour in one set before — 75551 Brick-Built Minions. Along with a 4×4 “Minion-eye” pipe top in red, we get one of the relatively new 3×3 domes in red, both used to make Minnie’s hat. In short, if domes are your thing, then Mickey and Minnie will prove a parts delight!

The retro-styled camera is particularly interesting from a parts point of view as it introduces a new corner piece to the curved brick selection — an element fans have been hoping for since these curved shapes first appeared back in 1992. Here’s hoping we see this useful new part in more colours soon. In another exciting development, LEGO has reintroduced the Classic Space helmet in black to create Mickey and Minnie’s noses. This helmet hasn’t been in production in this colour since 1987. However, for me, the best new parts in the set are the Big Mac 2×2 round 45° pipe, and the new 2x2x1 brick with studs on 4 sides. I look forward to playing around with these useful pieces for myself, and to see how they are used by other builders in their LEGO creations.

Beyond these parts the set offers a tonne of interesting bricks. In particular, it is packed full of brackets and bricks with studs on their sides, in a multitude of colours, and a variety of curved slopes.
The build
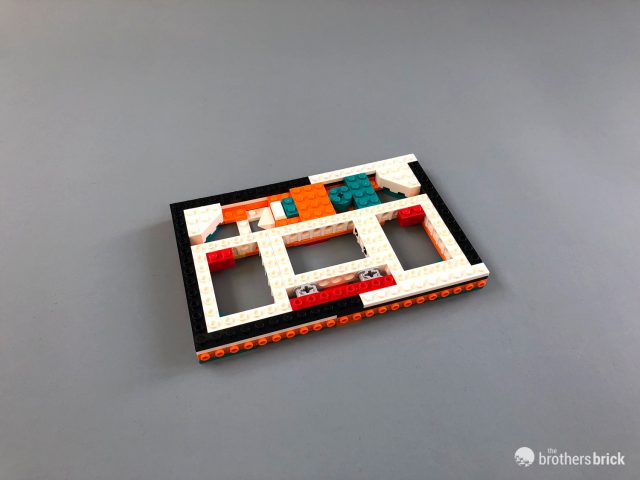
The build begins with the supporting base for the Mickey Mouse figure. It’s a sturdy construction of Technic and regular bricks, sandwiched between plates, with plenty of protruding sideways studs for attaching the decorative film-strip details. The colour selection here, and inside Mickey himself, sees a lot of white, orange, and teal. Made me wonder if someone involved in the design is a closet Miami Dolphins fan.
The off-grid angles of Mickey’s feet are accomplished with a simple turntable attachment for his left foot, and a more complex assembly for the raised right foot. I enjoyed the LEGO geometry involved in the construction of this angled support — for me, it’s one of the marks of a good set when you learn a new technique and file it away for personal use.

The instruction steps include a number of “x2” sections throughout the build. Personally, I prefer to build multiples at the same time, going through the steps only once, rather than making one section and then going back to the start over. However, I managed to regularly miss the small marker at the start of these repeating segments, only to be irritated at noticing the “x2” at the end of a section. My fault for not paying enough attention perhaps, but I do think the multiple marker at the beginning of these steps could be more prominent.
Minor instruction quibbles aside, the finished base looks good with the new opalescent blue windows making for an effective film-strip effect across front and back, and the printed signature creating a real Hollywood Walk Of Fame feel. However, I do worry about the base’s white tile cladding. These models are intended for display, and we all know what will happen to white bricks exposed to light for extended periods of time. I had a similar concern with another Disney set — 21317 Steamboat Willie. I worry that in a few years LEGO is going to face a wave of disgruntled Disney fans, angry their expensive display pieces have yellowed.


Mickey’s feet and legs come next in the build. There’s a lot of sideways building involved in Mickey’s yellow shoes, more than you might expect from a casual glance at the finished figure. This will come as a pleasant surprise for regular LEGO builders who were perhaps expecting a more traditional studs-up building process, and as an eye-opener for any adults newly returned to LEGO with this release. Similarly, the clip and bar attachments at the top of the legs are an interesting way to connect the model together, and lend Mickey his jaunty angle, something key to the appeal of the finished figure.


The innards of Mickey’s torso are a skinny cluster of bricks and brackets offering sideways studs. This whole section feels like you’re putting together a particularly complicated BrickHeadz model. As with the BrickHeadz range, this creates a peculiar mixture of anticipation and frustration. Yes, you’re putting together an interesting structure, and you’re excited to see what will attach to all those connection points, but you don’t actually feel like you’re making much progress.
In contrast, the next stage of the build, using the contents of Bag 3, is much more rewarding. You put together Mickey’s signature red shorts, bulk out his body, and add his arms and gloved hands. Cladding the frame with the collection of curves and quarter domes is a satisfying experience, banishing any lingering concerns the finished model will look malnourished. Our Mickey is one well-fed mouse, make no mistake.


Mickey’s arms and hands look great. The printed bonnet tiles and the curves and inverted slopes chosen for his gloves are spot-on. The arms are fantastic, with the new Big Mac tube parts giving them the even sinuous look familiar from nearly a century of cartoons. However, it is disappointing the shoulder and elbow connections are all axle-based, allowing no rotation. It would have been good to have more poseability in the arms, but only the wrist offers any articulation, and then only to let the hands rotate.
At this stage we’re ready to get started on Mickey’s head. Putting the head and face together is great fun — an undisputed highlight of the building process. Like in all the best LEGO sets, the growing sense of completion as the shapes come together is incredibly satisfying.

The “skull” inside the head is a solid piece of construction, a hefty piece of brickwork offering multiple sideways connection points. With this kind of cranium, I think our Mickey could do some serious damage if he were ever to headbutt someone! The cladding around the skull is a clever collection of hinged slopes and curved bricks. It’s fun clicking it all together, the best part of the build so far, reminding me of the sheer joy of construction I got following the complex instructions in the Apollo 11 LEGO set back in 2017. It’s particularly pleasing the head isn’t just a big ball — the different sizes of curves and domes used make for a more complex and interesting spheroid.

Despite the enjoyment of putting the head and face together, there is a problem which becomes apparent when you attach the final parts of Mickey’s face. We really need to talk about Mickey and Minnie’s nose issues…
Underneath each of the pair’s nose, you attach an inverted 4-wide bonnet piece. In the instructions and set photos this piece is attached so there is a “step” in the curve. Whilst I think LEGO have generally done an excellent design job on these figures, I have felt there was something just a little off in the sculpting in this area since I saw the first images of the set. The abrupt step in the curve creates a buck-tooth effect on both models. Personally I found reversing this part, simply attaching it the other way around, made for a much smoother curve. See what you think from the image below — the original design as instructed is on the left, the revised look with the bonnet piece reversed is on the right…

It makes such a difference in the curve, from such a small change in orientation, I did wonder if there had been some kind of mistake in the transition from initial design to final model and instructions. However, the orientation is consistent across both models throughout the instructions and photos, and you’ve got to think someone would have flagged if there had been an error. Maybe it’s my eye that’s off, but I know which I prefer and which version I will be displaying. For the purposes of this review, all the photos use the “proper” as-instructed orientation, but if you’d like to change your version then here’s the small change required…

Despite my issues with nose design, the finished Mickey Mouse figure looks good…

He’s a beast of a mouse, standing over a foot tall. It’s an imposing statuette, and there’s no doubting who the figure represents — it couldn’t be anyone other than Disney’s famous mascot. All the signature elements are there: the yellow shoes, red shorts, and gloves, and those ears above a wide cheeky smile.
The weight of Mickey’s head, and its single axle connection to the body, means he wobbles alarmingly when the statue is moved. But despite this, he stayed in one piece in the face of a vigorous shake test and a tilt to the almost horizontal in all directions. Maybe he’s more stable than his trembling suggests!
I was a little disappointed with the statue’s pose. Whilst the bent leg, angled torso, and tilted head add undoubted dynamism and character to the figure — it’s not a classic “Mickey pose”. The box art and instructions prominently feature a more immediately recognisable stance — hands-behind-the-back, one leg out with the foot resting on its heel. It’s an iconic pose, and it would have been nice if the figure could have copied it. That may seem like nitpicking, since the stance it does have is lively and fun, but if a significant proportion of this set’s audience will be Disney collectors and enthusiasts, perhaps a more classic Mickey pose might have held stronger appeal?

Mickey took me 3 hours to put together, although I was stopping regularly to take photos and scribble review notes. I reckon experienced builders could put Mickey together in 90 minutes to 2 hours, whilst those new or returning to LEGO building might take a little longer. Having spent this long, and after the fun of putting together Mickey’s head, the thought of going back to the more mundane steps of base construction for Minnie wasn’t that attractive. I must admit I took a short break before beginning on the other half of this famous couple.


I needn’t have worried. Minnie’s base comes together in no time — a combination of familiarity with the construction, and having learned the “x2” lessons first time around. Minnie’s base looks similar to Mickey’s, but Minnie’s leg design is not the same, and different construction methods are required for its angled support. It’s always interesting when you encounter different techniques to deliver similar ends, and once again I found myself filing this particular piece of building away for future personal use.

Minnie’s internal structure is similar to Mickey’s, almost like the construction of a BrickHeadz model, creating a block with lots of sideways studs awaiting the attachment of external details. However, her legs are quite different in design, making use of Technic pins and Mixel-joint connections rather than Mickey’s clip-and-bar approach. One thing I hadn’t realised from the official photos was how detailed Minnie’s bloomers were beneath her skirts. Probably just as well as the skirt itself doesn’t do much to preserve Minnie’s modesty.

With Bag 7, we clad Minnie’s torso and put together her arms and hands. There’s a lot of “x2” building here, and it’s very similar in steps to the same stage of Mickey’s construction. It’s not the most exciting part of the build, but it’s out of the way reasonably quickly, and then it’s on to the construction of Minnie’s head. It’s just as well that putting the heads together is the best part of the building experience in this set, as aside from two tiny details and different internal colours, the instruction steps are exactly the same for Minnie as for Mickey.
Those two variations are the use of a different mudguard piece for Minnie’s mouth, making it smaller and more rounded than Mickey’s, and adding an attachment point on the top of Minnie’s head for her little red hat.

When finished, the Minnie Mouse figure looks excellent. Her high-heeled shoes, flouncy polka-dotted skirt, and that hat, perfectly capture her famous look. She makes an excellent partner for Mickey, with the two figures forming a fabulous couple when displayed side-by-side.

The last bag of parts contain the pieces for the accessories — the final elements in the set. The posy of flowers is simple but effective, using tentacle tips to create the curving flower stalks. The small photo album is also a simple model, but with the addition of the stickers, it’s a sweet little element in the set.


Mickey’s cigar box guitar is blocky to the point of ugliness. But this perfectly reflects its original incarnation in the cartoons, so it’s difficult to hold that against it. It’s more interesting than you might expect to put together, using a variety of tiles and brackets to deliver its studless look.


The absolute highlight in these final construction steps is the camera — gloriously retro, in a super-cute chibi-style design. It’s built using a clever selection of sideways building techniques and interesting parts. It’s great fun to build and looks absolutely magic, perfectly capturing a nostalgic Hollywood feel that fits well with a celebration of two of animation’s greatest stars. The tripod is excellent too, making smart use of LEGO geometry to create a perfect spindly look.


Whilst the accessories might have felt like a downbeat finish to the set after the “main event” of constructing the two figures, the camera’s cute and clever design makes for a fun and interesting finale.
The completed model
The finished set comes together for an impressive display. Mickey and Minnie look good, their scale and sculpting immediately catching the eye, whilst the accessories add some fun little details beyond the central characters. It’s a satisfying experience seeing the finished models displayed together — it creates a solid sense of accomplishment after a lengthy building process.

Conclusion and recommendation
So what’s the verdict? As usual with this kind of “display piece” model, it really all depends on your attitude to the source material. If you’re a LEGO fan rather than a Disney fan, you’ll find things to enjoy here, with a selection of interesting new pieces used in interesting ways. But if you’re neither a Disney nor Mickey Mouse fan then there’s little reason to buy this set over picking up the new parts via Bricklink.
For Disney geeks or Mouseketeers, this is a good-looking set, with a lengthy and enjoyable building experience. And if you’re already into the world of Disney collectibles, the price point looks remarkably reasonable for two 14″ statuettes of these iconic characters. Similar sized options in other materials would make a significantly bigger dent in your wallet than this set!
Whilst I enjoyed putting this together, I didn’t think the end-result was perfect. I’d have preferred a more classic stance for Mickey and more poseability in the character’s arms. And feeling the need to change an element of the sculpting to better capture the subjects’ famous faces was a bit of a let-down. However, the rest of the design faithfully recreates two iconic characters, and does so through a lengthy building experience which is packed with clever techniques and smart parts use.
In short, if you are a fan of these characters and want to create an impressive tribute to them, then I’d heartily recommend this set.
43179 Mickey & Minnie Mouse Buildable Characters contains 1,739 pieces and features the iconic couple as large-scale figures, clad in their signature outfits, and with a range of accessories. It will be available from July 1st, retailing for US $179.99 – CAN $229.99 – UK £169.99.
The LEGO Group sent The Brothers Brick an early copy of this set for review. Providing TBB with products for review guarantees neither coverage nor positive reviews.
Check out the full gallery of images below:


