Continuing our series on LEGO organization and storage, guest contributor Kevin Moses shows us that maintaining a collection in a small space doesn’t have to be overwhelming. Read the previous articles here:
- How to organise and sort your LEGO collection, by the Mad Physicist
- It takes all sorts of sorts: LEGO organization and me, Chris Doyle
Those of us who live in smaller urban spaces have limitations and considerations that are more pronounced than people with larger houses. While any space can be optimized and organized, we must do this more out of necessity than desire. Since many of us are stuck at home, it’s a great time to think about how you can make things better.

I’ve given a few presentations on this topic at conventions and started the Urban Brick Builder website to collect ideas that come up.
Choose area(s) to use
First and foremost, pick dedicated areas to use for your storage. Ideally the areas you choose should be used for nothing but LEGO. Stacking things wherever they fit at the moment, saying you’ll “get to it later” makes disorganization very easy to take (or keep) hold. For urban spaces the two most likely storage locations will be closets and kitchen cabinets.
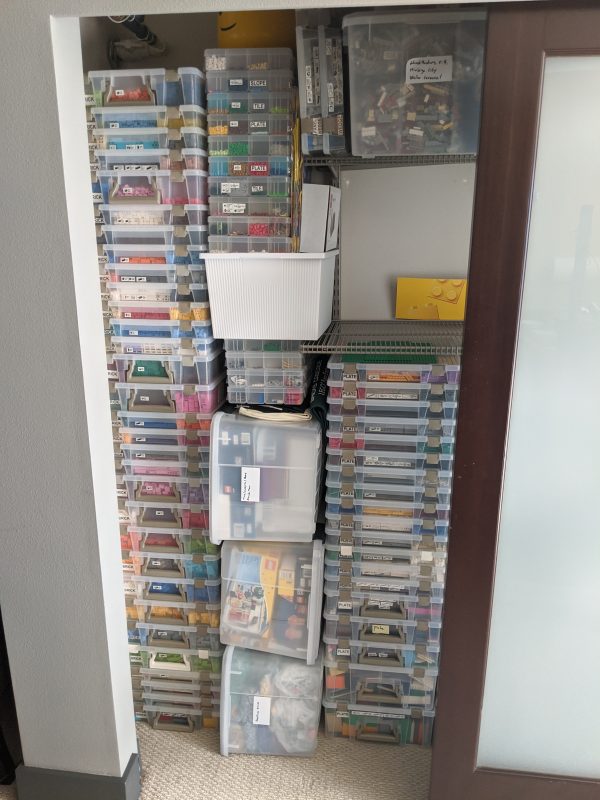
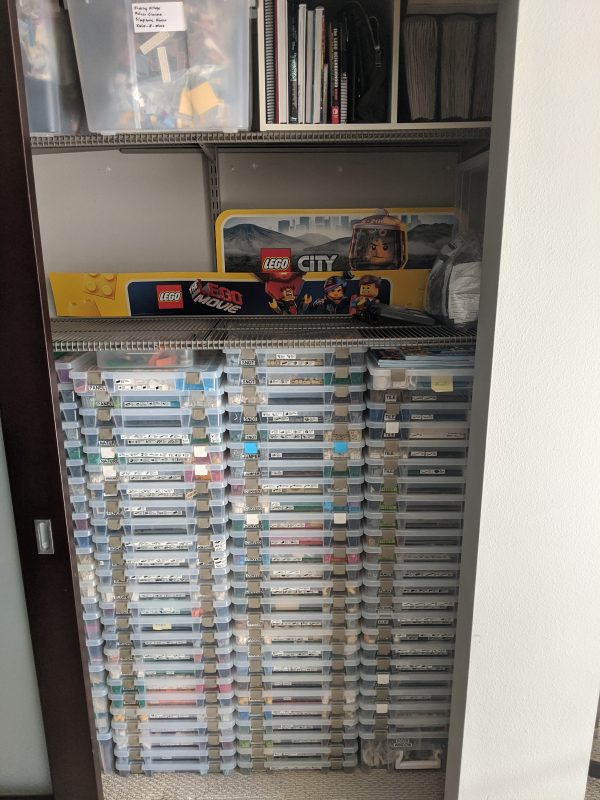
I am a fan of minimalist design and dislike visible clutter so my storage is always behind a door that can close. My closet has a simple setup of two wire rack shelves that go about 3/4 the way across the space. Under that and to one side I keep my storage containers stacked which represents the majority of my loose brick. These rack systems are inexpensive, available at most home improvement stores, and easy to install.
Folding tables and chairs are placed in front of the containers and fit perfectly while still allowing the doors to slide closed.


It’s all a tight fit and sometimes feels a bit like playing Tetris. Try a bunch of different configurations until you find the one that works best for your space.
One thing I strongly suggest is to leave an area of empty space in your largest storage area. You will always need temporary space for new sets that come in, bricks to sort, or builds in progress. Having a place to put these transitory items will make sure you feel more organized. You can see the space I use in the middle of the picture below.
I also use a large and deep cabinet over the refrigerator for 1 and 2.5 gallon zip lock bags containing broken down sets. Plastic weave bins from the Container Store hold the bags nicely and are easily stackable.

De-clutter
Once you settle on an area to use, it will likely require de-cluttering. This purging process can be slow and hard to do if things start to get emotional. Take this one step at a time and repeat the process in waves. You’ll find that after going a few rounds, it will be easier to part with something that at first appeared to be necessary. I use the “1 year rule”. If an item is something I’ve not used in the last year, out it goes to the trash or donated where appropriate.
Containers
If at all possible, try to pick a specific brand that you like and stick with it. This will allow you to make the most efficient use of your storage space since there won’t be gaps caused by odd container sizes sitting next to each other. After a few rounds of trial and error I settled on the ArtBin Super Satchel series which comes in several heights. I like them because of their flexible dividers and low profile which allows taller stacks with nice stability.


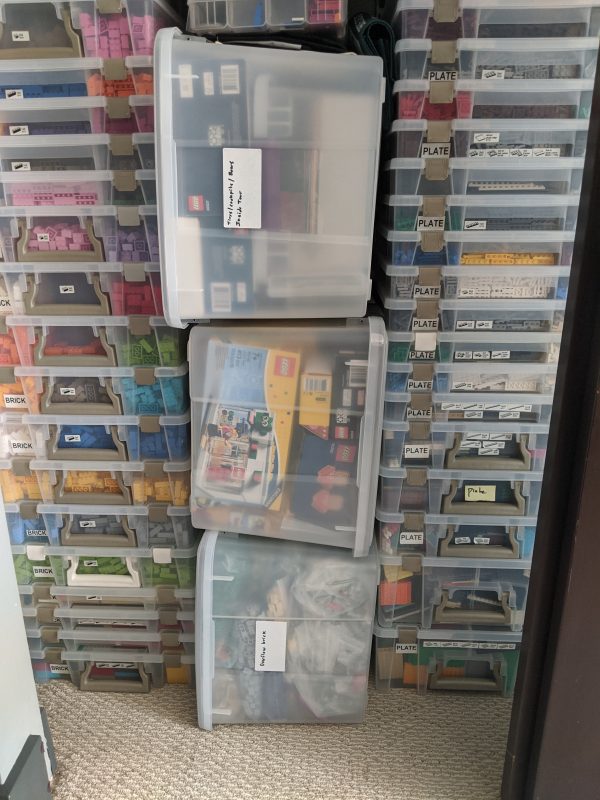
Experiment with different placement of the containers to find an optimal configuration. In my case I found that a narrow space was left after placing the maximum of container rows in the closet. It turned out that this space perfectly fit an IRIS gasket latch tote bin set on its side. These are containers with room for more bulky storage and work great stacked this way.
Price and quality for different containers varies wildly and buying enough can definitely set you back a fair amount of coin. My go-to locations for containers are Joann Fabrics, Amazon and Target. Joann is the best since they have frequent and deep discounts, sometimes 50% or more.
By trying out different containers and storage layouts you’ll find the one that works best for you. Just don’t forget to save your receipts to return what doesn’t work out.
Labeling
Proper labeling is critical to organized storage, but it’s not difficult. I only use two kinds of labeling.
For larger containers like the IRIS gasket totes I use a simple adhesive shipping label and a sharpie.
For part storage I use Tom Alphin’s label system from Brick Architect and an inexpensive P-Touch printer. Each container has a label for the parts inside on two adjacent sides. There’s also a large label of the part family (slope, round, etc.) on the left side which makes grouping them at a glance very easy.

Frequency
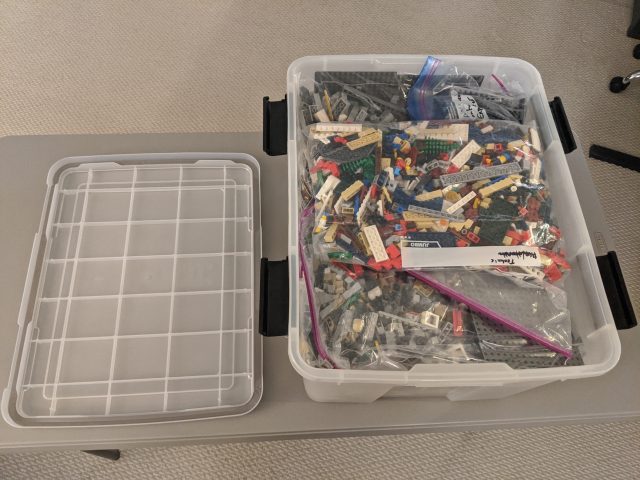
Try to keep regular sorting and part storage habits to prevent a buildup of brick. Pick a dedicated container to hold your loose, unsorted parts. When full you know it’s time for some sorting and filing. I use two large minifigure head containers and religiously work through them when they fill up.
Coarse sorts are easy to do while watching TV, listening to music or chatting with friends. At the end, all of my slopes, bricks, rounds, etc. are in large bags ready for the next step.

Filing those coarse sorted bricks in their specific element and color locations is obviously more labor intensive and all the more reason not to let too much of it build up. I find that dedicating part of a single weekend makes it feel manageable enough to not be overwhelming. Like everything else, find your Zen and what works for you. Just stick with it.
Building
Pick a fixed location to do your builds with as much light as possible. Since I do not have room for a dedicated build area, folding tables are used for the task. I keep both a smaller and larger table in order to adapt to the build at hand. It also allows me to bring both out if I’m hosting a build party with friends. Buy the sturdiest table you can afford to minimize wobbling and make sure it has cross bracing on the legs.

If you need additional light there are several inexpensive LED task light options at Amazon and IKEA.
To cut down on clutter and maximize surface area, I download a PDF of the building instructions from the LEGO website and use a tablet to view it.
Displaying
Some AFOLs (Adult Fans of LEGO) like a “more is more” approach to displaying builds, where as much surface area as possible is covered. Maybe it comes from watching too much HGTV but my minimalist view is the opposite. I’ve made the decision to only display a few builds at a time, rotating them out periodically with new ones. As a huge fan of the modular building series it’s fun to rebuild them every once in a while when it comes time to show something new.
The IKEA 12×12 floating shelf is very inexpensive and perfectly fits a standard baseplate which makes it ideal for displaying modular buildings. A small grouping of these shelves is stylish, lends itself to smaller walls and does not look too cluttered.

Their longer floating shelves work for displaying a mix of different build types as well as non-LEGO items to express your style. As we all know, builds can be heavy so be sure to properly anchor these shelves in the wall according to the installation instructions.

One stylish non-mounted option is a console table. These are narrow and can fit in tight spots with just enough depth to hold a 32×32 baseplate comfortably.
Accumulation Strategy
This is a term I came up with to describe how I need to go about deciding what bricks, sets and paraphernalia to bring into my house. When you are in a small space, buying every set you want is simply not an option after a certain point.
After my “dark age” ended 4 years ago, I purchased any set I could get my hands on to part-out and build my inventory. At a certain point I consciously realized that this was not sustainable. As a result I now look at every set or volume of bricks with a critical eye. Do I have room for it? Will it require an additional storage container? Where will it go?
All serious collectors know the “I must have it….” feeling that comes with holding a LEGO box, especially if it’s on sale or clearance. But now I stop and think about its effect on my space every time I am considering a purchase. Unless it’s a set I really want or bricks I’m using for an upcoming build, I don’t buy it. Bricklink is always there for your “might need” bricks down the road.
This is admittedly a hard conversation to have with yourself and harder still to follow through. Thinking about it purposefully and often will help keep you on track. Plus, the rewards are plentiful when it comes to your sanity and finding the space and items you need when you want to build.

So there you have it! Even in smaller spaces it’s possible to keep everything neat and organized. By taking a little time to experiment and examine your space with a critical eye, you can balance your LEGO hobby and urban living.
If you liked this feature on sorting LEGO, remember to check out the following in this series:
- How to organise and sort your LEGO collection, by the Mad Physicist
- It takes all sorts of sorts: LEGO organization and me, Chris Doyle
Really great article. Everytime we move house I seem to acquire more (and subsequently less) storage space for Lego- decluttering and accumulation strategy really resonated with me as too often I hold onto things because nostalgia or buy because cheap.
Organising and collecting all require a lot more discipline than what you would initially think!
Excellent article. I am arriving at a point where I find the required space for the hobby no longer feels balanced. So I am thinking about selling some stuff, being more critical about wheter I am ever going to finish that moc and comic to terms with the fact I am never going to have a large permanent city layout. It’s tough. But feels good at the same time.
Love these articles and the different thoughts each contributor is bringing to the conversation. I haven’t really seen anyone’s approach to the original packaging. What do other AFOL’s do with packaging in terms of storage? Do you keep all, some, none, and if so, how do you store the packaging/boxes?
Thanks
Thanks @RichardAM. The whole accumulation strategy thing has struck a chord with a lot of people at the talks I’ve given. I’m glad it did with you as well.
@Tomasso Tomasso it does feel great doesn’t it? Well, once you get past the resistance phase anyway.
This was a great article. I’m really enjoying this series because I have gotten to the point where my Lego hobby is starting to take up a ton of space and I’m trying to figure out how to manage it
Hmm, this shoe fitted more than I would have liked to admit. I guess I should consider some culling of some bulk and odd themes where I have less interest…
Thanks for the article. Very interesting insights and always fascinating to see other people’s strategies. Unless I’ve misunderstood your system, I must say I’m surprised by the stacked storage, rather than drawers. What do you do if you need one single slope from the lowest in the stack? All that Lego is going to weigh a lot above, and to have to unstack and restack everything, every time for a piece seems rather arduous to me. Or, to have to have all the boxes out during building so that everything is easily to hand sounds like chaos! Perhaps I don’t have enough imagination to get how you would do it? Everyone has their own system that works for them, so I’m curious as to how this works during a build.
I too am enjoying reading these, especially since both contributors who followed my article seem to think that labels are essential, when I have none! Although, I suppose that when your parts are stored in a giant stack of boxes, they probably are. It makes me appreciate my drawers.
@Scott H
I don’t know about the other contributors, but I care little about the boxes. I do like the large Creator cars and I’ve got a Saturn V and a lunar lander, but the boxes go into the recycling. In fact, I’ve gotten into the habit of buying LEGO on (work) trips to the US (back when that was still possible) and then I don’t even take the boxes home. I bought the lunar lander last year, during a stopover at Tyson’s Corner Mall on my way to Dulles airport. I subsequently poured the contents of the box into my suitcase, right in front of the LEGO store. The looks on people’s faces were priceless :-)
@Scott H
That’s a good question. I mostly only keep the boxes for my modular buildings. They’re stored in my second closet in a narrow space between my clothing drawers and the wall. I’ve also seen them placed under a bed. I guess any out of the way place you can tuck them away would work.
@Guido
You’re correct about the stacks and the down side of having what I want at the bottom. I’ve decided to live with this since adding more shelves would reduce the number of containers I can squeeze in the closet.
@Mad physicist
For me the labeling is really critical since things are packed so tight and I can’t see what’s in the ArtBin containers from the front.
Kevin, these are great ideas. While I’m not as constrained space-wise in my home, I do try to be considerate of my spouse and children so that the LEGO don’t take over the whole house.
Those artbin stackables intrigue me. I am having trouble finding ones with the smallest divisions, as you show pictured w/ your 1×2 plates, cheese slopes, etc. Do you remember the specific names of those?