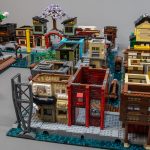
Summer is here, and that means there are only about three months left until BrickCon 2018. As we announced in May, The Brothers Brick will be hosting a public collaborative display of Ninjago City open to any full convention attendees. Check out that announcement for detailed instructions on the guidelines and how to participate. In the meantime, we here at TBB have been busy little builders, and have over a dozen city blocks underway, not to mention a massive volcano lair for Garmadon. Today we want to share some tips and tricks to help get you started, as well as some of the building techniques that we have used so far in the construction of the lower levels of Ninjago City. Let us know in the comments below if you would be interested in more detailed guides or additional techniques shown in our city blocks.

Ninjago City is a layered city, with the oldest buildings on the bottom stories, rising to modern, nearly sci-fi architecture at the top. As such, we’re approaching the building of our modules from the bottom up, starting with the oldest, lowest level. Nearly all of the buildings shown here will have additional structures placed on top to complete the upper levels–in many cases several more stories. Look for additional articles as we continue building the upper levels. Each of these modules conforms to our standard to ensure the whole layout will fit together well (except in the few special modules we’ve noted).
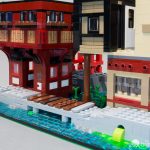
Shipping Dock
I wanted to build a nice cap for the edge of the city that would link up to the official Ninjago City Docks set. This double-sized block includes a lighthouse inspired by traditional stone lighthouses found in some Japanese ports.

One of the visual themes that sets the lower level apart from the upper level is the worn-down and sometimes broken sidewalk, which can be easily achieved using wedge plates and a mixture of studs and tiles.

Ninjago City Dock
Another important design detail from the official sets is that every level and area has some kind of clear access, either stairs, or in many cases, ladders.

On the left side, a simple curved staircase connects the water level to the second floor, while on the right, a straight stair with a landing continues to the upper level sidewalk.
The official sets also include a Technic pin brick at the 10th stud in from each side to help the modules connect. We know from experience that, in practice, connecting dozens of modules with pins is often more troublesome than it is helpful, but we’ve continued that detail here just in case they’re needed.

One more prominent visual element in both of the official sets is vegetation in the water, both along the edge of the sidewalk, and floating in open water.


Inside corner
One of the three city block templates is the inside corner. These will allow the final city layout the flexibility of extending some areas of the city forward and help create a dynamic display. The downside to this particular template is limited visibility from the front, as 2 of the front sides will face up against other straight blocks.

In order to ensure that the city looks good from any angle, all four sides of your block should look finished, and some sides will have more visibility depending on where they end up in the final display. This is a great opportunity to include fun surprises and other details.

Another key visual element for Ninjago City are the air-conditioning units found on most of the shops, restaurants and other buildings in the official sets (seen here in the upper left on the brown building). Including these will help to tie all of the blocks together.

Straight Template
These will make up many of the blocks, but they don’t have to look the same. Consider breaking up a straight block with changes in elevation of the sidewalk, including bridges over open canals. In this block, I added a canal but made the bridge only for pedestrians. The upper level is supported by the lower level, so you might want to include structural support in the form of a pillar or two. especially if your lower level buildings are a bit on the worn side.

The official Ninjago City set uses a bridge that is tall enough for a small boat to pass underneath.

For this straight block, I wanted to try something a bit different on the back side, so I included an elevated walkway connecting the second-floor shops in back.

For this straight block, I added a staircase along the back of the buildings.

For an added challenge, consider building visual signs to spice up your shops, like this Koi fish adorning the Koi fish shop/Japanese Garden.

Speaking of Koi, I also built a Koi pond in the back.

Here is another example of a straight block, with a waterway in the middle. In this one, however, the sidewalk goes across the entire block, with the waterway acting as access to the boat repair shop.


Outside corner templates
The last template for city blocks is the outside corner, which is inspired by the official Ninjago City set. The outside corner block will be fairly prominent, as it will have 2 sides fully visible. But just like the official set and any other module, it should be built with completed details on all four sides, even though the two back sides will face against other blocks. Even the “hidden” sides will be visible to other fan attendees, as well as eagle-eyed members of the public.

Consider providing more substantial support, as more of the upper-level sidewalk will likely overhang your lower level buildings.

An alternative to a bulky pillar to support the upper level might be to overhang the second floor of your lower level with smaller supports.

You might also consider breaking up the lower level with stairs and bridges to create more open spaces that your upper level can look down on.

Harmony with nature
One more straight block I am working on includes a shrine in the back. Have fun with the footprint of your block by adding rockwork, gaps in the foundation to allow water and vegetation to create spaces of harmony between man and nature.

Our own News Editor Dave has built a very tranquil focal point in our city with a tree growing in the middle of a bridge.

Besides being a great example of harmony with nature, it also serves as a model example of building flush to the edge of your block, as even the rooftop does not extend beyond the 32×32 baseplate.

Our editor-in-chief Andrew has built another tranquil space in the form of a traditional shrine.

One more example of a water baseplate, including an island.

We are super excited to see how Ninjago City is starting to take shape, and we are looking forward to seeing what all the participants come up with. We hope these will serve as inspiration for you in building your own modules, and we hope you’ll join us at BrickCon in October to assemble this amazing city!


Fantastic! That tree on the bridge segment is phenomenal.
I am really looking forward to participating and seeing this in person.
I Really wish I had the time to contribute. Because this is a very intriguing collaboration!