Last month we announced that LEGO is re-releasing the iconic 10189 Taj Mahal set as Creator Expert 10256 Taj Mahal. There was a mixture of surprise, pleasure and dismay at this announcement, depending on your ownership of the original 10189 and whether the re-release could affect your “investment” or your ability to finally afford this iconic set. Taj Mahal is the second-largest LEGO set of all time with 5,923 pieces, and is available beginning today in LEGO stores and from the LEGO Shop Online for $369.99 USD / £299.99. It is rated as 16+, reflecting the size and nature of the set as a display piece rather than any technical challenges when building.


In contrast to some recent re-releases like UCS Millennium Falcon 75192 or UCS Death Star 75159, this is not a re-modeled set but a pure re-release of the same set under a different set number. Let’s take a quick look at the two sets for comparison, as there are a couple of differences worth highlighting.

There are two differences between the inventories when comparing Taj Mahal sets. The first is that an orange brick separator has been sneaked into Bag 1. The other change is to Crossaxle 3M With Knob (Part 6587), which was Dark Bluish grey in 10189 and has been changed to Dark Tan in 10256. This reflects a LEGO-wide change as Dark bluish grey was supplied in sets made between 1995 – 2010, while it appears in Dark Tan only from 2010 onward.
While the inclusion of a brick separator may excite a few, the biggest change is the numbering of bags and the alteration to the instructions. According to the designer video, which features Jamie Berard (Design Lead for the Creator Expert theme), this change was done to enhance the building experience. We’ll also note that this brings the set in line with nearly all of the other sets that LEGO currently offers. The numbered bags and restructured instructions contained within a single booklet are positive improvements.

In the Box
In the box there are bags numbered from 1-14, half of which are contained within two white inner boxes. The instructions are also within one of the inner boxes, which was effective in ensuring they arrived in pristine condition.

The thought of emptying out and hunting through nearly 6,000 pieces to build the previous Taj Mahal made me appreciate the updated system of numbered bags used in the new version, especially since the vast majority of the pieces are white.

The Build Process – Base
The first part of the build uses the six 16×32 blue baseplates to create a quadrangle-shaped base. 208 white 2×2 turntable bases are used to create an attractive tiled floor effect, with headlight bricks and arches repetitively used to add architectural details. Unfortunately, my set contained only 207 turntable bases, but I scavenged one from my own collection for the final build photographs.


The four minarets are built next. Each one is identical, and the larger cylindrical sections have a central axle for strength. This part of the build process is mainly stacking parts and is very simple.

Each minaret sits upon a small tile place-setting offset by a half-stud all around, which makes them easy to place and remove.

The Build Process – Centre
The main central part of the build comes next, with four corner sections and four central archways. The central arches are very nicely detailed with Medium Blue and Dark Red used to augment the architectural details, employing some lovely SNOT techniques.

Each window is made up of 1×1 plates rather than bricks, which gives a much more attractive final appearance—although stacking 1×1 plates for every section does start to get a little painful on the fingertips.


The eight sections then connect together with Technic pins to create the central part of the Taj Mahal. The kiosk domes and the main dome will rest on top of this section.

The roof is well supported using Technic bricks to secure the brown plates. The four kiosk domes are sculpted using plates, rather than the more ‘modern’ approach with curved slopes. They are then placed onto the roof leaving the central area free for the main dome.
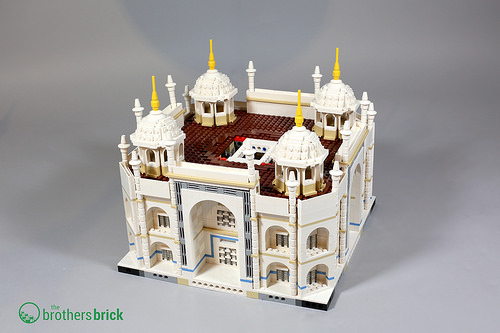

The central part of the Taj Mahal can then be placed into the base.

The Main Dome
The final part of the build, the construction of the main central onion dome, was definitely my favourite aspect of the build experience. The base of the dome is formed using hinged panels around the outside to give the circular appearance.
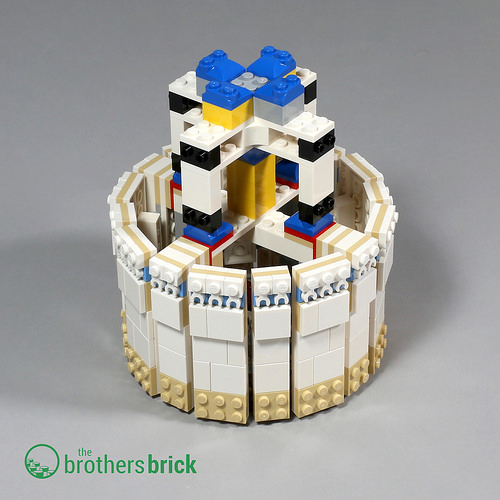
The dome is then sculpted with plated sections. It’s a simple technique that works well to create the famous complex curves of the onion dome.


The final dome appearance is very different from the smooth curved slope look of more modern sets, but I actually found it very fitting. I wonder if this is because it has become an iconic LEGO set and now seems proud to show off its studs. In a way, the sculpted style seemed a bit retro since so many larger builds within the Creator Expert theme are smoothly curved and tiled, rather than ‘studs on display’ (e.g. compare the previous VW Beetle set 10187 to the more recent VW Beetle set 10252).

Once the main dome is placed, the set is complete and you can step back to admire the second biggest LEGO set ever. This is definitely a look-but-don’t-touch set, given that there are absolutely no play features. Like the Architecture sets, I would consider the Taj Mahal to be a decorative piece of LEGO sculpture rather than a play set, although I imagine many people would struggle to find shelf space for the complete set, which measures over 20″ (51cm) wide and over 16″ (41cm) tall!


Final Thoughts
This is a large set but is actually very well designed for breaking down into built sections for storage or travel. I was impressed at just how sturdy it was, letting you easily lift the set and move it around without the sections falling apart.
It’s very, very white. As someone who LOVES colours, I was beginning to get a little White colour blindness (perhaps snow blindness is more accurate) and was very pleased to see the occasional Dark Red or Medium Blue part. The newly supplied brick separator was one of the most attractive parts, in its lovely shade of orange! The early Architecture sets are reminiscent of this set on a smaller scale (mainly white with the odd drop of colour). In the end, I can’t really complain, as the set is accurate to the real-life building.
Re-releasing iconic sets is a good thing, as many more fans who could not afford the hugely inflated after-market prices for the original will now be able to buy the re-release at a much more reasonable price. We at TBB heartily encourage LEGO to continue this with more classic sets in the future.
This set makes an excellent build for more mature LEGO fans, who perhaps enjoy relaxing and taking time with the process rather than building to finish as soon as possible. You’ll end up with a beautiful building and a bit of LEGO nostalgia.
10256 Taj Mahal is now available from the LEGO Shop Online for $369.99 USD.
The LEGO Group sent The Brothers Brick an early copy of 10256 Taj Mahal for review. Providing TBB with products for review guarantees neither coverage nor positive reviews.
Amazing! I was in Taj Mahal since 2016
One other difference that I haven’t seen in any reviews is a part variance for the large 6×6 white inverted dish (44375) and there are 17 of these in the set. The original set had parts with four hollow studs on top – this no doubt uses the newer mold which has solid studs.
Numbered bags will change everything. The most difficult part of assembling 10189 was finding a big enough space to spread out all the bowls with all the pieces.You literally had to walk around to find a piece. It’s very repetitive, so you get to know where the pieces are very quickly, but there’s still an awful lot of them. This will be a much more enjoyable build with only 1/6th of the pieces on the table at any time.
Your white comment is in line with something I was thinking of doing. Altering this. I took a look at some photos and you can clearly see a lot of discoloration in the dome and other parts over the years. The whole structure is a massive tribute and garden too so I was wondering if it might be possible to put in some greenery but it looks like Lego focused on the building itself. I would need to add large plates around the perimeter.
What jumper plates were used? Old ones without ridge or the new ones?
Also great some parts in ‘old colors’ are back in business like Technic beams 4×4 in black, 6×8 in white and L-beam in yellow.
Jumper plates were all the ones with groove (i.e. newer ones)
Funny, because then they used old photos e.g. the steps…
interestingly in the instructions some of the parts have solid studs in the “parts needed” box for a particular step but then the hollow studs in the actual placement photograph.
Great the set is back. This should slow down some of the speculation on retired sets.
One thing I just don’t understand is why the number of steps should be increased so much. This happens in all sets. The original 853 Technic car chassis instructions fitted on one big leaflet, and still it was no problem to build it. I think people are just as smart now as they were back then.